As Halloween approaches, the creative spark can sometimes be elusive. But with just a few weeks until the big night, it’s time to start brainstorming ideas for decorating both inside and outside your home. Procrastination won’t cut it – you don’t want to be caught without a plan on October 31st! Instead, take some time now to think about how you can fill your space with festive decorations that will leave trick-or-treaters in awe.
From spooky centerpieces to creepy outdoor displays, the possibilities are endless. So grab a cup of coffee, put on your thinking cap, and get ready to conjure up some Halloween magic.
Pumpkins Gone Smashing Mad
What Makes Halloween?
Halloween decorations don’t have to be complicated or expensive to create a spooky atmosphere. Instead, focus on the holiday’s core elements: the transition from summer to autumn, the thrill of a single night’s mischief, and the joy of trick-or-treating with friends and family. The excitement of seeing costumed kids out and about, either partying or going door-to-door in search of candy, is a big part of Halloween’s charm.
And let’s not forget the iconic pumpkin decorations that have become synonymous with the holiday. By embracing these fundamental aspects of Halloween, you can create a festive atmosphere without breaking the bank.
Transitioning
As the warmth of summer gives way to the cozy atmosphere of fall, Halloween becomes a time of transition. The festive decorations that fill our homes and yards during this spooky season are an integral part of what makes it so special.
From intricately carved pumpkins to skeletons, ghosts, goblins, witches, vampires, black cats, spiders, spider webs, bats, cemetery headstones, and creepy crawlies, the array of decorative elements brings Halloween to life, creating a sense of excitement and anticipation for the festivities that lie ahead.
Pumpkin Carvings
As Halloween approaches, families can get creative with logical and natural decorations that evoke a sense of autumnal charm. Pumpkin carvings and other gourd-based decorations are a staple of the season, offering a fun and wholesome way to bond over a DIY project. There’s something special about bringing a pumpkin carving idea to life and seeing it come together before Halloween night.
Many people have their own favorite designs from past years, and they can easily draw inspiration from these to create new and exciting patterns. The process of designing and executing a unique pumpkin carving is an enjoyable experience that anyone in the family can participate in.
Ideas for the Taking and Making
When it comes to pumpkin decorations, the possibilities are endless. From carved and painted designs to more creative approaches like stamping, dipping, decoupaging, crackling, sequining, glittering, beading, corded work, stenciling, lettering, fabric wrapping, stacking, or even creating a topiary effect by planting them, the options for transforming pumpkins into unique masterpieces are virtually limitless.
Inspiration
As you browse through these pumpkin decorations, let the creative juices flow and envision how you can infuse your own unique touch to your autumnal arrangements. Halloween, with its eerie allure, is a season where pumpkins truly come into their own, serving as a canvas for imaginative and often whimsical decorative designs.
To get ahead of the game, draw inspiration from these pumpkin decoration ideas and let them guide you in crafting truly one-of-a-kind masterpieces that will make your neighbors green with envy.
Black Magic Minis
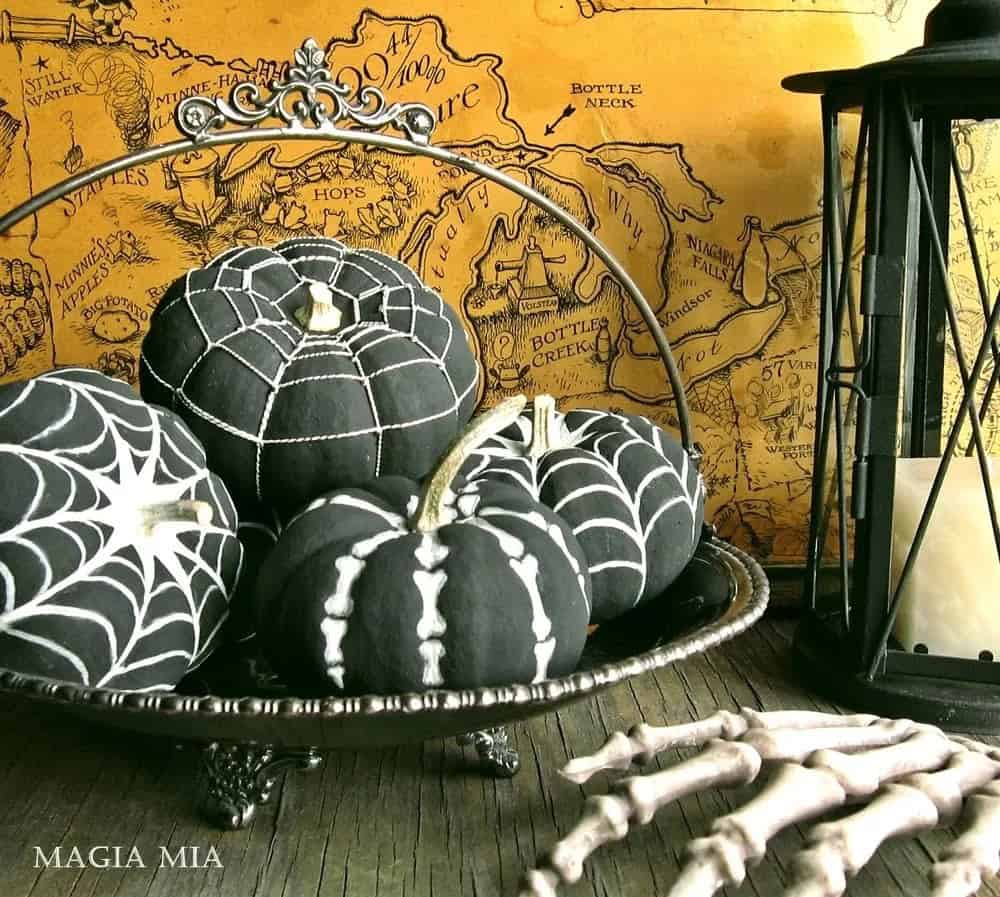
When working with miniature pumpkins, their small size becomes an advantage. A few coats of black paint on a white pumpkin can accentuate its features, especially when paired with glow-in-the-dark highlights to create a spider-web-inspired etching or skeletal details. For added visual interest, silver elastic cording can be used to mimic the metallic sheen of a spider’s web.
This is achieved by wrapping the cord around strategically placed pins and then winding and stretching it to complete the design. The result is a unique and captivating mini pumpkin decoration.
Punch a Hole Pumpkin
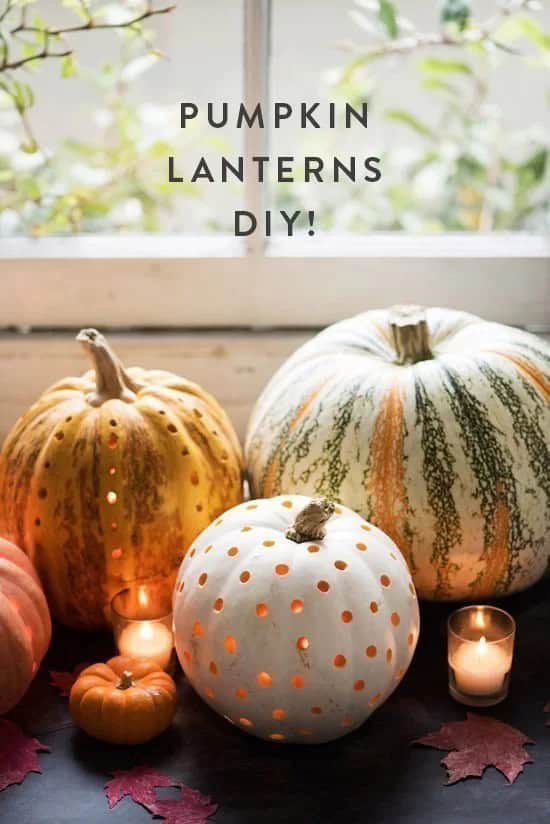
Transforming a classic Halloween pumpkin into a charming lantern is a simple yet effective way to add warmth and ambiance to your indoor or outdoor entryway. This DIY project creates a cozy atmosphere that’s sure to delight trick-or-treaters, party guests, or anyone who steps foot into your home during the spooky season. By hollowing out the pumpkin and drilling holes for light passage, you can create a lantern-like effect that rivals its ceramic counterparts.
To complete this easy DIY, start by cutting off the bottom of the pumpkin, carefully removing any pulp and seeds from the inside. Next, drill holes to allow light to filter through, creating a warm glow when paired with a candle or battery-operated light source placed beneath. This unique pumpkin lantern makes for a thoughtful decoration that’s sure to impress anyone who visits your home during Halloween.
Bat Crazy Cat
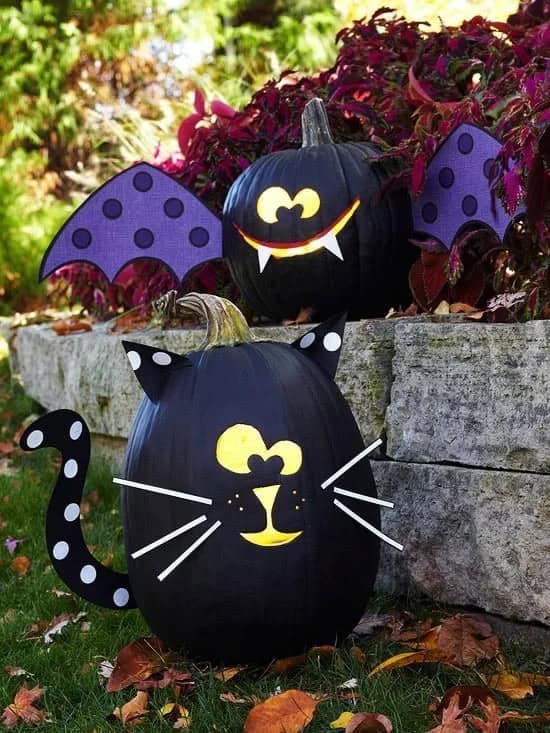
Add some spooky fun to your Halloween celebration with these adorable bat and cat decorative pumpkins! A simple yet creative project that’s perfect for kids (and adults alike) who love crafting. All you need is a couple of pumpkins, some flat black paint, and cardstock or heavy craft paper in dark, wild, or traditional Halloween colors to create the animal features and accents. You can either create your own patterns or download free templates from a Halloween crafting site for kids.
Once done, these pumpkins will make a great centerpiece for your spooky soiree, allowing kids to unleash their creativity and imagination with this goofy pair.
Salt Laden Pumpkin
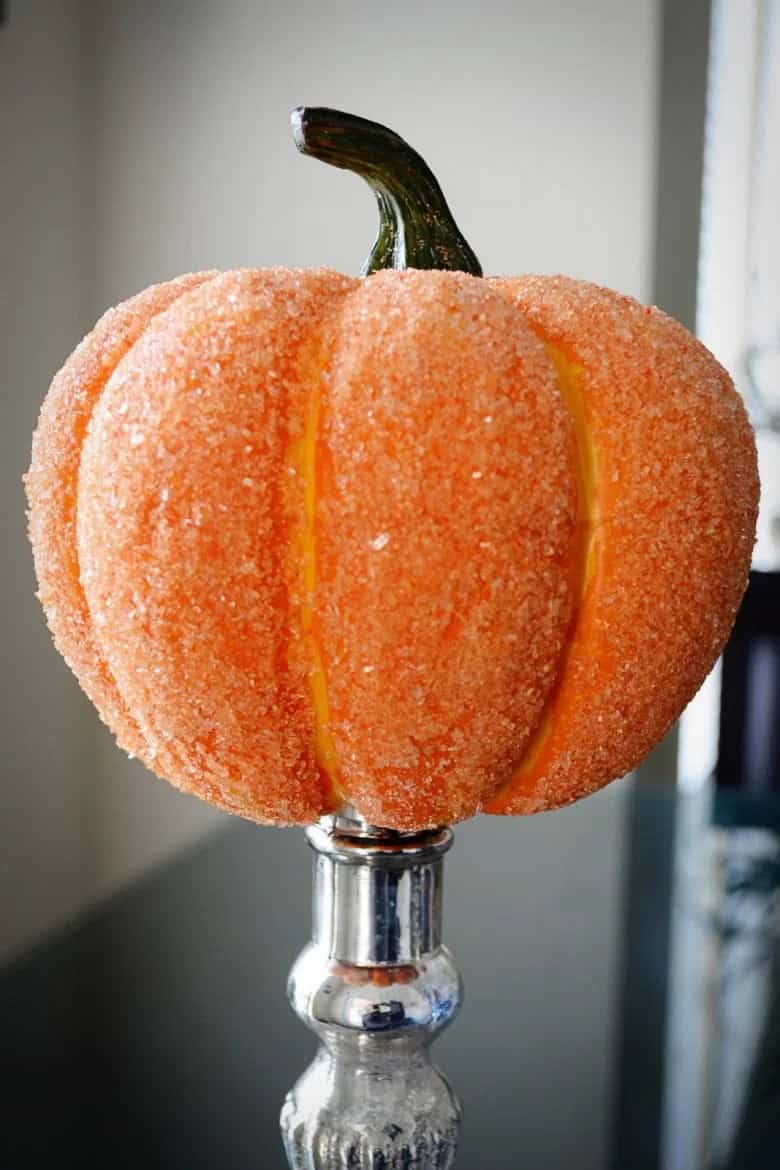
Imagine adorning your home with an exquisite Russian-inspired pumpkin ornament, crafted using a simple combination of a seasonal gourd, glue, and sea salt or Epsom salts. A smaller pumpkin can be beautifully displayed on a silver candlestick, while a larger one can be placed on a decorative cake stand, tray, table, or shelf. To create this enchanting piece, start by applying white glue to the pumpkin in sections, allowing each layer to dry before adding more salt crystals.
As the glue dries, the salt will adhere and create a beautiful frost-like effect. This unique ornament is sure to elevate your Halloween decor and add an extra touch of elegance to your fall festivities.
Crayon Melt and Drip
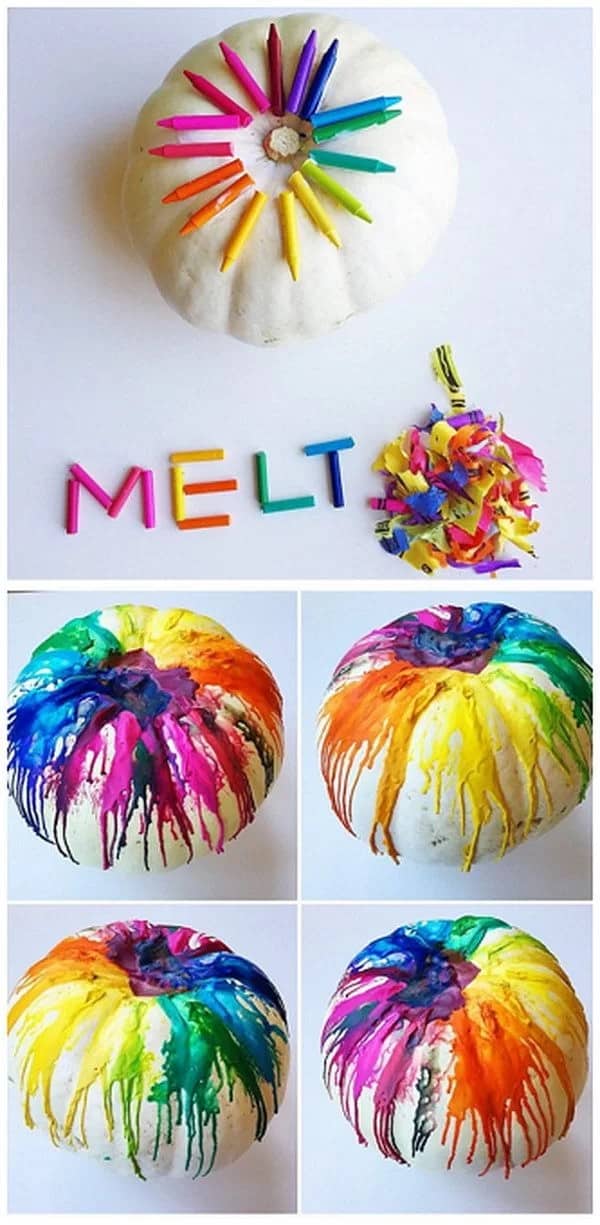
Transforming ordinary pumpkins into vibrant masterpieces has never been more fun! The process of melting crayons on pumpkins is an effortless and rapid way to add some Halloween flair, yielding a stunning array of colors with just one blast of heat. Begin by selecting your favorite crayon hues (approximately 8) and remove the wrappers. Cut each crayon in half for optimal results. Next, apply tacky glue to secure the crayon pieces atop the pumpkin, allowing it to dry completely.
Once set, use a hair dryer to melt the crayons, carefully directing the heat towards the desired drips.
Toothy Dracs and Winged Friend
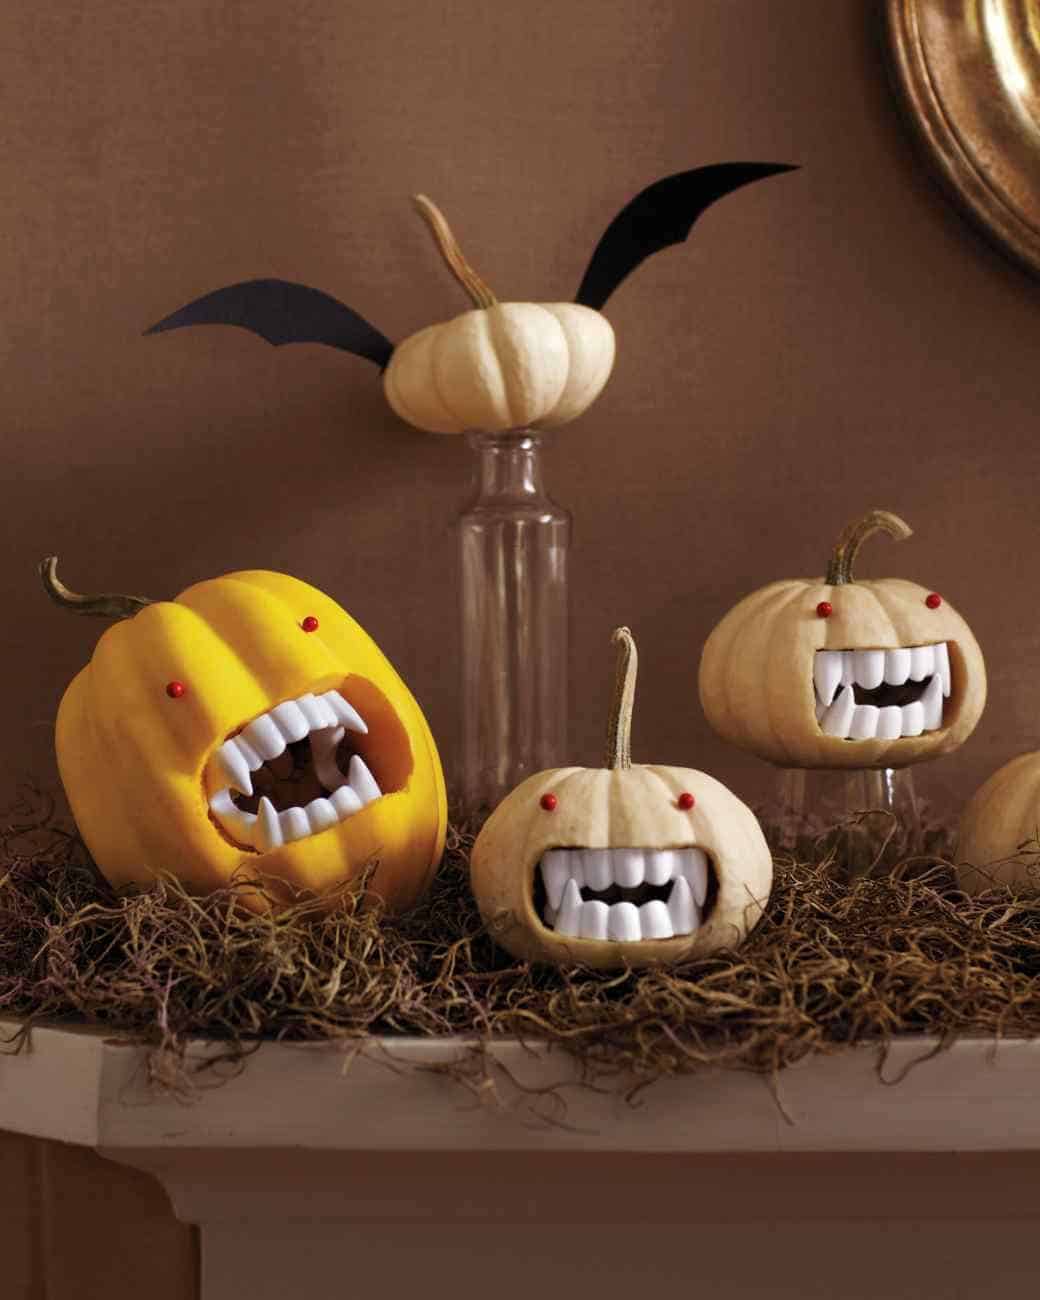
Create a spine-tingling display by grouping three toothy vampire-like pumpkins with their lone bat winged companion on your foyer table, mantel, or niche. The trio’s evil red eyes and plastic fangs will have you conjuring up tales of Dracula’s Transylvanian escapades. To craft this eerie arrangement, start by using a printed template to create the mouth areas on three small white pumpkins.
A thumbtack can be employed to trace the mouth design, and any excess material can be removed with a small saw blade. Next, insert and secure the vampire teeth into their respective openings and position the eyes accordingly. For the bat winged pumpkin, design or print a wing template and transfer it onto construction paper. Cut out the wings and fold their ends about ¼ inch before attaching them to the final pumpkin using hot glue.
Stacks of Glitter’n BOO
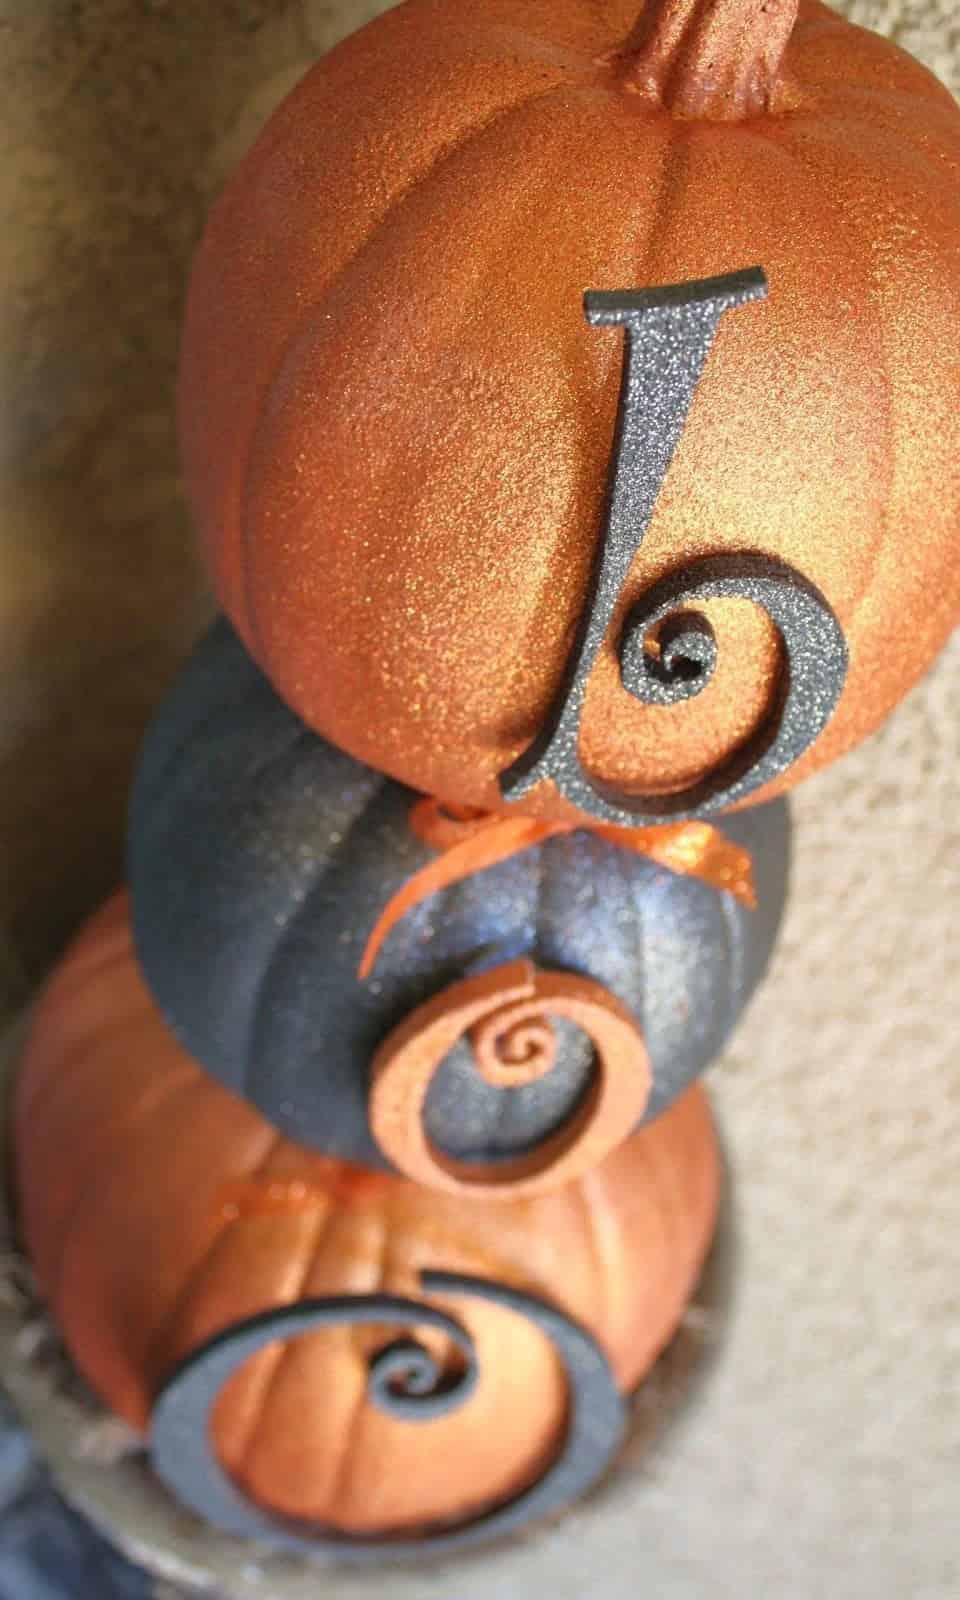
Transform your Halloween decorations into a show-stopping focal point for your front porch or entry with a creative DIY project. Start by collecting three foam pumpkins, spray glitter blast paint in bold Halloween colors, and wooden letters B, O, and O. Remove the stems from two of the pumpkins to create a unique shape. Once all the pumpkins are coated in their desired color combinations, use hot glue to stack them, placing the stemmed pumpkin on top.
Add some finishing touches by adhering the spray-painted letters in place with hot glue. To conceal any excess glue, wrap an iridescent orange ribbon around the seam where the second and third pumpkins meet. With a few simple steps and some creative flair, you’ll be enjoying your very own topiary-inspired pumpkin display.
Halloween Minions Pumpkin Style
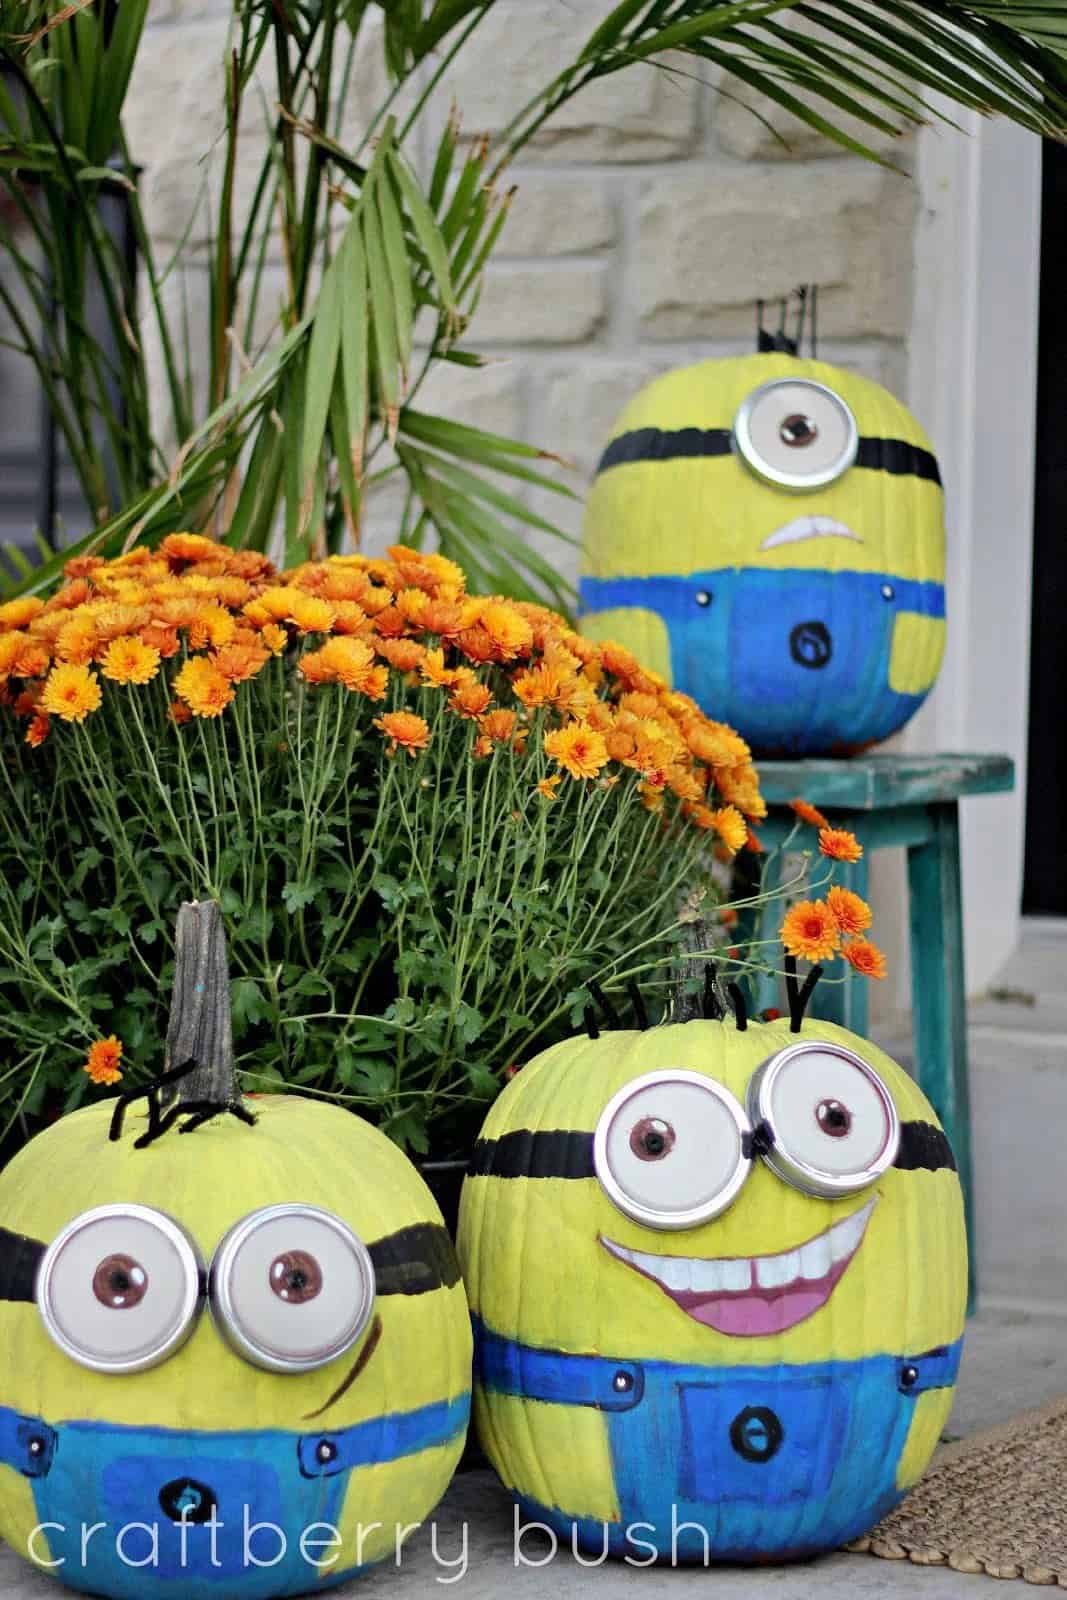
Bring some Minion magic to your Halloween celebrations by transforming pumpkins into adorable characters from Despicable Me. These make perfect decorations for kids’ parties, birthdays, or any other gathering. The best part? Kids can help create these Minion pumpkins with a little guidance and adult supervision. Start by painting the pumpkins yellow, allowing each layer to dry before adding more.
Then, get creative with the costume pieces, eye attachments, and materials from online sources or craft stores. Use glue or adhesive-backed tape to attach the outfits, and pipe cleaners and a drill (or a carving tool) to create the hairpieces. Simply insert the pipe cleaners into the pumpkin and bend them into shape for a one-of-a-kind Minion look.
Pixie Dust My Pumpkin
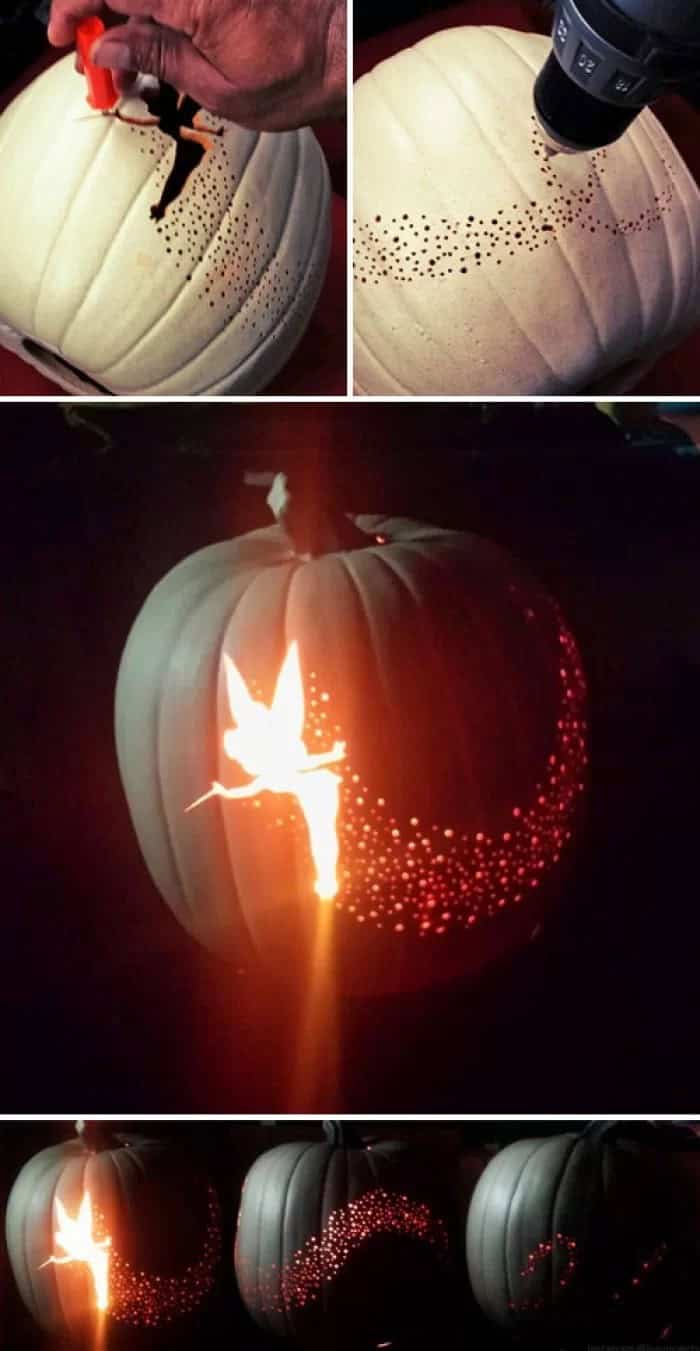
Tinker Bell, the iconic Disney character, has won over hearts with her mischievous charm and sparkly essence. And what better way to bring that magic to life than by transforming a plain pumpkin into a whimsical masterpiece? This enchanting DIY project is sure to delight both kids and adults alike. Start by printing out a Tinker Bell image and affix it to an artificial pumpkin using glue or tape.
Use a hot knife or carving tool to carefully remove the inside of the design, leaving a thin outline. Create the iconic pixie dust trail in the same manner. To complete the look, place a small light bulb or battery-operated candle inside the pumpkin, allowing Tinker Bell’s radiant glow to shine through. This delightful decoration is sure to cast a spell of wonder and delight on all who behold it.
Wide-eyed and Mummified
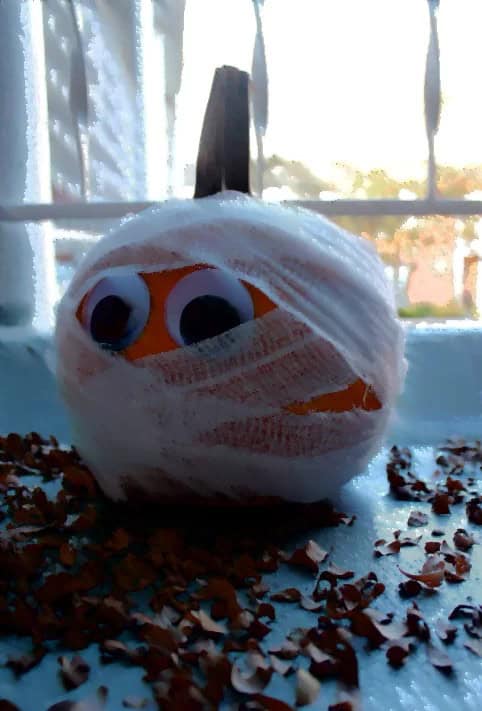
While the thought of a real-life mummy can be unsettling, especially when pacing menacingly, its cute pumpkin counterpart brings a playful twist to Halloween festivities. This adorable mummy pumpkin, joined by iconic monsters like Frankenstein’s creature, Dracula, Godzilla, and the Wolf man, forms a harmonious combination perfect for any pumpkin-themed celebration.
To bring this design to life, simply follow these easy steps: wrap white gauze bandaging around your pumpkin, use imagination to create unique patterns, apply glue and attach fake plastic eyes. With these basic materials, you’ll be creating a charming mummy pumpkin that’s sure to delight at any Halloween gathering.
Glitzy Bling Pumpkin
Transform your everyday pumpkin into a dazzling display with the help of bling effects. By incorporating iridescent, metallic, and crystal beading, you can add texture, volume, and glamour to your pumpkin decoration. To create this stunning look, start by selecting a string of beads in a single color or featuring different types of beads. Wrap the bead length around the pumpkin in a circular motion, beginning at the base and working your way up to the stem area.
Ensure each section of the pumpkin is securely fastened with a thin layer of craft glue before adding the next part of the beading. Continue this process until you’ve wrapped the entire pumpkin, then stop and admire your sparkling creation.
Neon Witch in Waiting
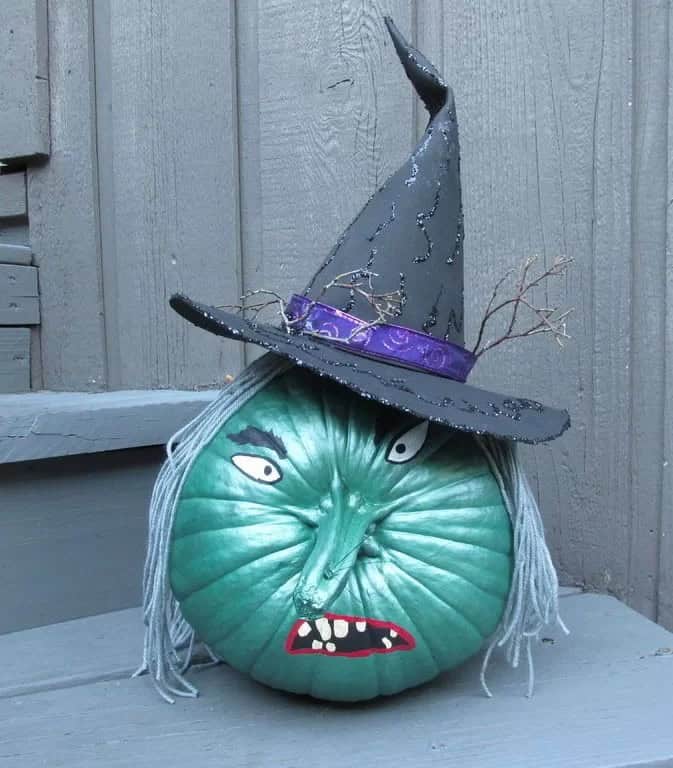
As you gaze upon this witch, her unsettling appearance seems to defy the boundaries of horror. Her elongated nose, disoriented eyes, and jagged teeth conspire to create a visage that’s nothing short of terrifying. The metallic sheen of acrylic paint only serves to amplify her grotesque features, rendering her an abomination that would make even the bravest trick-or-treaters take pause.
This ghastly creation is the result of meticulous craftsmanship, requiring multiple coats of paint, a pointed black hat, scraggly yarn hair, and deliberately contorted facial cutouts all carefully glued into place. She’s sure to strike fear into the hearts of anyone who crosses her path, sending even the most stalwart of souls fleeing in terror.
Ribs of Sequins
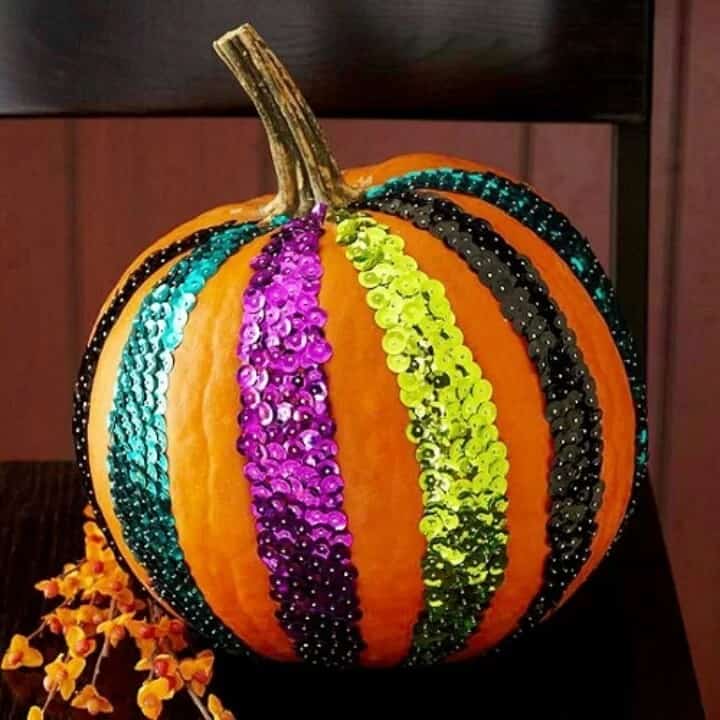
Transform your decorative pumpkins into showstoppers by incorporating the dazzling magic of sequins! A simple yet effective way to add some glitz and glamour is to place strategically placed bands of sequins along the pumpkin’s ribs. By using pins, sequin pins, or craft glue, you can create a solid band that follows the natural curves of the pumpkin. To achieve the desired width, simply overlap each application until you’ve reached the perfect thickness.
And if you want to take it up a notch, try alternating your sequin bands with brighter, carnival-inspired hues or more traditional Halloween colors for a unique and eye-catching design.
Petals and Vines
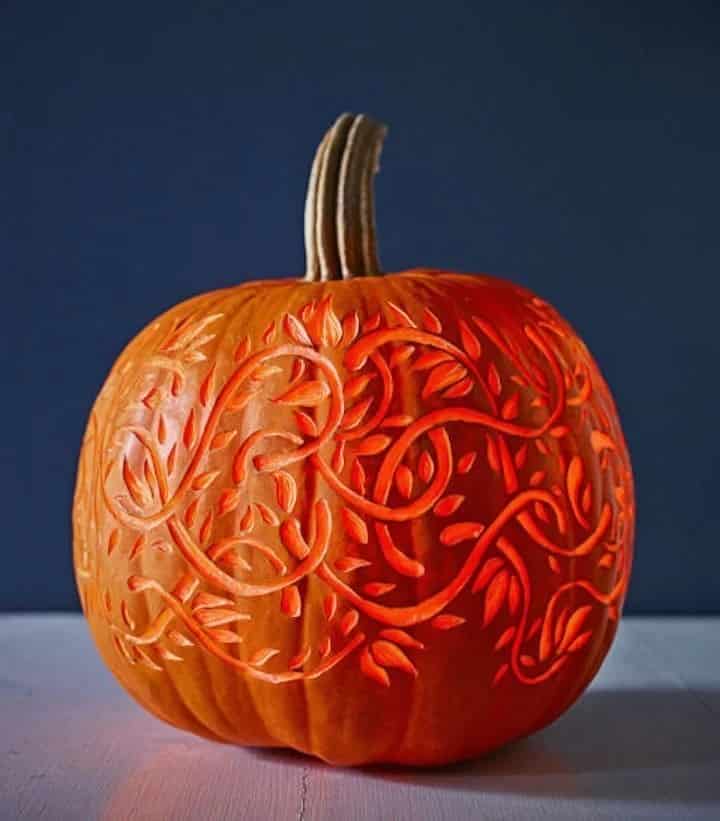
Pumpkin carvings can evoke a sense of whimsy and nostalgia, reminiscent of crisp autumn days. The design’s flowing vines and petals seem to dance in the breeze, transporting you to a season of harvest and celebration. To achieve this three-dimensional effect, carve only the top layer of the pumpkin, leaving some depth intact. Alternatively, sketch or stencil the design onto the pumpkin before carving out the areas with kitchen tools like a lemon zester, linoleum cutter, or clay loop.
The gentle layers will reveal a beautifully textured and dimensional work of art.
Pumpkin Tree Entry Topiary
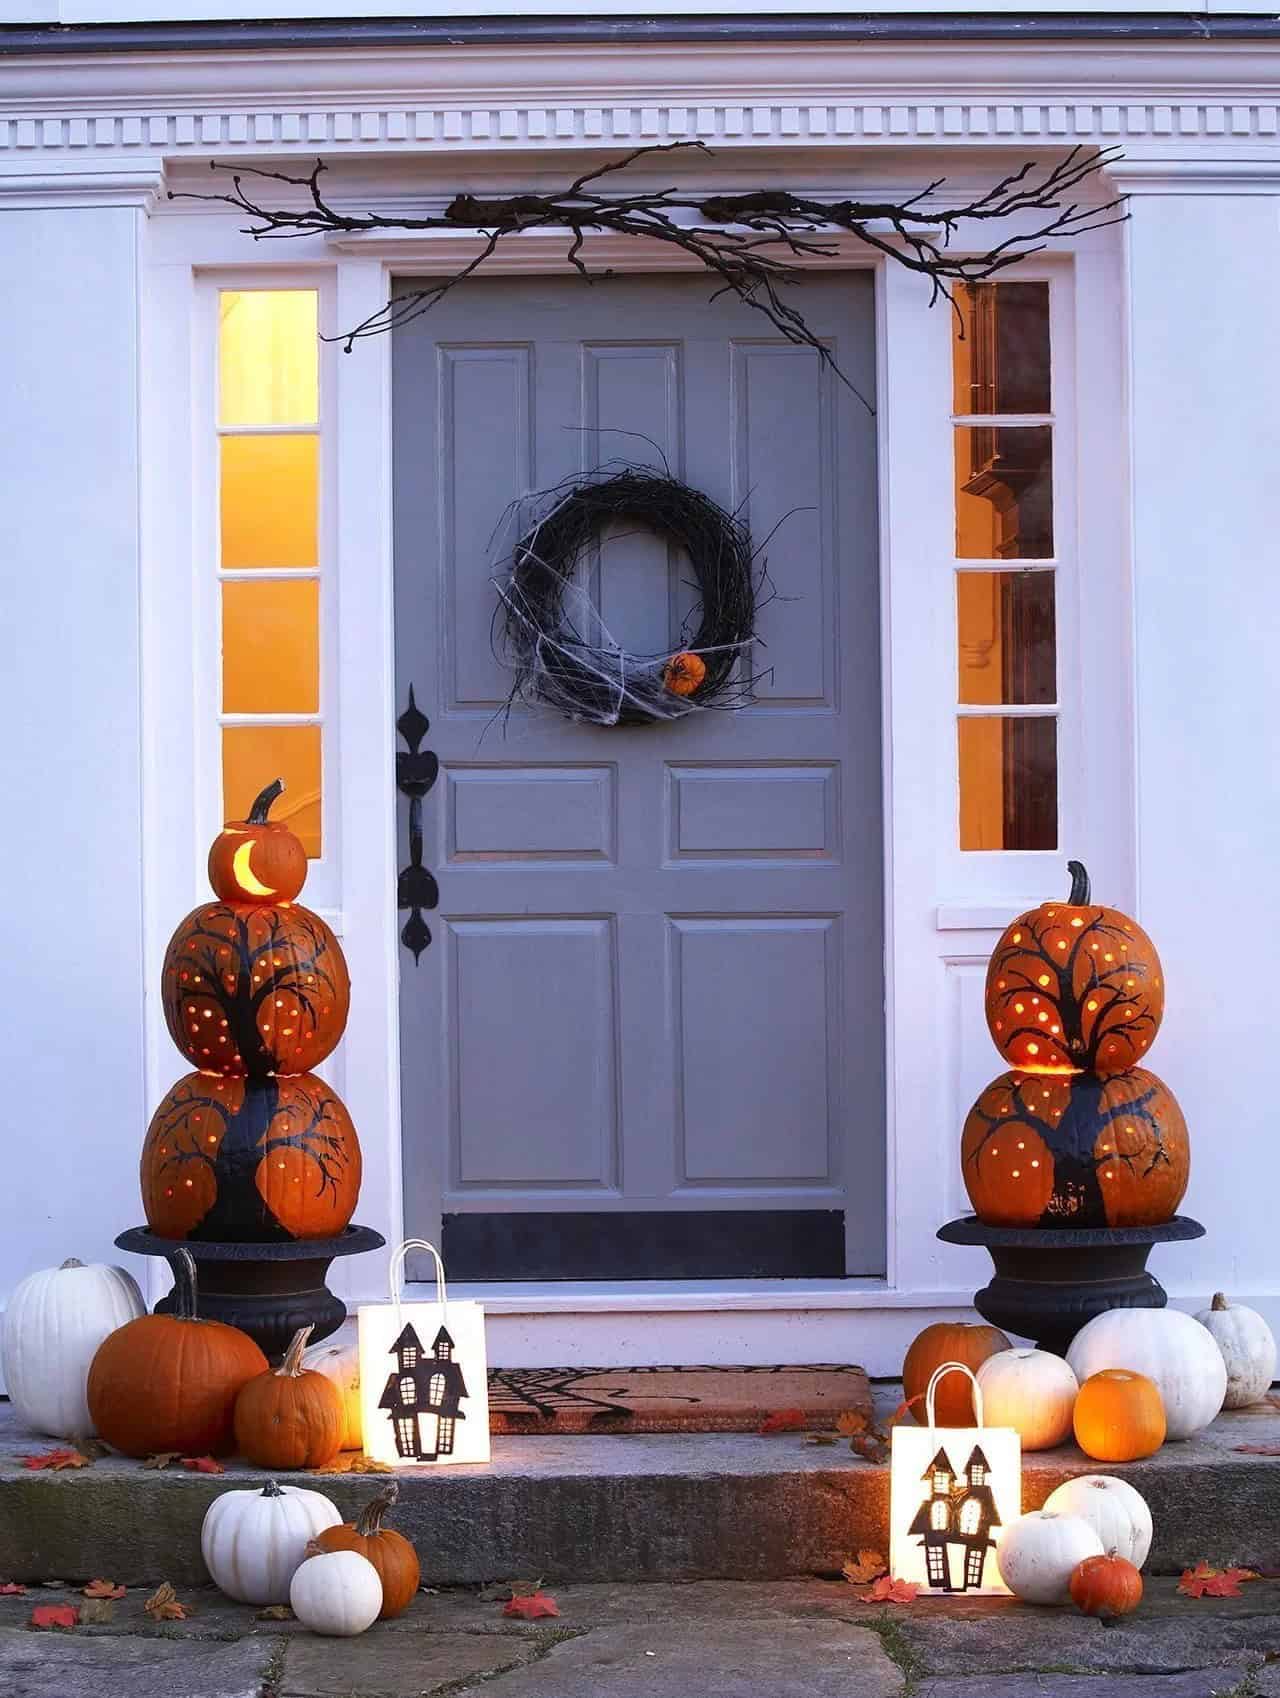
Transform your front porch into a spellbinding Halloween scene with a Pumpkin Tree topiary! This DIY project is surprisingly straightforward and requires only some basic crafting skills. To create this eerie yet charming centerpiece, start by selecting two large pumpkins and sketching or painting a gnarled tree design onto their flat surfaces. Remove the stems to flatten the pumpkins, then punch or drill small holes throughout to mimic the stars on a moonlit night.
Finally, add a miniature pumpkin with a glowing ‘moon’ as the crowning touch.
Silver, Gold, and Black Stack Scare
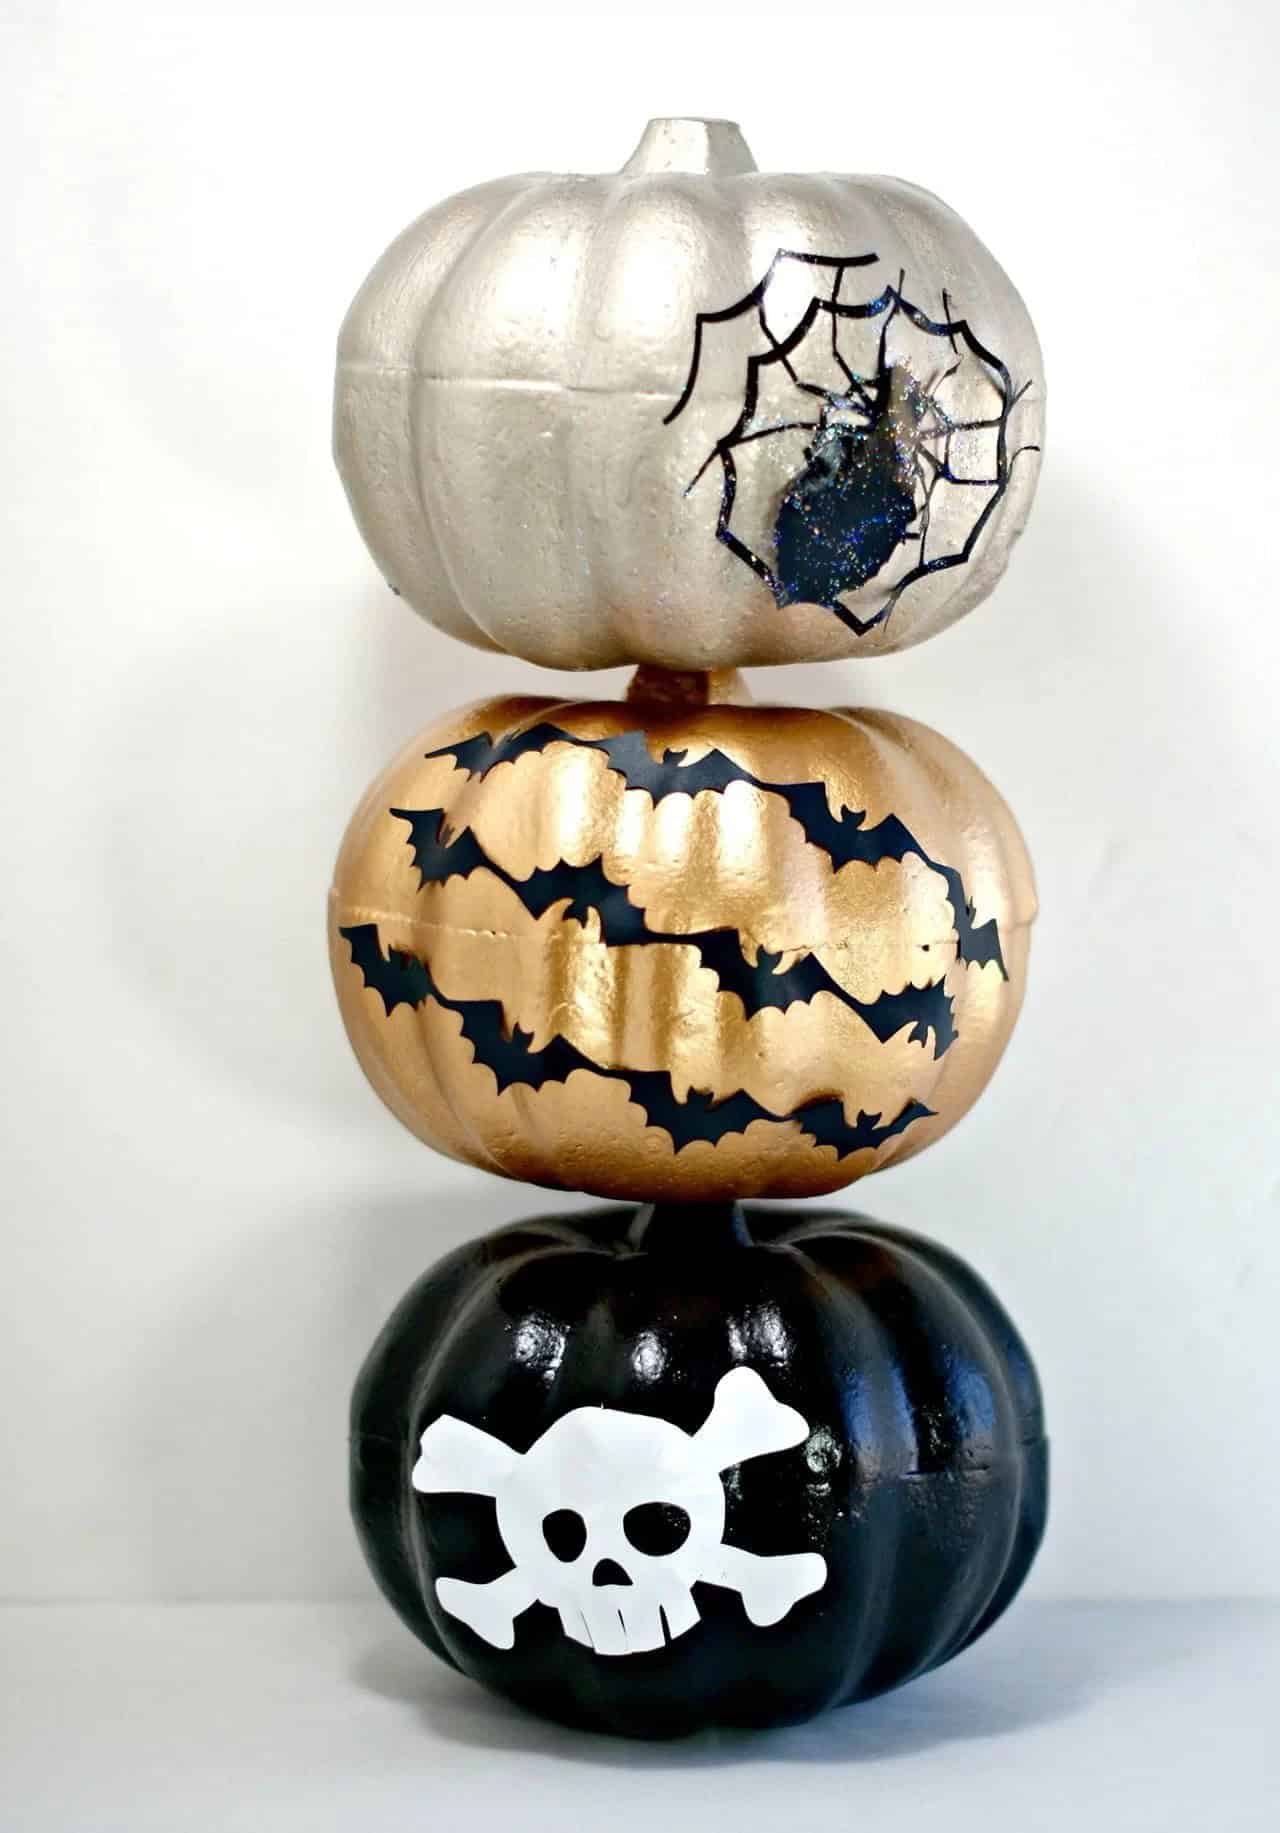
Transform your outdoor space into a spellbinding setting with this striking metal pumpkin topiary! The combination of silver, gold, and black paintwork creates a dramatic effect from top to bottom, while the added Halloween creature features bring an extra layer of whimsy. What’s more, using foam pumpkins makes this project surprisingly easy to execute. Start by giving each pumpkin two coats of metallic paint, allowing it to dry completely before moving on to the next step.
Once the paint is fully set, cut out the skull, bats, and spider from stenciled vinyl pieces or use pre-cut adhesive-backed Halloween stick-ons. If you encounter any issues with the vinyl’s adhesion, a quick fix can be achieved by applying Mod Podge to secure the cutouts in place. Finally, use a slender dowel or skewer to connect the three pumpkins and bring your masterpiece to life.
Pumpkin Bouquet
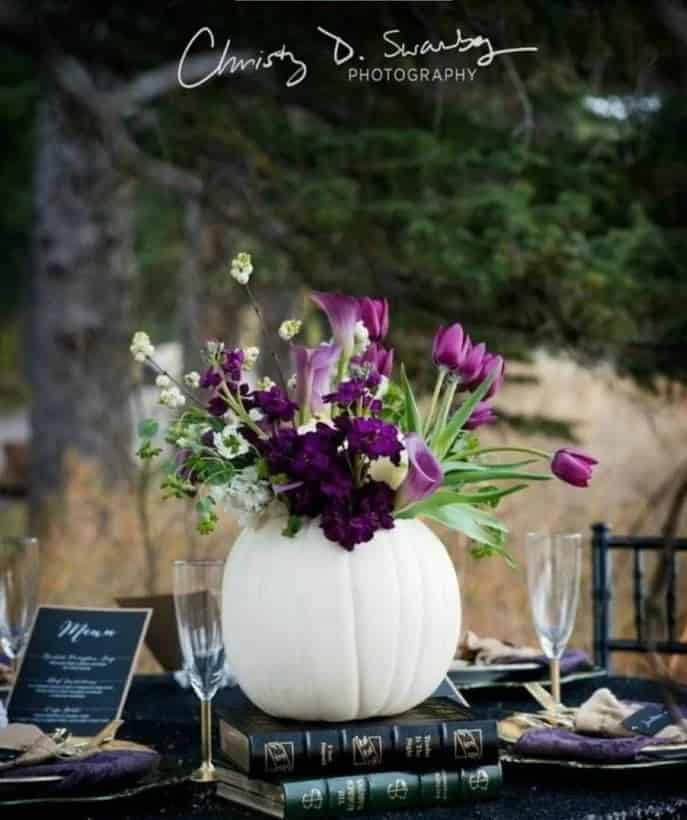
As you prepare for your Halloween gathering, don’t forget the finishing touches that make it truly special. A stunning floral arrangement in a white pumpkin is an effortless way to elevate your party’s ambiance. By hollowing out and preparing the pumpkin, you’ll create a beautiful centerpiece that provides a serene contrast to the more playful and spooky decorations that surround it. To get started, simply cut off the top of the pumpkin and remove the seeds and fibers inside.
Once clean and dry, insert a glass vase into the opening and fill it with water. Then, arrange your chosen flowers and foliage within the pumpkin, allowing you to enjoy their beauty for as long as possible.
Kitties in a Gourd
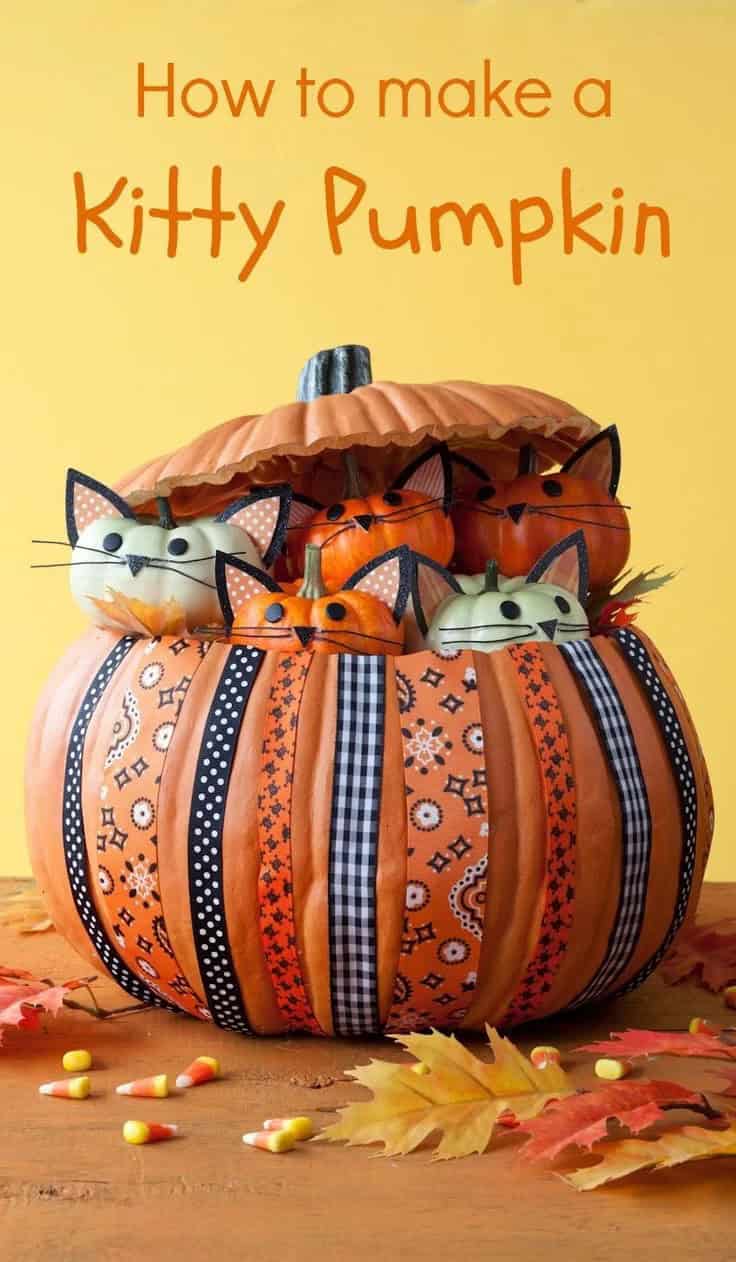
Imagine creating a whimsical Halloween display that combines the magic of cats and pumpkins. This adorable ‘kitten’ pumpkin arrangement is sure to delight both cat lovers and trick-or-treaters alike. Start by selecting a medium-sized hollow pumpkin, which can be easily found at craft stores. Next, gather three to five smaller pumpkins that will serve as the ‘kittens.’ Carefully remove the top portion of the larger pumpkin with a knife to create space for the smaller pumpkins.
To add some autumnal charm, fill the hollow pumpkin with fall foliage like leaves or twigs. Once the base is set, it’s time to bring the ‘kittens’ to life. Use black foam ears, cord whiskers, and a black marker to draw eyes and noses on each small pumpkin. Finally, insert narrow wood skewers or dowels into each ‘kitten’ pumpkin and place them within the fall leaves, creating a playful and inviting display that’s sure to be a hit this Halloween.
Harlequin, Stripes and Dots Stack

Transform your Halloween setting with a striking display of stacked, patterned pumpkins. These versatile decorations can elevate any space, whether it’s a front porch, deck, or entryway, adding height, depth, contrast, and ambiance to the area. To take your design to the next level, simply place them in a resin planter for an added layer of anchoring, extra height, and a high-end aesthetic.
This unique grouping features weather-resistant pumpkins with harlequin, stripes, and polka dots in traditional Halloween colors, expertly crafted using a combination of resin, styrene, and fiberglass. For a customized look, consider creating your own topiary by combining the same resin pumpkins with different pattern choices, paint colors, planters, and pip-berry planter filler.
Bats in Flight Pumpkin
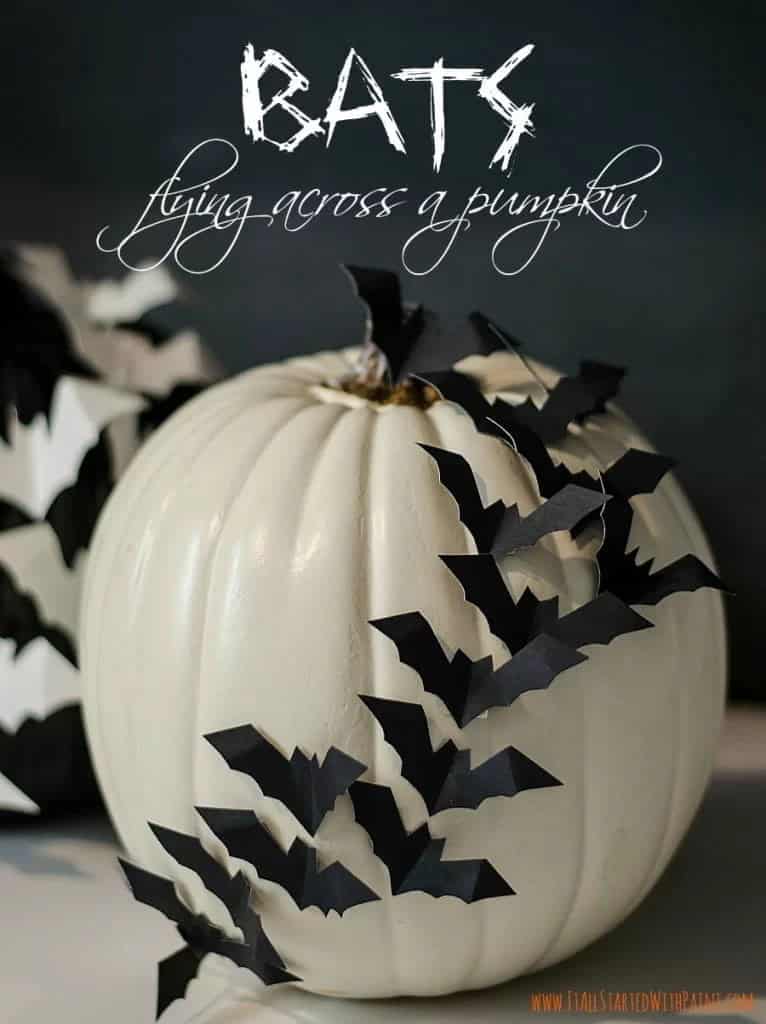
Transform your pumpkin display with an eerie yet elegant touch by incorporating bat cutouts. When attached to white resin, ceramic, or natural white pumpkins, the bats create a striking visual effect that adds depth and texture to the arrangement. For an even more dramatic presentation, combine the bats with other pumpkins in a spider web design. To craft the bats, use black poster board and a free printable pattern from a Halloween crafting website.
By tracing the pattern onto a fold of the poster board, you’ll not only save time but also achieve a more dimensional and polished finish. The final result is a bold yet serene centerpiece that’s perfect for a Halloween party table or any autumnal celebration.
Illuminated Haunted House
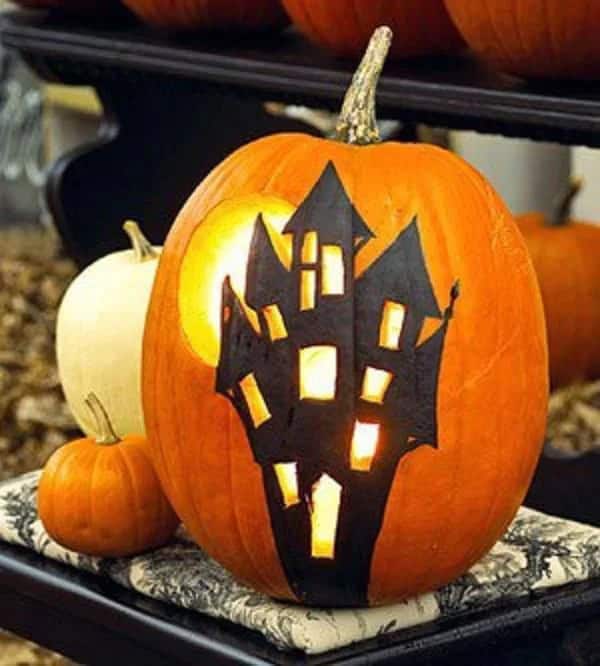
Transforming a pumpkin into a spooky abode is an ideal autumnal activity, and a perfect addition to any haunted house party. With the right stencil and black paint, you can recreate the eerie ambiance of a haunted mansion on your pumpkin’s surface. The design can be seamlessly integrated with Halloween-themed table decorations, tableware, and other party elements. Start by printing out an online template or copying a haunted house design from a craft book.
Transfer the image to the pumpkin using the stencil and paint it black for an ominous effect. Use a chisel to cut out the windows, adding depth and dimensionality. Illuminate the open areas with a battery-operated candle or other lighting sources to create a hauntingly beautiful display that brings the haunted house scene to life.
Caterpillar Pumpkin Stretch

Transforming caterpillars into butterflies and pumpkins can be a delightful experience. The right-sized pumpkins can help bring character to your insect pumpkin creation. Kids will adore this easy-to-assemble project, which combines the natural charm of pumpkins with the whimsy of decorative details. Start by painting smaller pumpkins in shades of green that evoke the caterpillar’s distinctive hue. Add colorful adhesive-backed felt circles to create a playful, segmented body.
Embellish the front pumpkin with googly eyes and attach colorful pipe cleaners to the head area to create antennae that add an extra layer of realism. To complete the display, arrange the pumpkins in a winding or S-shaped pattern on your front yard, porch, or deck. Alternatively, consider placing them along a long picnic table for an outside Halloween party for kids, where they can be admired and enjoyed.
Ghostly Welcome
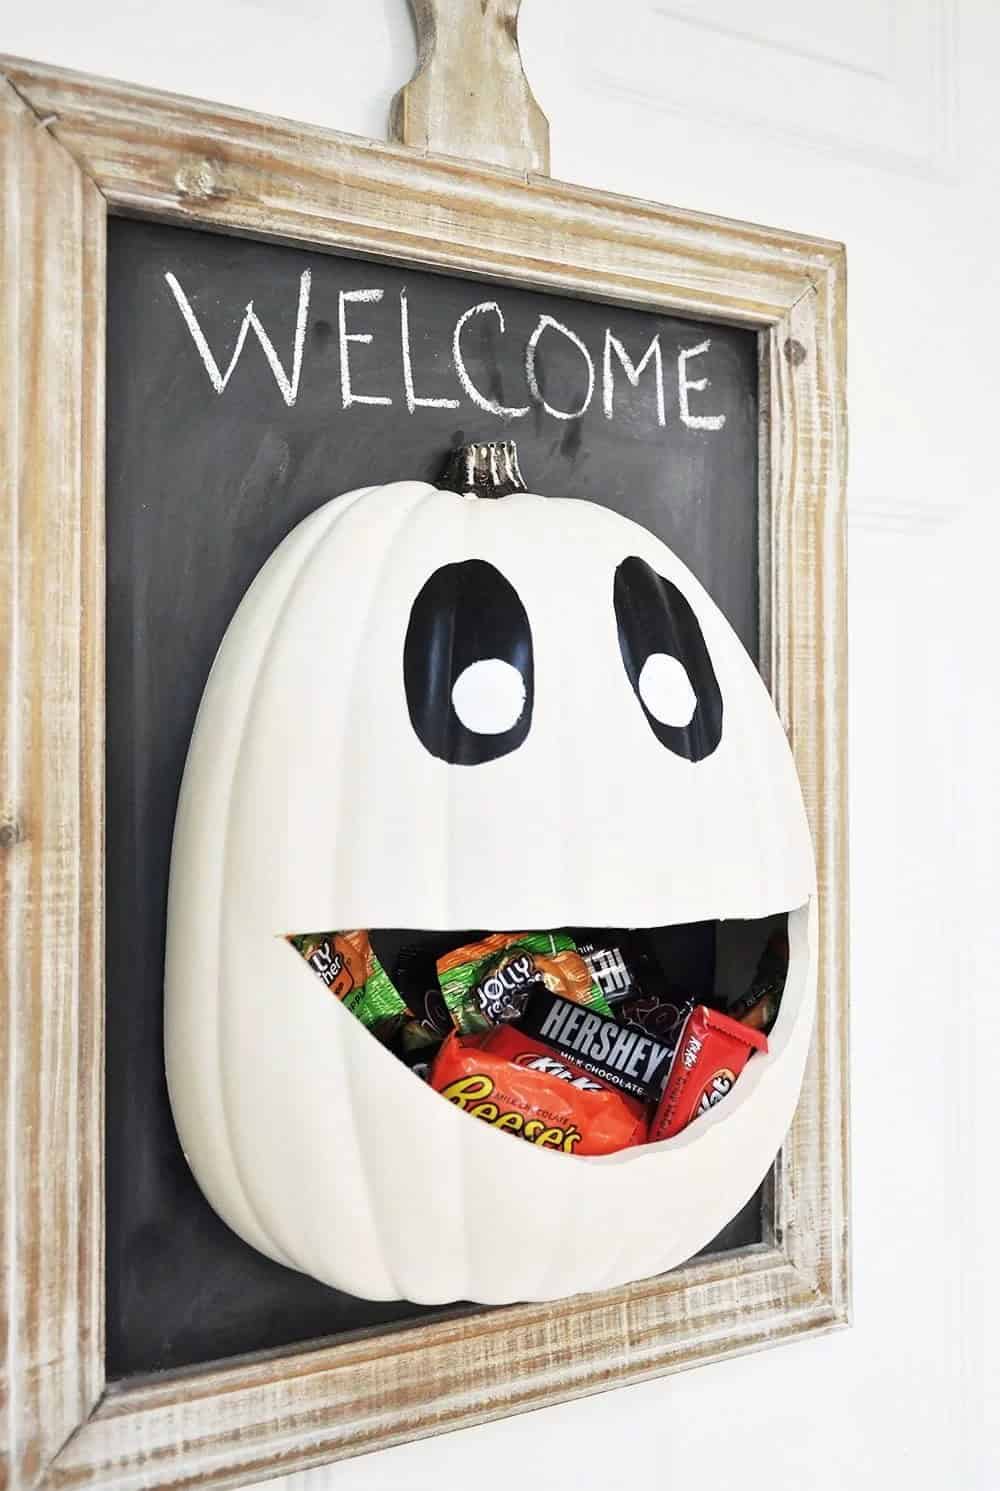
For a warm and inviting welcome on Halloween night, consider creating a charming chalkboard door hanger featuring a smiling jack-o’-lantern. This clever DIY project is perfect for those who won’t be home to answer the door, allowing trick-or-treaters and party guests to easily collect their candy and read a personalized message. By incorporating a white pumpkin with ghostly features and an open expression, you’ll create a unique and festive design that’s sure to delight both kids and adults.
To assemble this decoration, simply cut out the middle and bottom half of the pumpkin to form the smiling receptacle, then paint on the black and white eyes and attach the pumpkin to the board using screws. With its welcoming charm and practical functionality, this chalkboard door hanger is a must-have for any Halloween celebration.
Ribbons and Speckles
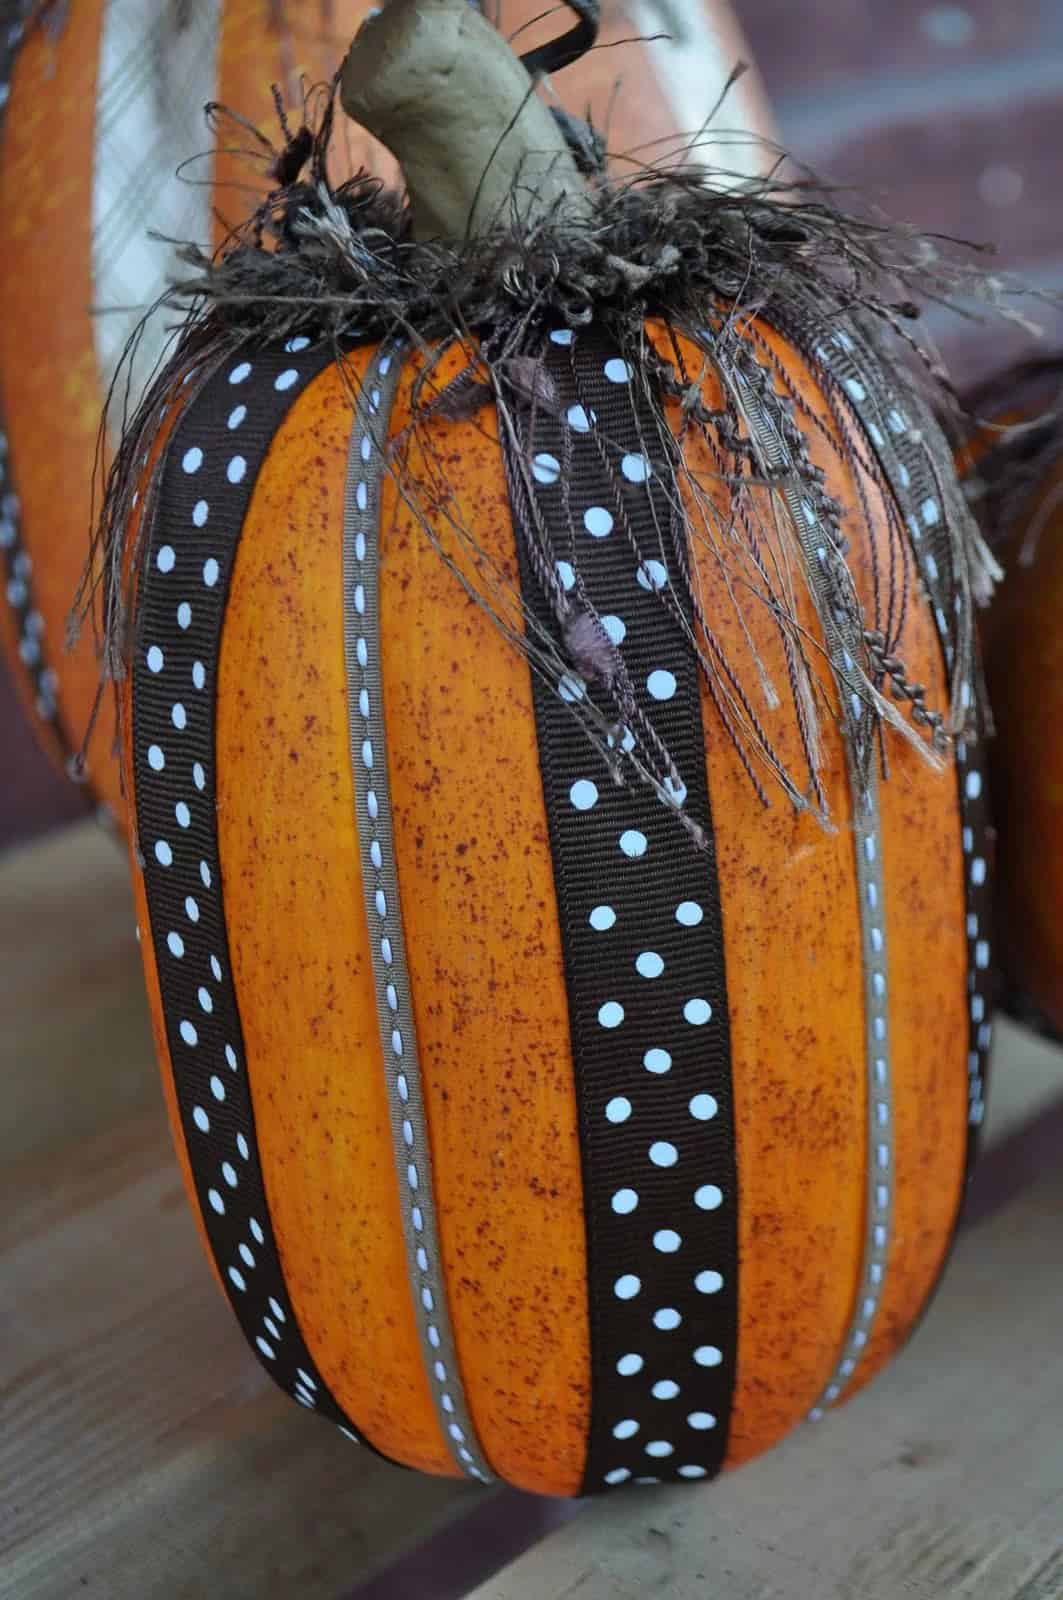
When it comes to decorating an elongated pumpkin, ribbons and a feather-like stem topper are ideal. The flowing ribbons showcase the pumpkin’s length, adding texture and visual interest to the design. The contrasting ribbon color on the stem draws attention upwards, introducing a touch of elegance to the overall look. This DIY project is relatively straightforward, requiring only a taller pumpkin, various ribbon patterns and widths, and a feather-like filler material.
To complete the design, paint the stem with a bold contrasting color, and add black accents to the pumpkin’s body for added depth. Start by applying the ribbon from the bottom up, securing it with craft glue as you go. Finally, fill in any gaps with the topper material, creating a cohesive and eye-catching display.
Electrically Charged Buggies
As you add a touch of autumnal charm to your decor with a trio of pumpkins, why not bring in some eight-legged friends to join the party? Spray paint foam pumpkins white and drill holes for the light tips. Then, create an opening in the back of each pumpkin large enough for a spider light string to pass through. Remove the spiders from the lights and insert them into the pumpkins, reattaching them once they’re securely in place.
Next, apply double-sided tape or sticky dots to the backs of the spiders and press them onto the pumpkins to ensure they lie flat. Finally, plug everything in and watch as your spider friends illuminate their pumpkin abodes, casting a spooky yet charming glow.
Crown Jewels
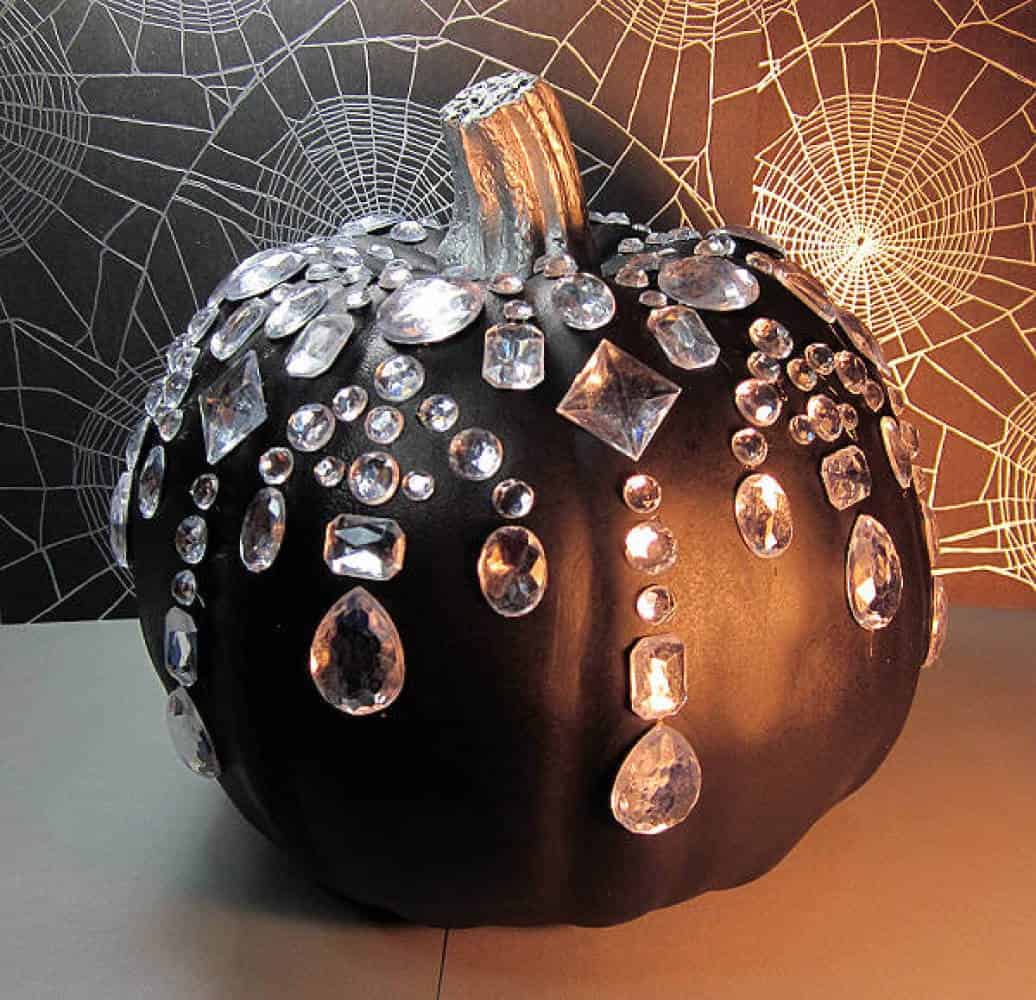
Transform your pumpkin decoration into a masterpiece fit for royalty by incorporating crystal-like jewels. This elaborate design is not only regal but also elegant, and can be achieved using either a real or faux pumpkin – though a fake one will provide years of continued use. The metallic paint effect with jewel-toned hues brings the pumpkin to life, while the addition of another metallic color to the stem creates striking contrast.
To achieve the desired intensity, you may need to apply several coats of paint, but once dry, the pumpkin is ready for the final touches. The real showstopper is, of course, the jewels themselves, which can be secured using adhesive-backed bling or hot glue for a professional finish.
All Dressed Up in Tulle
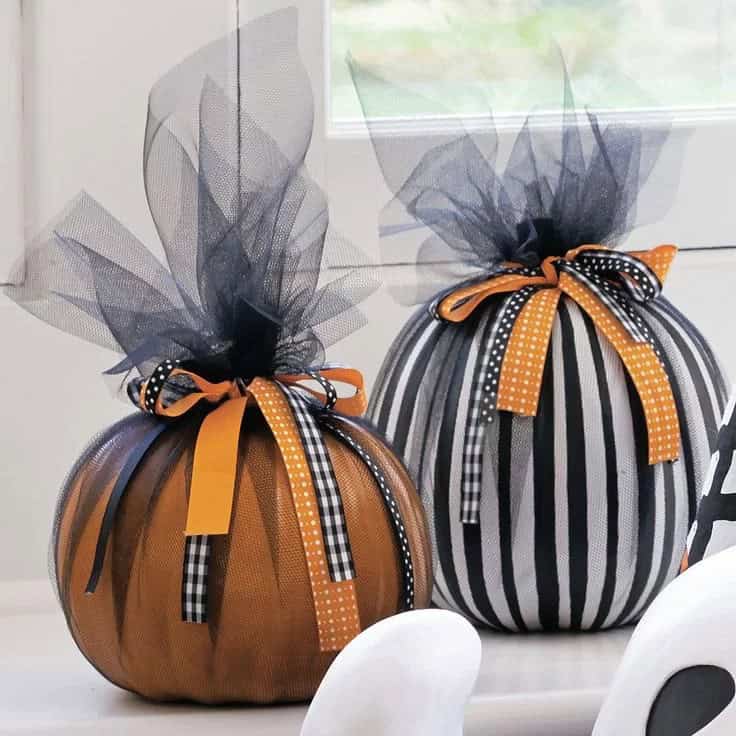
Elevate your pumpkin decoration ideas by combining tulle, ribbon, and a dash of creativity. Wrap real or foam pumpkins in a simple yet striking design featuring entwined tulle netting and Halloween-colored ribbons. Secure the bundle with a tiny bow tying technique that adds a touch of whimsy to the overall look. For added texture and visual interest, incorporate patterned or printed ribbons into your design.
Purchase sufficient tulle to cover one or two pumpkin forms, leaving enough fabric to extend beyond the stem and create a dramatic height effect once the ribbon is tied in place.
Thumbtack My Pumpkin
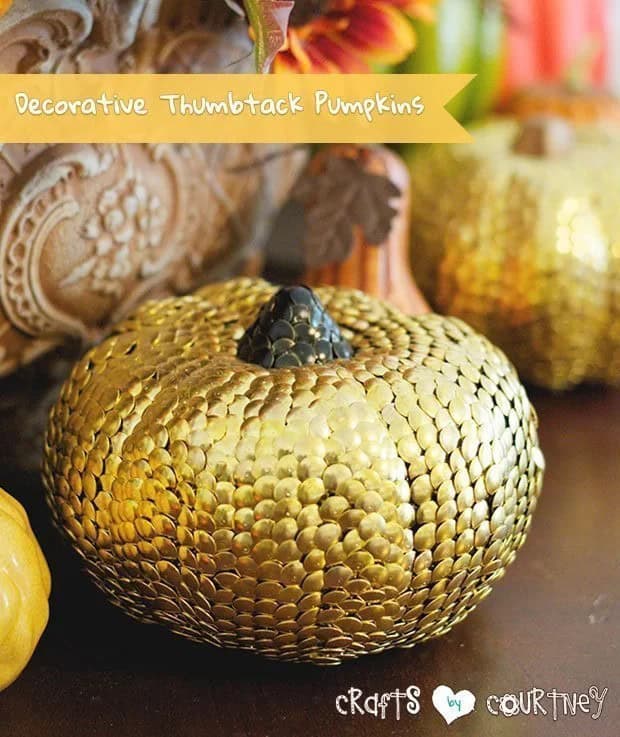
Pumpkin perfection is just a few thumbtacks away! The latest crafting craze involves using these tiny metal wonders to add an industrial chic touch to your autumnal arrangements. You can find thumbtacks and styrofoam pumpkins at most craft and dollar stores. To achieve the desired look, it’s recommended to purchase at least three boxes of thumbtacks – two and a half boxes should be sufficient for average-sized pumpkins.
Don’t forget to grab a box of darker thumbtacks specifically designed for the stem area. Simply begin by placing the tacks in a circular motion starting from the top of the pumpkin, working your way around until you reach the bottom. The result is a stunning, uniquely textured display that’s sure to impress.
Criss Crossing the Web
Transforming a white foam or hollow pumpkin into a spider web masterpiece is a fun and effortless DIY task. By applying the same technique used to draw lines with a magic marker or sharpie, you can create a simple yet striking design. The process begins by drawing vertical lines in the pumpkin grooves, followed by horizontal or circular lines around the pumpkin to resemble a spider’s web. Add a personal touch by free-handing a spider or using a pattern and tracing it onto the pumpkin.
To give your creation an eerie glow, paint the spider with flat black paint, or opt for a shiny finish for an eye-catching Halloween display that’s sure to impress.
Dual Personality – Inner Face Outer Face
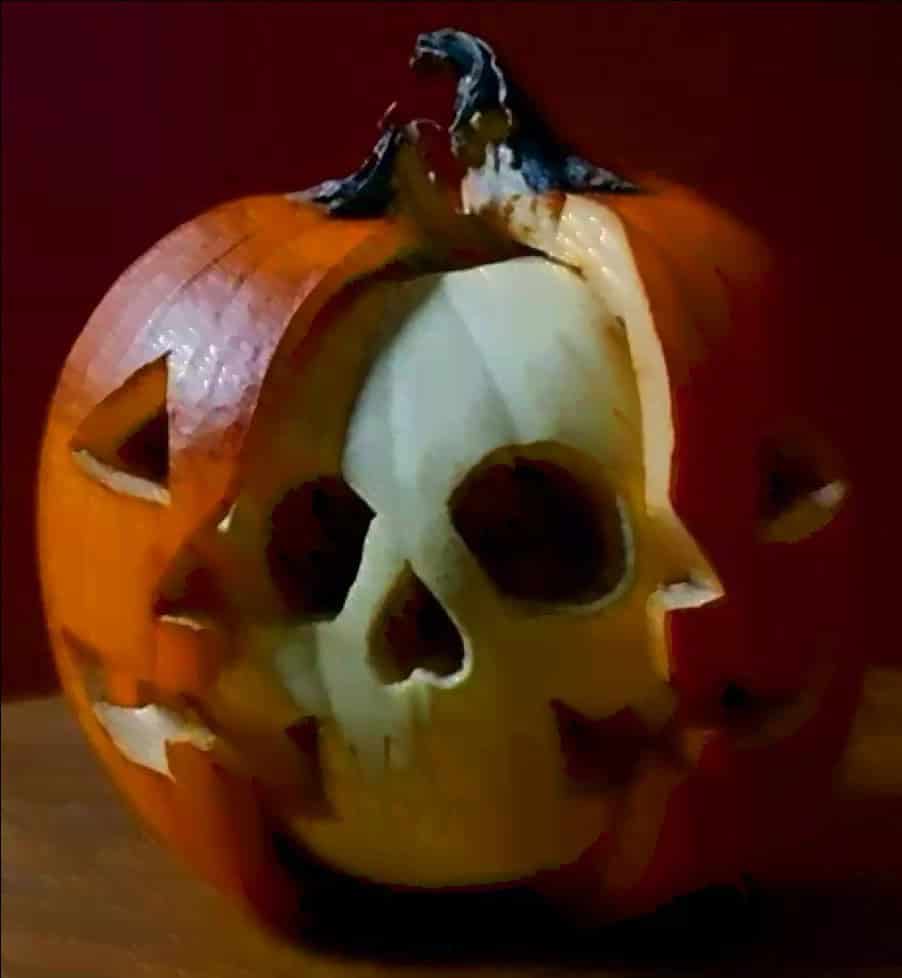
At santaphotos. com, a unique Halloween pumpkin creation is brought to life by combining an inner and outer pumpkin. The dual personality design features two distinct sets of carvings that require a split open orange pumpkin to accommodate a white inner pumpkin transformed into a terrifying skull with exaggerated hollow eyes and a menacing mouthful of clenched teeth. The juxtaposition of the evil skull against the brave pumpkin creates a striking visual contrast.
To recreate this look, start by carving an orange and white faux hollow pumpkin using a craft knife blade. Once carved, attach the two pumpkins together with crafting or hot glue, allowing their contrasting personalities to shine.
Abundant Color Mini’s
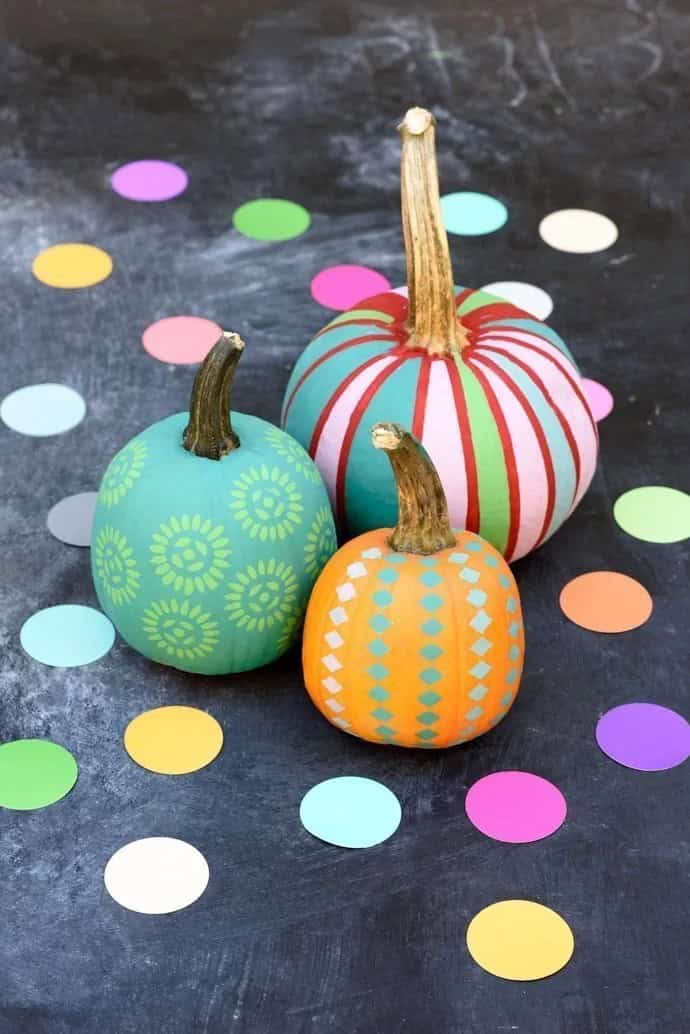
Mini pumpkins are a delight to work with, boasting an ease of use that makes them perfect for crafting unique Halloween gifts. The vibrant colors and playful patterns used to enhance these small pumpkins create a charming aesthetic that’s impossible to resist. For the pictured pumpkins, chalk paint is used in conjunction with stencils, allowing for crisp, long-lasting results without the need for prepping or priming.
Additional dimension can be added through free-hand painting with sponge brushes, daubers, and other paintbrushes, before the design is complete and dried.
Beaded Bling Swirl
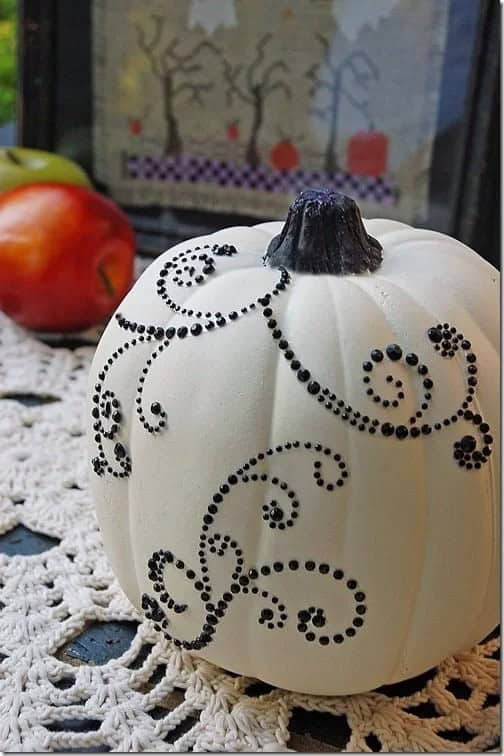
Transform a plain white pumpkin into a unique piece of art with ease! By applying black jewel stickers in various patterns, you can take your pumpkin from an ordinary to an extraordinary centerpiece. The process is as simple as affixing the designs onto the pumpkin’s surface. You’ll find plenty of swirls and flourishes available, allowing you to customize your design and give your home a warm, inviting ambiance.
Trick or Treat Ombre Twist
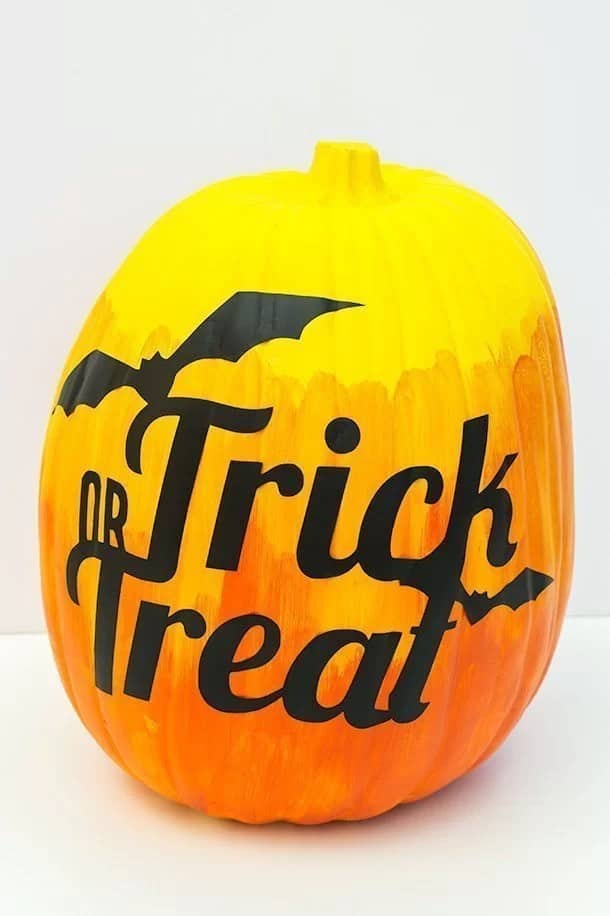
To create this striking pumpkin decoration, start with a white faux pumpkin and use an ombre painting technique to add depth and dimension. Begin by applying the lightest shade of craft paint to the top third of the pumpkin, leaving it wet before moving on to the middle section. Here, apply the medium shade paint color. Finally, paint the bottom third of the pumpkin with the darkest shade. To blend the colors seamlessly, brush over each section once the paint is dry.
Allow the entire design to fully dry before adding bold lettering that screams Halloween. For this, you can use a stencil or pre-cut adhesive-backed lettering. The end result is a unique and eye-catching decoration that’s sure to be a hit at any fall gathering.
Polka Dot Bouquet

Adding a whimsical touch to your Halloween decorations or fall decor, a polka dot pumpkin vase is an excellent choice. This decorative piece boasts a vibrant, cheerful appearance that complements seasonal flower arrangements, dried foliage, and other short-stemmed decorations. Its versatility also makes it perfect for use as a centerpiece at parties or as an accent piece on shelves, vanities, end tables, and other areas of the home.
To create this unique vase, start with a white faux craft pumpkin. Remove the stem and top layer to create an opening, then coat the pumpkin in gold acrylic metallic paint. Apply multiple coats until the desired coverage is achieved. Next, use a white paint pen to add polka dots to the pumpkin. Allow the dots to dry completely before reapplying as needed to achieve the desired level of coverage.
Finally, add a vase insert for use with fresh flowers and enjoy your beautiful, one-of-a-kind decoration.
Pumpkin Votive Glow
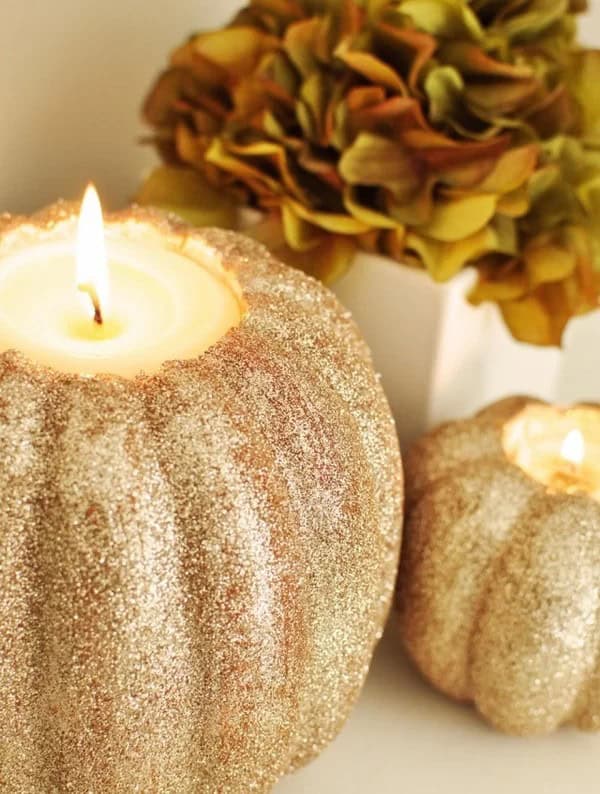
Transform your holiday setting with a touch of warmth and joy using votive candles and a dash of creativity! By dipping these candles in gold glitter, you can add a soft glow that illuminates small spaces like table place settings, sideboards, nightstands, and niches. This festive combination is perfect not only for Halloween but also for any winter holiday where ambiance is key. To create this delightful decoration, start by selecting small styrofoam pumpkins in the desired size.
Next, determine the depth of the opening needed to accommodate your chosen votive candles. Drill out the center of each pumpkin to the required depth and remove any excess foam with a knife or craft tool. Once the hole is cut, apply a generous coat of craft glue to the outside of the pumpkin. Sprinkle gold glitter evenly over the pumpkin, allowing it to dry completely before sealing the design with a light misting of hairspray to prevent flaking.
With this simple yet effective project, you can add a radiant and inviting ambiance to your holiday gatherings.
Halloween Medley
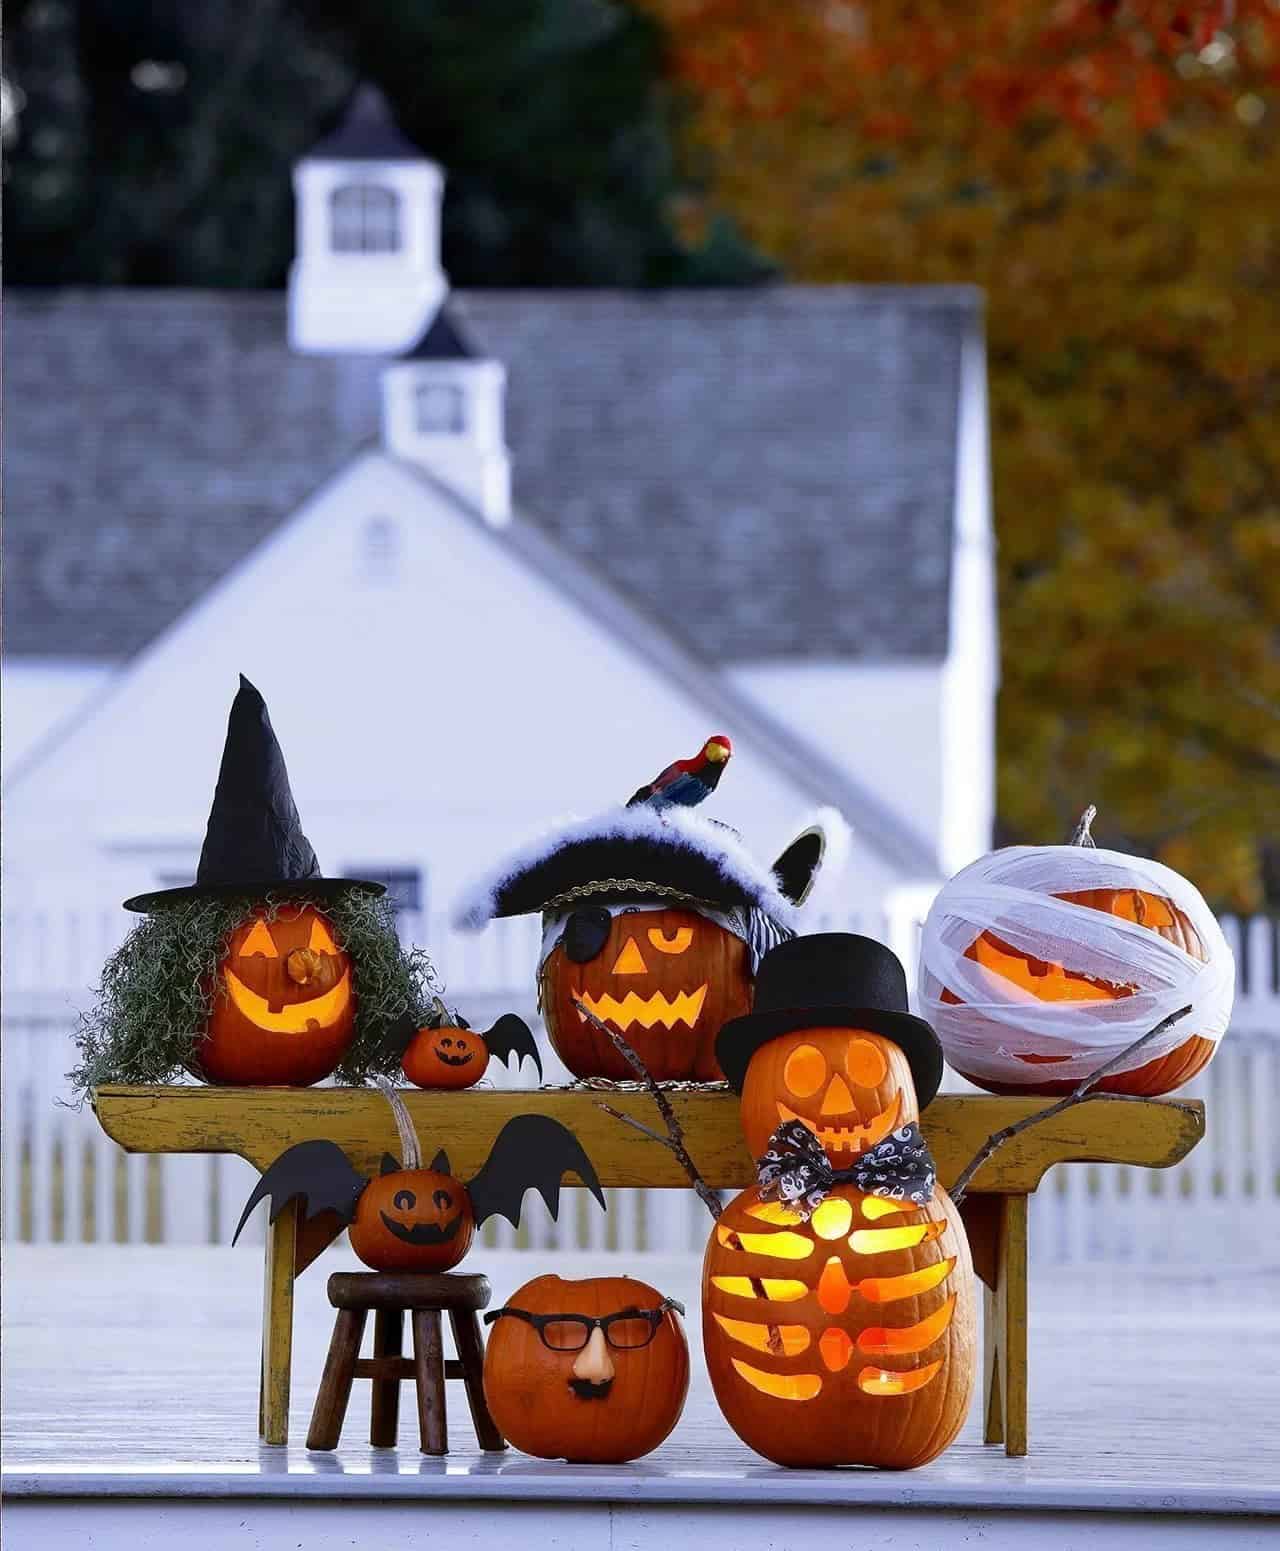
Create a hauntingly beautiful Halloween display with this diverse group of partygoers! The assortment of pumpkins in varying sizes, real or faux, serves as the perfect foundation. To add depth and texture, incorporate an array of costume pieces and accessories, carefully selecting facial features to bring each character to life. Use your pumpkin carving skills to craft unique expressions for a few, while finding fitting features for others.
This eclectic ensemble welcomes snowmen, pumpkin people, pirates, bats, witches, and mummies as honorary Halloween guests. Whether adorning a mantle, party table, front porch, or yard area, this group is sure to captivate and delight.
Address my Pumpkin
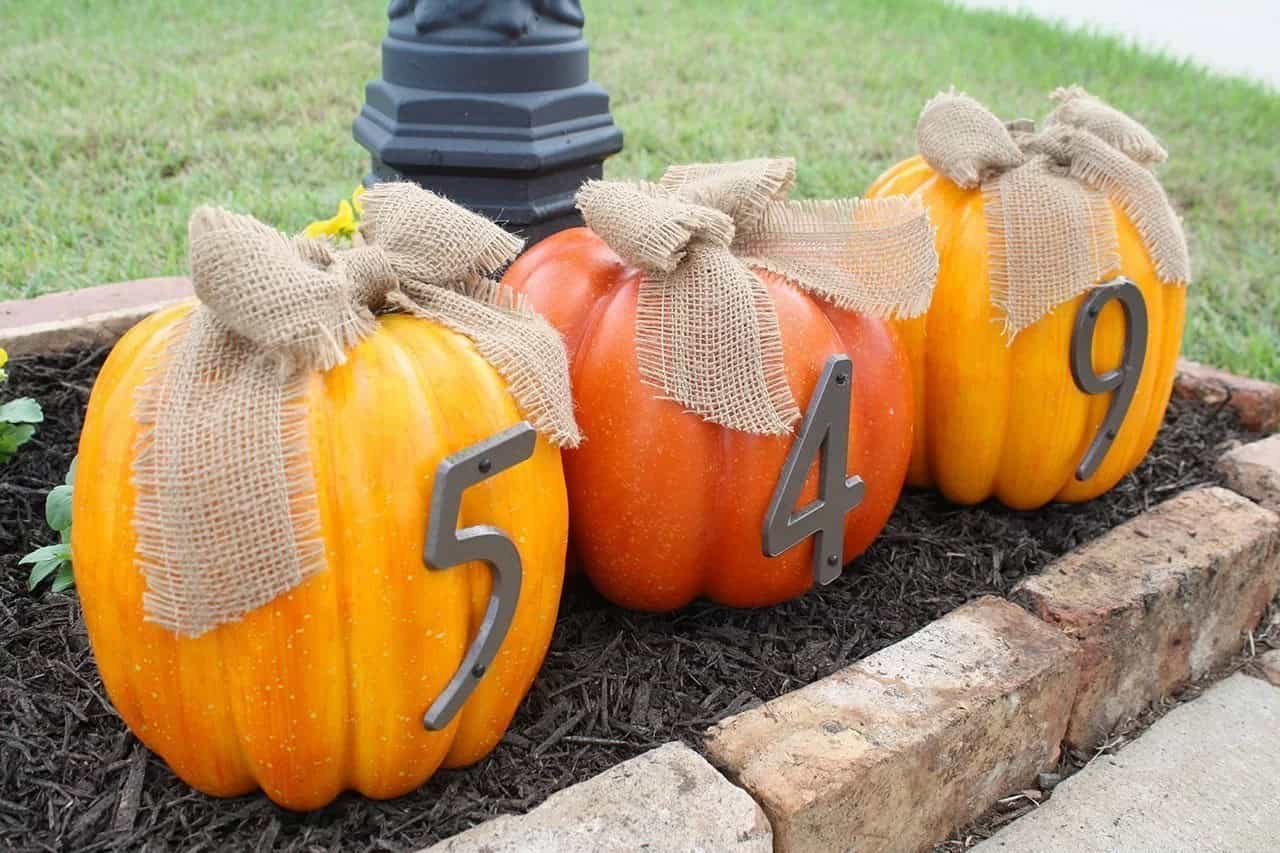
Creating a unique and functional address display for Halloween and Thanksgiving seasons can be achieved through a simple and creative project. By utilizing pumpkins as a backdrop, partygoers, trick-or-treaters, mailmen, and delivery services will appreciate the effort. Real or faux pumpkins can be used, with real pumpkins being more stable in inclement weather. The necessary materials include three large pumpkins, wooden or metal numbers, burlap for bows, and a small amount of glue.
Attach the house numbers using glue or screws that penetrate the pumpkins, then tie the burlap around the stem areas to complete the look. This personalized pumpkin address label can be placed on a curb or front stoop, providing an inviting and seasonal touch.
Snail ‘in Pumpkin
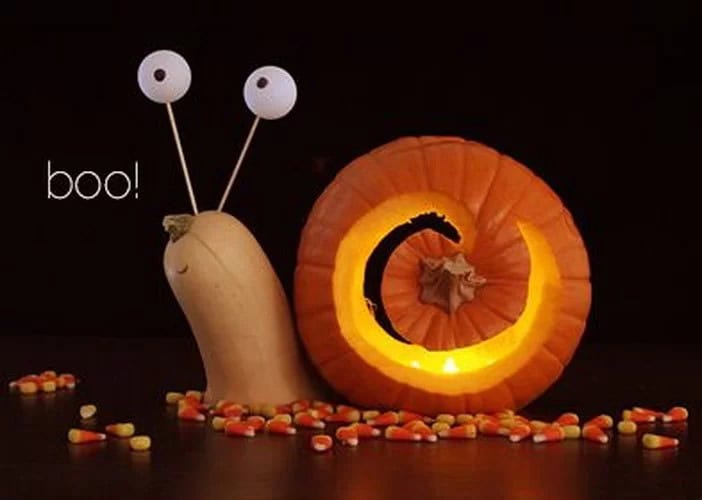
Get your kids excited about Halloween by creating a snail-shaped pumpkin display that’s both eerie and fascinating! This DIY project is an excellent way to introduce children to unique and slimy creatures like snails. The best part? It’s ridiculously easy to make. Simply carve a spiral design on the top of a pumpkin, leaving room for a chopped-off side to act as a stabilizer. Use the crown of a butternut squash as the snail’s head and secure it with wooden skewers.
Glue ping-pong balls in place to create the eyes, then add some spooky flair with a black marker to fill them in and draw on a mouth. To give your creation an otherworldly glow, place a tea candle within the pumpkin’s spiral design. This mesmerizing display will be the talk of the town – or at least your neighborhood – and can be enjoyed long after Halloween has come and gone.
Pumpkin Lady
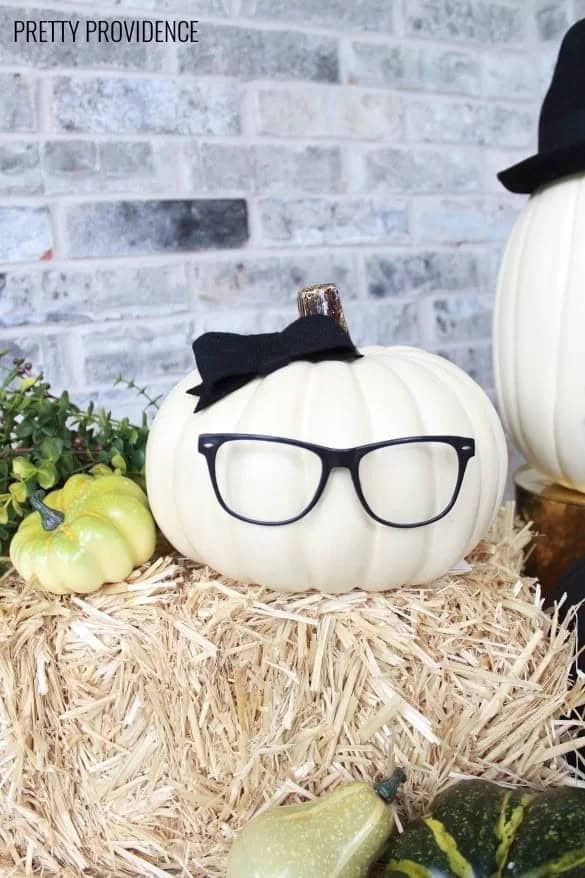
Transforming ordinary gourds into personalized representations of loved ones is a delightful way to add a touch of whimsy to your Halloween celebration. The ‘No Carve Pumpkin People’ concept, featuring simple white or cream-colored pumpkins adorned with black felt accessories, offers a charming and easy-to-execute DIY solution for decorating pumpkins.
This versatile idea can be applied to create pumpkin personas that reflect family members, friends, co-workers, executives, and other notable individuals. To get started, gather your essential materials: craft pumpkins, black felt, scissors, glue, and an assortment of accessories like hats, wigs, glasses, flowers, and mustaches. Cut out the desired facial features and hot glue them directly onto the pumpkins to bring your pumpkin people to life.
Wire and Sequin my Web
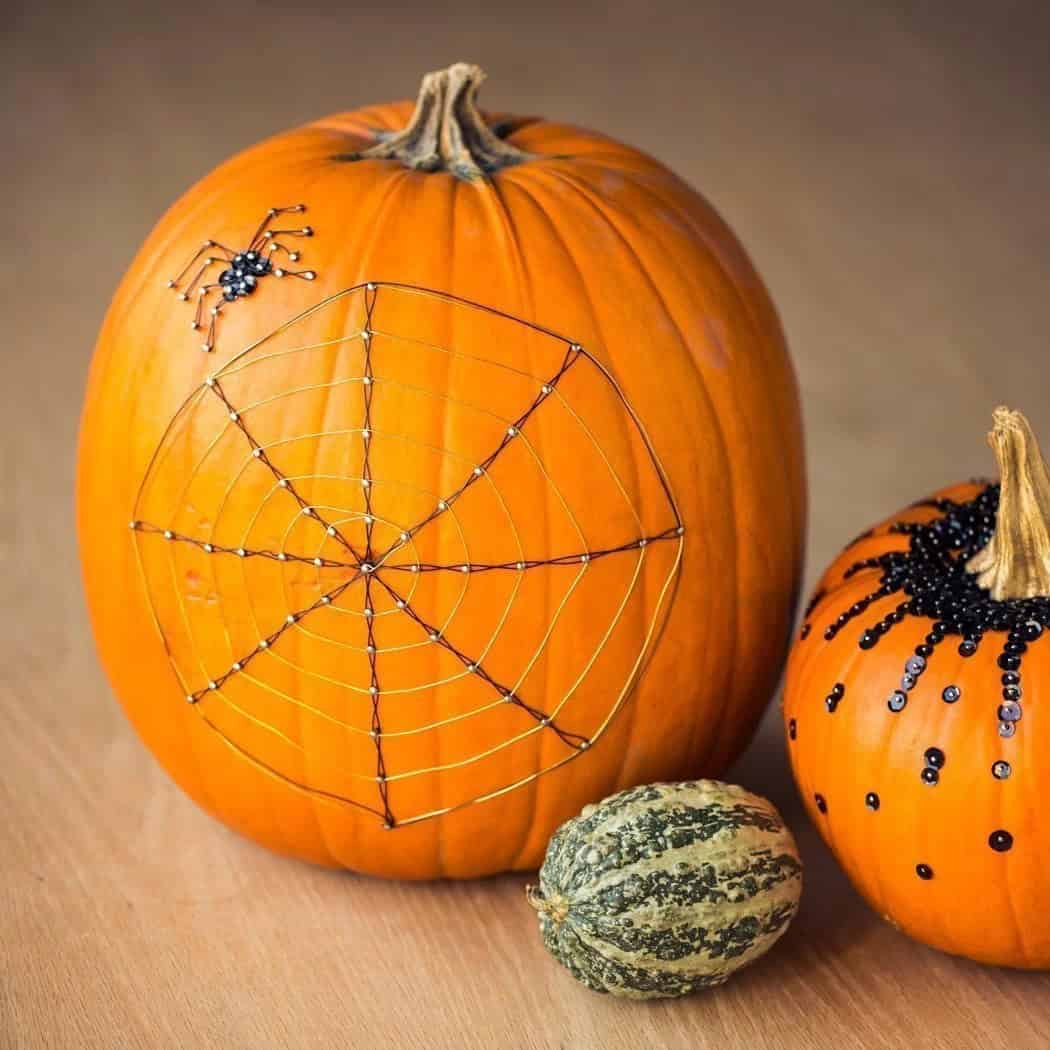
Add a touch of Halloween charm to your pumpkin decorations with a simple yet effective combination of wire and sequins. This DIY project requires minimal time and energy investment, making it perfect for busy enthusiasts or those new to crafting. Begin by marking the center of your chosen pumpkin with a small dot. From this mark, draw six smaller dots that radiate outward, creating a spider web pattern.
Secure these marked areas with small brads before weaving wire in and out to form a crisscross star-like design. Complete the pattern by adding a border of black wire around the outer edge of the pumpkin. To bring your spider to life, use wire and sequins to create its body and eight legs, adding a playful finishing touch to your pumpkin decoration.
Bat’ Tin a Thousand

Beneath their innocent appearance, these bats pack a punch. Their diminutive size belies their ferocity, making them the perfect Halloween frighteners. To create these creatures, start by painting mini pumpkins black to form the body of the bat. Then, use vinyl cutouts, adhesive-backed designs, or black tag board for the wings and ears. You can either utilize pre-made bat wing and ear patterns or draw your own and transfer them to the tag board.
Cut out the shapes and secure them to the pumpkins using hot glue. For the eyes, create patterns and add color with a magic marker, bringing these eerie bats to life.
Buttons, Bows and BOO
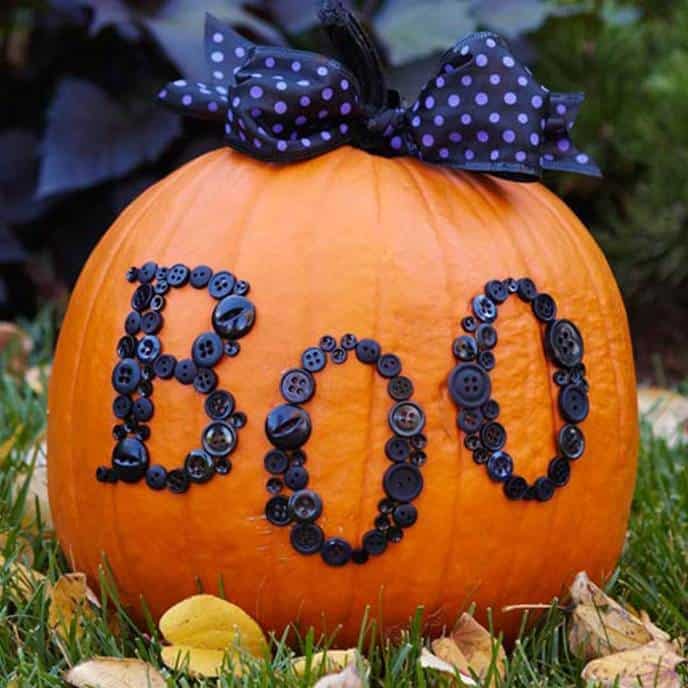
Transform an ordinary pumpkin into a charming Halloween decoration by incorporating vintage flair with buttons and bows. The design features the word BOO spelled out using various sizes of black buttons, which can be achieved by finding a large enough pumpkin. To create the lettering, use a stencil or print out letters from a downloadable pattern, cut them out, and place them on the pumpkin.
Use a pencil to trace around each letter before filling in the individual letters with buttons and securing them with hot glue. Add a touch of elegance to the pumpkin stem by painting it black and allowing it to dry. Finally, complete the look by tying a black polka dot wired ribbon into a bow around the stem.
Crazy Pumpkin Plant Trio
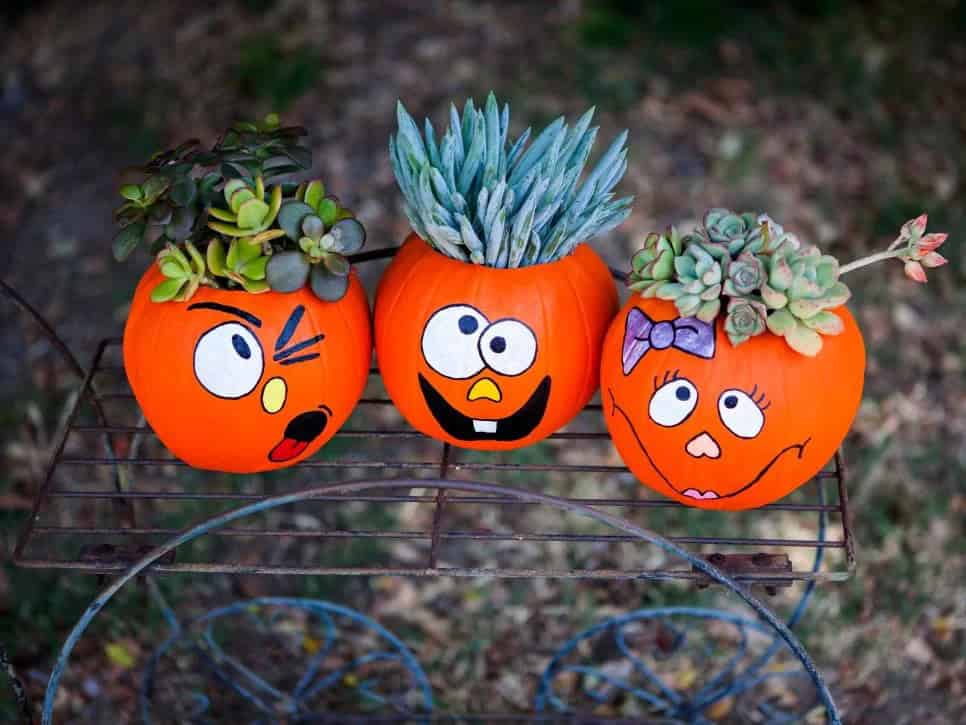
Three small pumpkins, sans stems and tops, form the unlikely foundation for a trio of quirky plant holders. To prepare, carefully remove the stem and top portion from each gourd, then thoroughly clean out the interiors. Next, create three small holes in the bottom of each pumpkin to ensure proper water drainage and prevent root damage or rot. With artistic flair, employ craft paint to imbue your pumpkins with playful or frightful visages – the goofier, the better!
Once transformed, fill each shell with a layer of soil and plant your chosen succulents. As they grow and thrive, you’ll be treated to a delightful display of greenery, all contained within these delightfully quirky containers.
Lollipop Monster Pumpkins
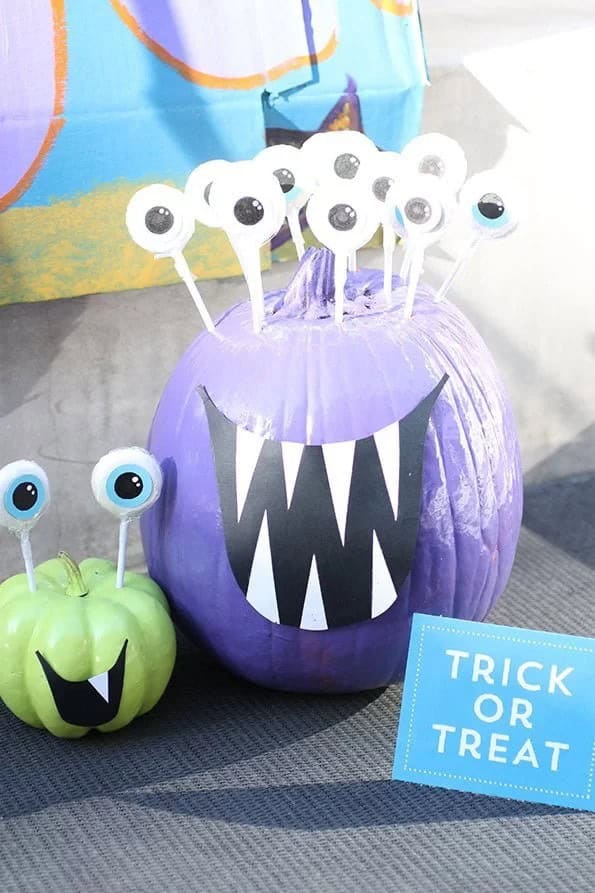
When it comes to crafting unique and playful pumpkin decorations, lollipops can be a surprisingly effective tool. By creating stalk-like eyes with these sweet treats, you can add a whimsical touch to your Halloween party setup. Two neon-colored pumpkins, complete with fang-like teeth, are an ideal centerpiece for a kid-friendly gathering. The combination of their vibrant hues and spooky-but-playful demeanor creates a perfect blend of eerie and delightful.
To bring this idea to life, simply gather some colored construction paper, paint pens, neon spray paint, wood skewers, and white lollipops. With these materials at your disposal, you’ll be well on your way to creating two pumpkin masterpieces that are sure to captivate kids and adults alike.
Wrapped in Lace
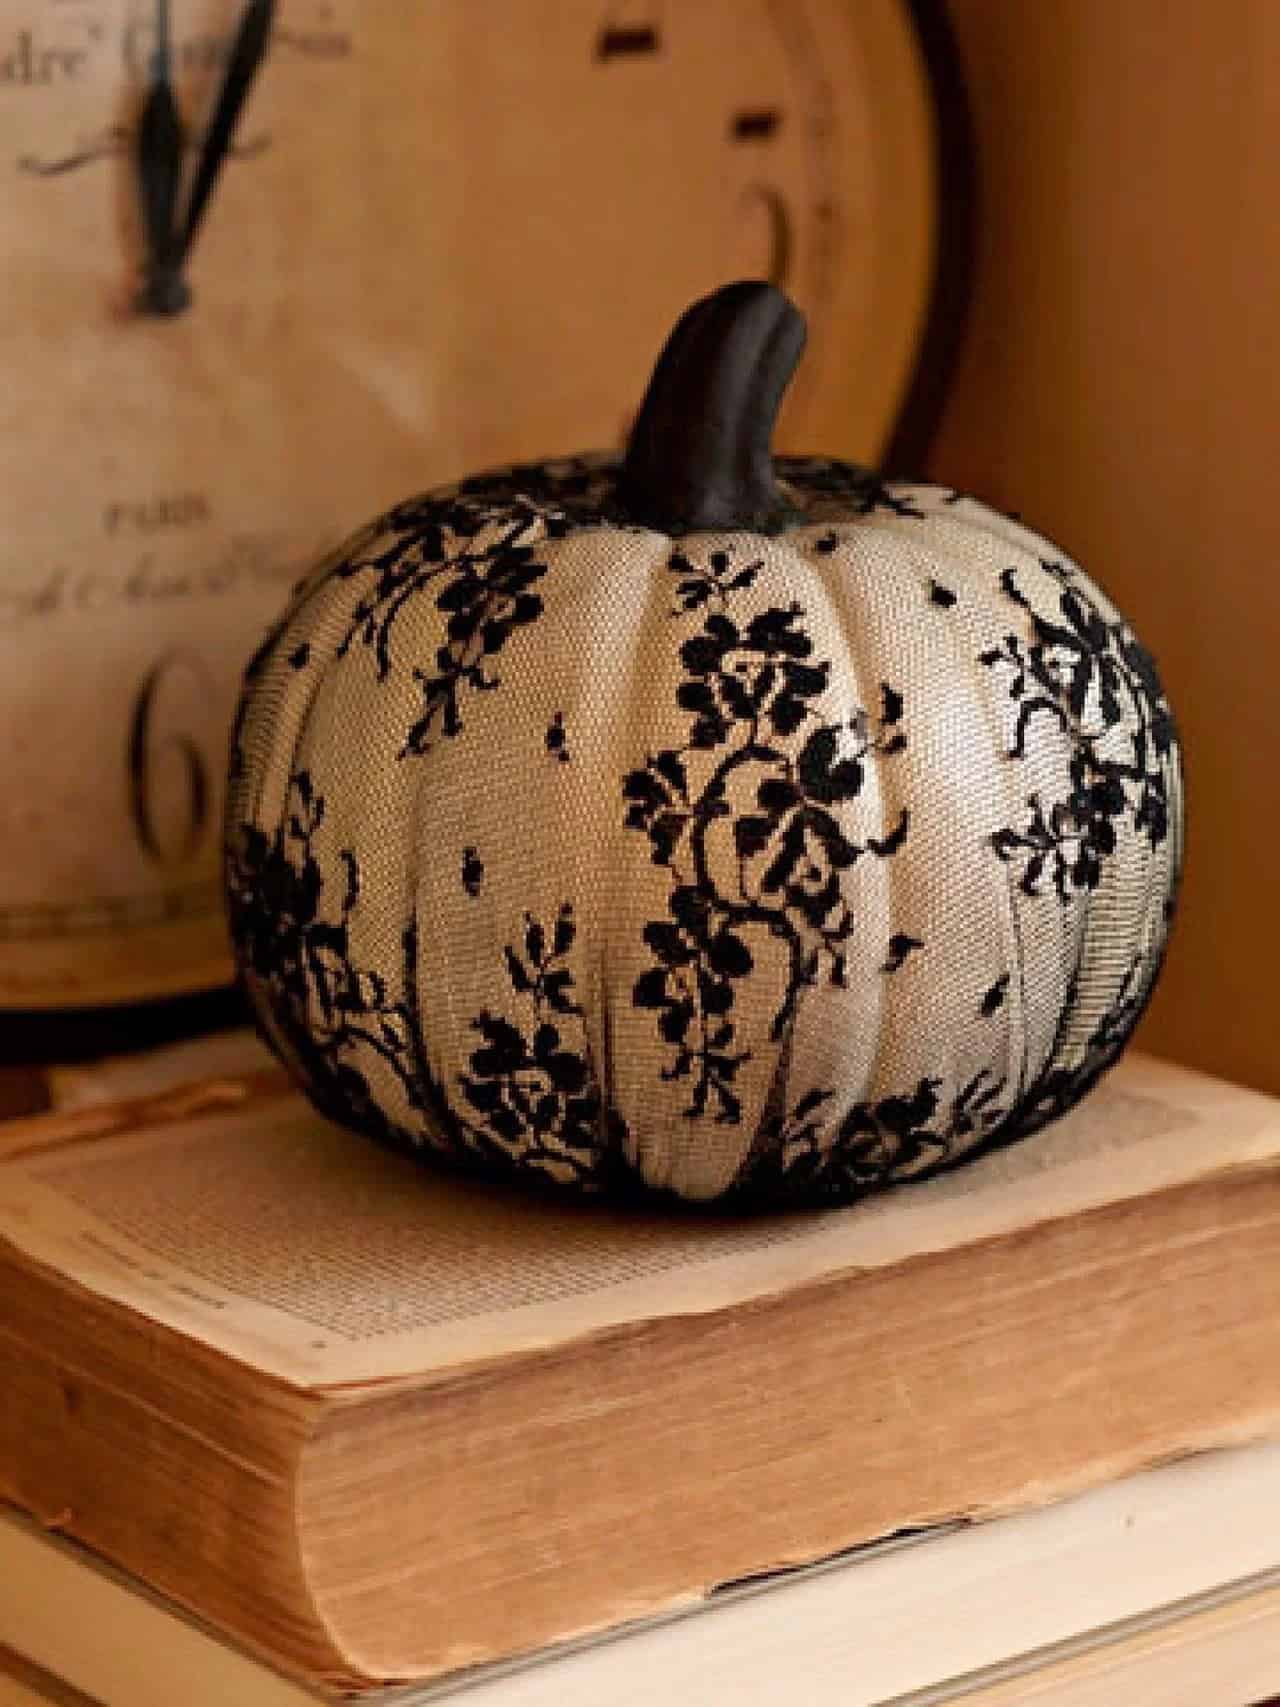
Transforming a plain pumpkin into a showstopper is as effortless as wrapping it in embroidered lace. The choice of lace depends on the pumpkin’s natural color or any painted designs. For a medium to large pumpkin, buy enough fabric to cover the top and gather it at the bottom. Identify the stem opening and mark its position before cutting a circle for the stem using scissors.
Place the lace over the stem area and secure it by gathering the fabric to the bottom of the pumpkin, trimming away any excess, and fastening with stitching or fabric glue.
Split Mummy
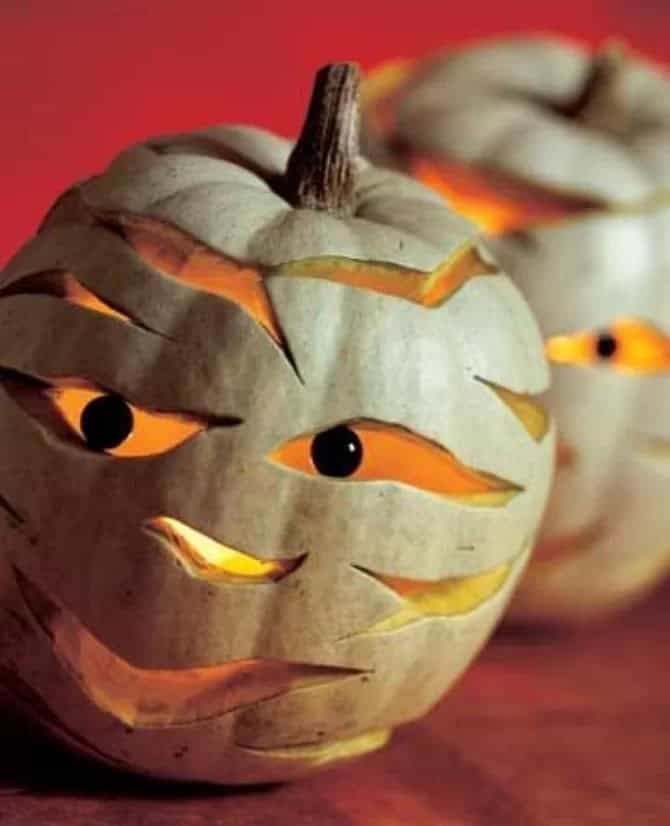
As you approach your Halloween celebrations, it’s hard to imagine a more iconic symbol than a lifelike mummy pumpkin guarding your porch or table. While creating this realistic mummy requires some carving expertise, the process is still accessible with a little practice. Start by using a regular-sized natural white pumpkin and carefully cut off its top portion. Next, scoop out the innards, clean and dry both the inside of the pumpkin and the lid.
To add an eerie touch to your mummy’s gaze, use two flat toothpicks to create a foundation for the black marble eyes. Insert the toothpicks into each eye opening at the right depth, then glue the marbles to their ends using a glass-safe adhesive. Allow the areas to thoroughly dry before moving on to the next step. For an even spookier effect, consider placing a candle within the pumpkin to illuminate its face and cast an otherworldly glow.
Pumpkin Baubles
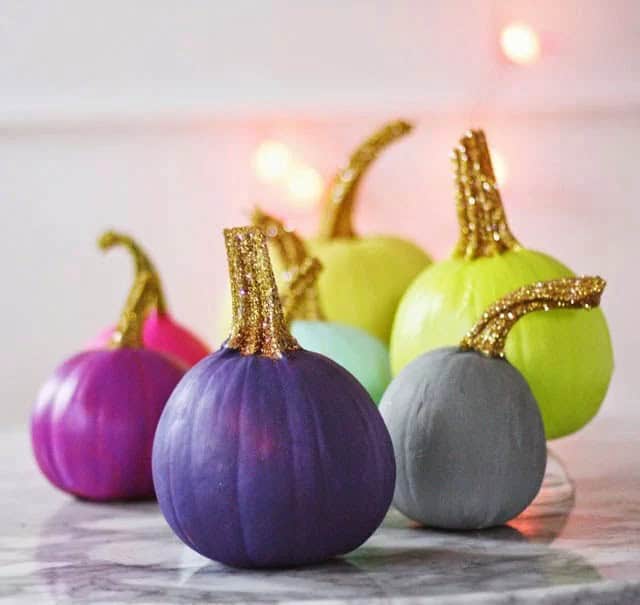
Transforming pumpkins into festive decorations is a breeze! With real or faux pumpkins as the base, you can unleash your creativity by painting designs that evoke holiday cheer. This particular idea is reminiscent of Christmas tree balls and baubles, but it’s equally suitable for any seasonal celebration, including Halloween. These decorative pumpkins can be arranged in baskets or trays, lined up on shelves, used as a centerpiece, or strategically placed throughout the house or outdoor spaces.
To create this look, start with small pumpkins featuring long stems. Then, get creative with an assortment of paint colors and apply them to the pumpkin up to the stem. Allow the paint to dry before adding a generous amount of white tacky glue to the stem. Next, sprinkle the stems with glitter and let it set. Finally, gently brush away any excess glitter using a dry sponge.
Eye Candy Sweet Skull
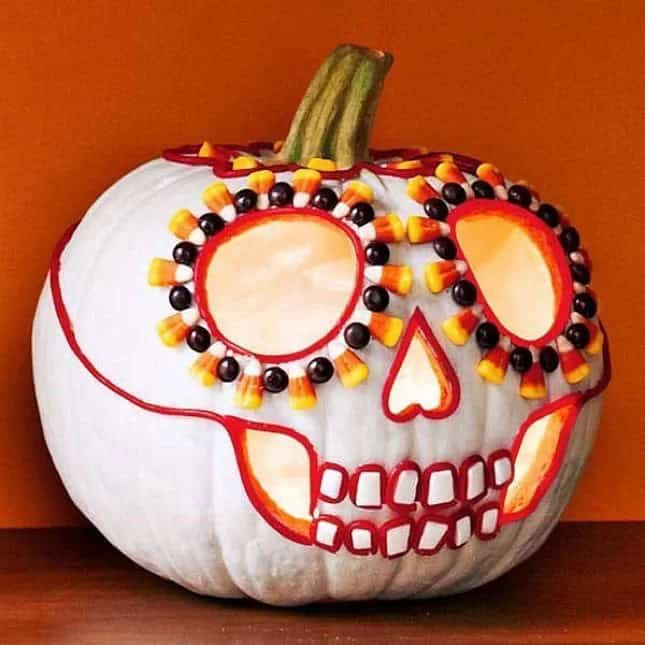
In Mexico’s vibrant tradition of Dia de los Muertos, sugar skulls play a significant role in honoring the deceased. This unique holiday celebrates life by commemorating those who have passed on. One creative way to bring this festive spirit to your Halloween gathering or outdoor decor is by crafting a pumpkin replica of these iconic sugary skulls. The end result is an eye-catching and unconventional centerpiece that shines when illuminated.
To create this masterpiece, start with a white pumpkin and carve out the eyes, heart-shaped nose, and chiseled cheeks. Remove any debris and use special craft glue to secure candy decorations. Arrange corn candy and M&Ms around the eyes, and outline the area with red licorice. For added authenticity, use square gum pieces in white to create the teeth. This easy pumpkin carving idea is perfect for anyone looking to add a touch of Dia de los Muertos flair to their Halloween celebrations.
Plan, Relax and Enjoy
When it comes to pumpkins, the possibilities seem endless. With hundreds of decorating ideas out there, it’s natural to feel overwhelmed. To simplify the process, consider categorizing your options by level of difficulty, personal taste, and time constraints. While carvings can be a labor-intensive but rewarding experience, other pumpkin decorations can be quick and easy to achieve. In today’s fast-paced world, crafting doesn’t have to be expensive or stressful.
Set aside some time, start with a simple idea, and involve your family – especially the kids! The key is to have fun and enjoy the process. That’s what Halloween decorating is all about.