Embracing the magic of Halloween, pumpkin carving is an ideal way to tap into the festive spirit and infuse your home with a touch of DIY flair. This beloved activity transcends age barriers, making it an excellent opportunity to bond with loved ones, whether that’s your kids or fellow enthusiasts. From eerie designs to playful patterns, we’ll provide inspiration for all types of pumpkin carvers.
53 Sweet Pumpkin Carving Ideas You Don’t Want to Miss
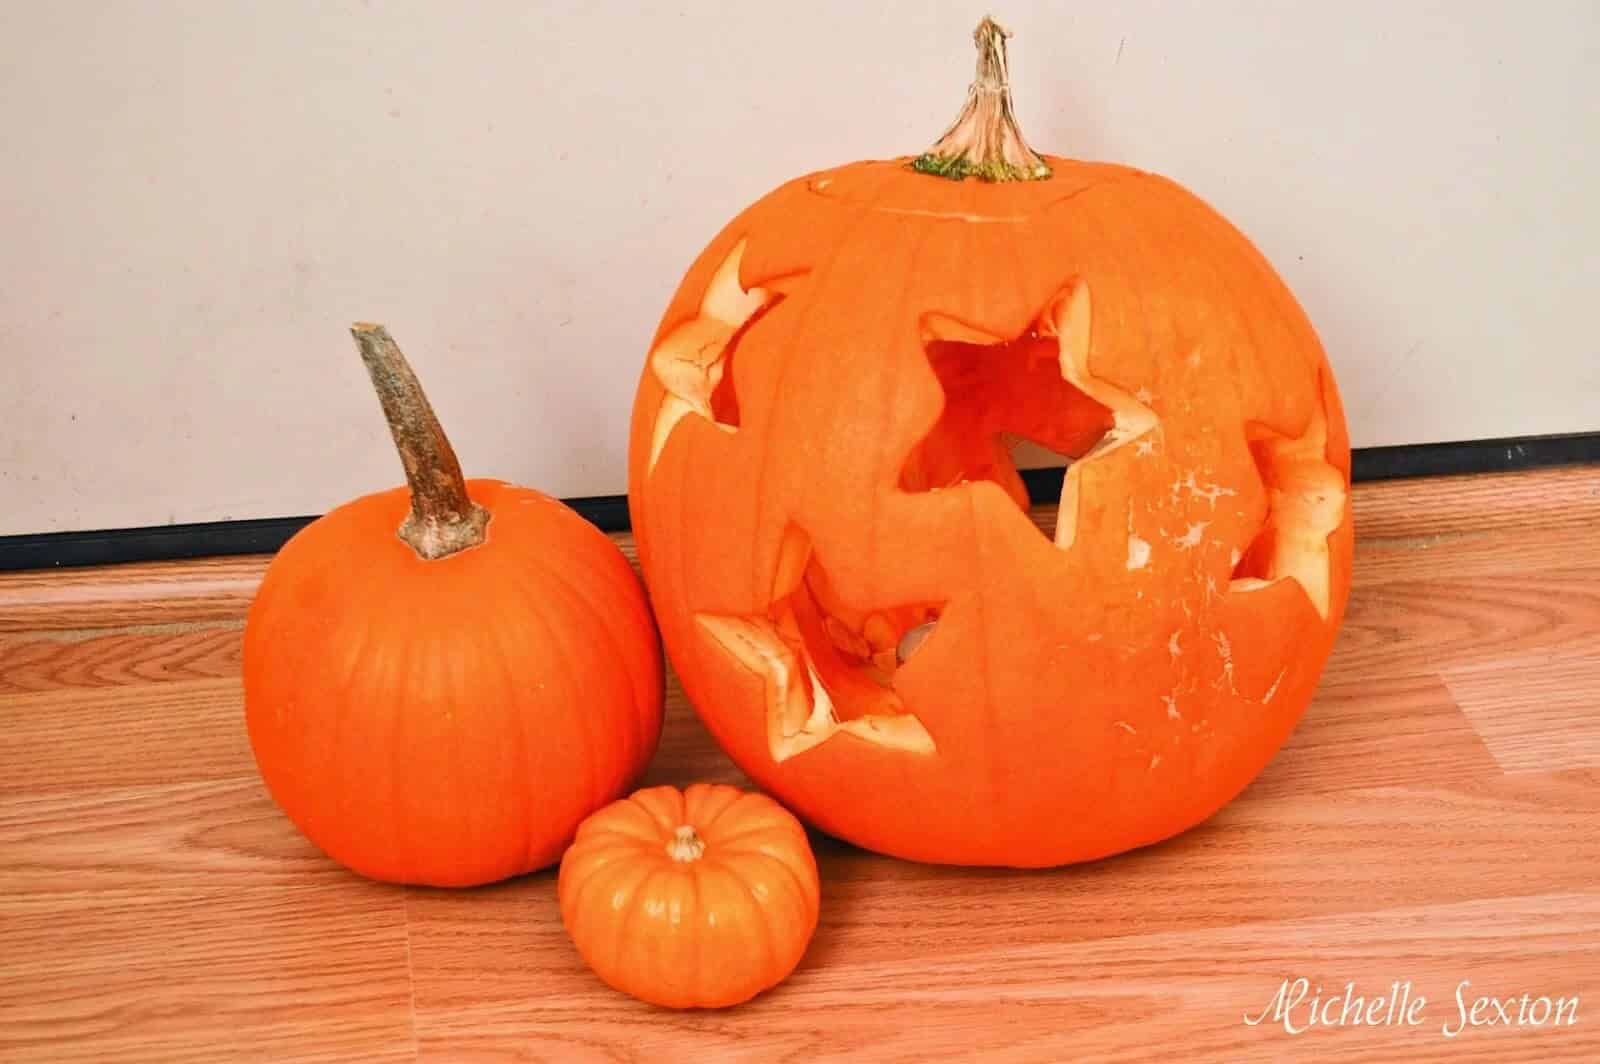
How To Carve A Pumpkin
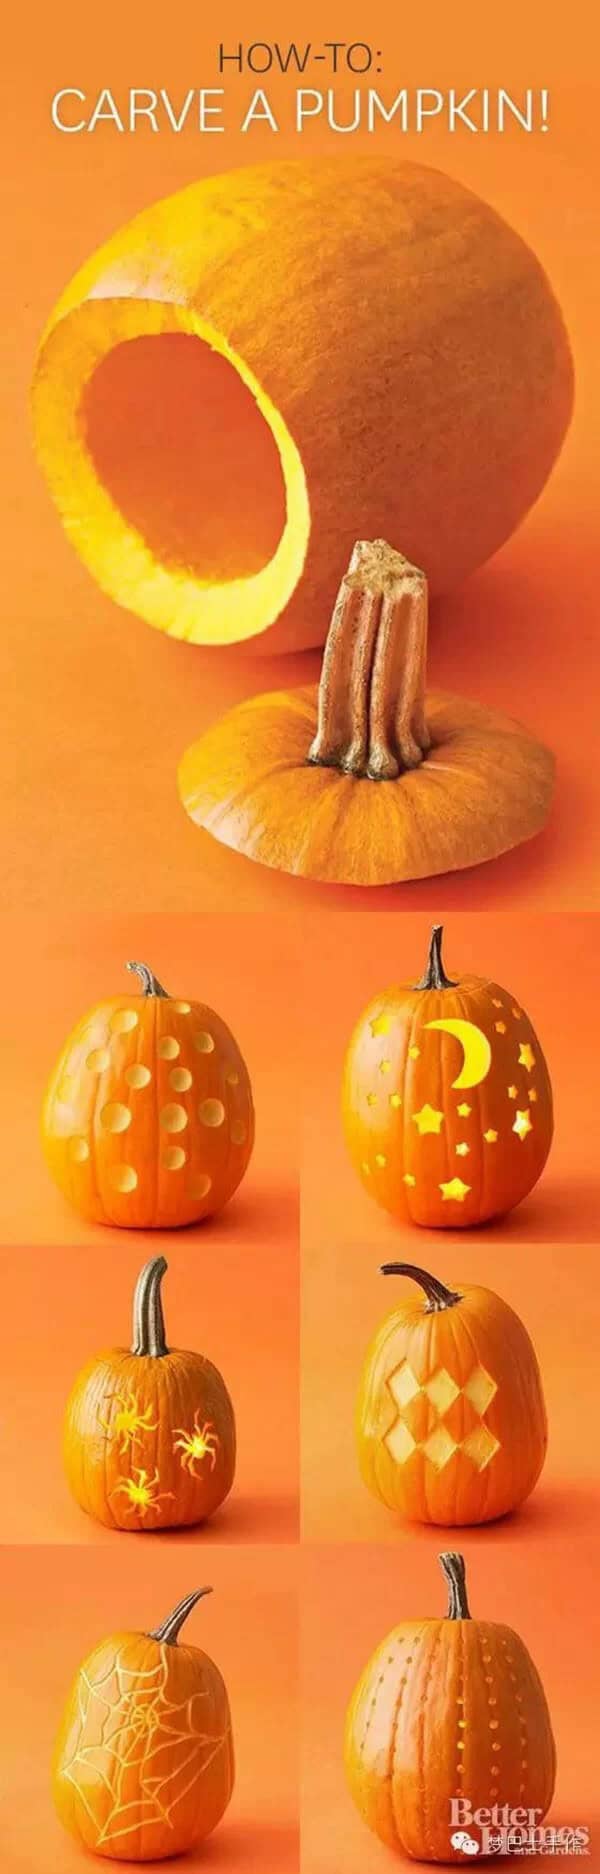
Before diving into the carving process, start by selecting a pumpkin that suits your design. Ensure you have all the necessary tools within arm’s reach, including a serrated knife, a large spoon, and a carving saw or other specialized utensils. Once you’ve got your pumpkin prepped, begin by cutting off the top with a precise cut from a serrated knife. Next, use the same spoon to remove the seeds, as well as some of the fibrous pulp and flesh.
Discard this unwanted material unless you plan on saving the seeds for snacking. Now that the pumpkin’s interior is tidy, you’re ready to start carving! If you’ve chosen a template, adhere it to your pumpkin and use a sharp object to carefully create perforations along the template’s lines. Remove the template and follow the dotted lines to achieve your desired design. Alternatively, place tracing paper beneath the template and tape them together.
Use a pen to meticulously trace over the template, then remove it to reveal your guide. Carve along these traced lines to produce impressive Halloween decorations. To complete the classic Jack-o-Lantern look, place a tea light candle in the center of your carved masterpiece.
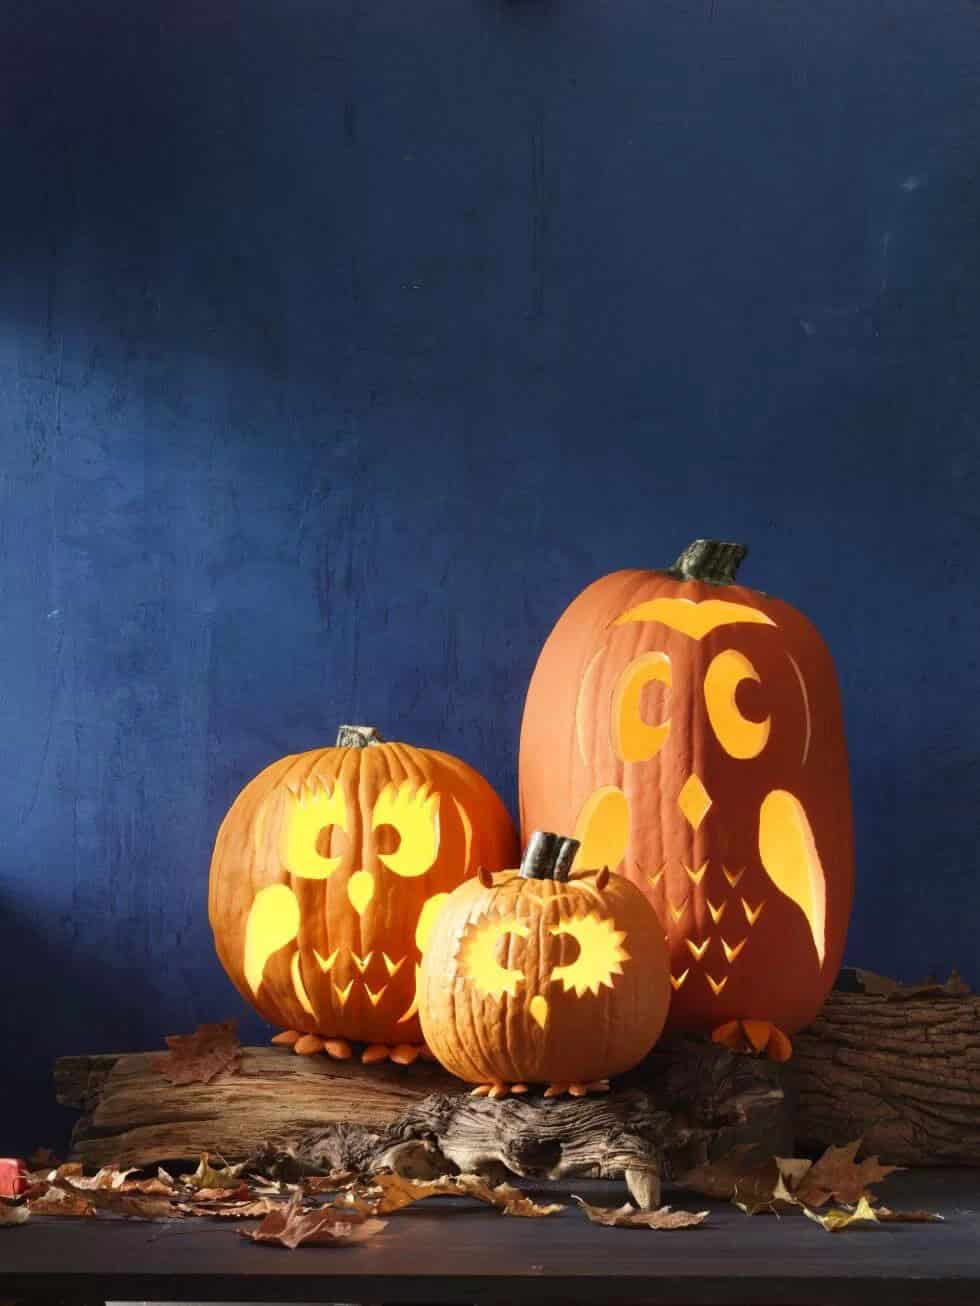
What a Hoot!
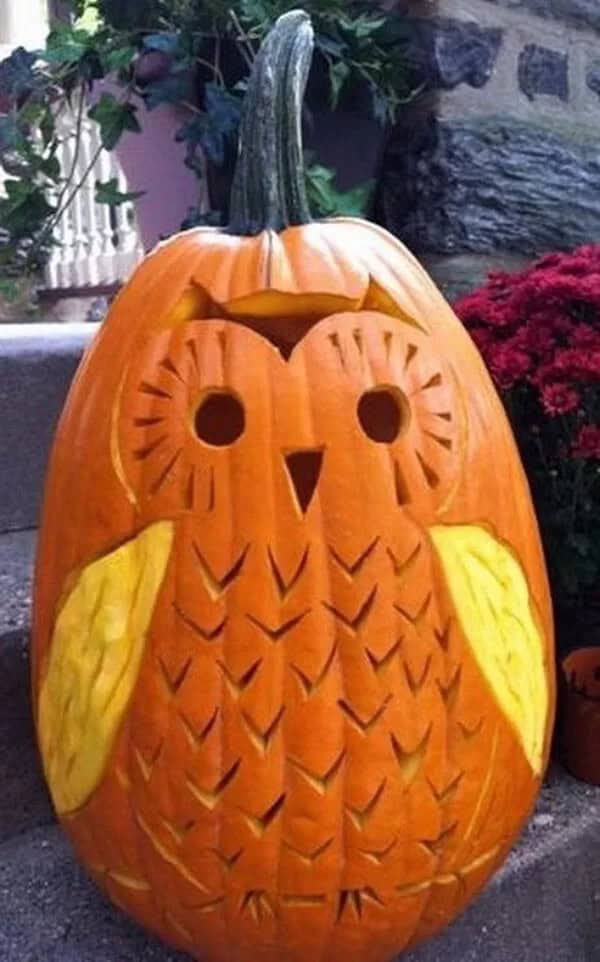
Create a unique owl pumpkin without a template! Start by carving basic circles for the eyes and a triangle for the nose. For the body, use several V’s close together to mimic an owl’s feathered appearance. While you can carve out the wings entirely, consider leaving them partially intact to create a striking contrast in color and texture with the rest of your pumpkin. This simple design allows for creative freedom and produces a one-of-a-kind fall decoration.
You Name It
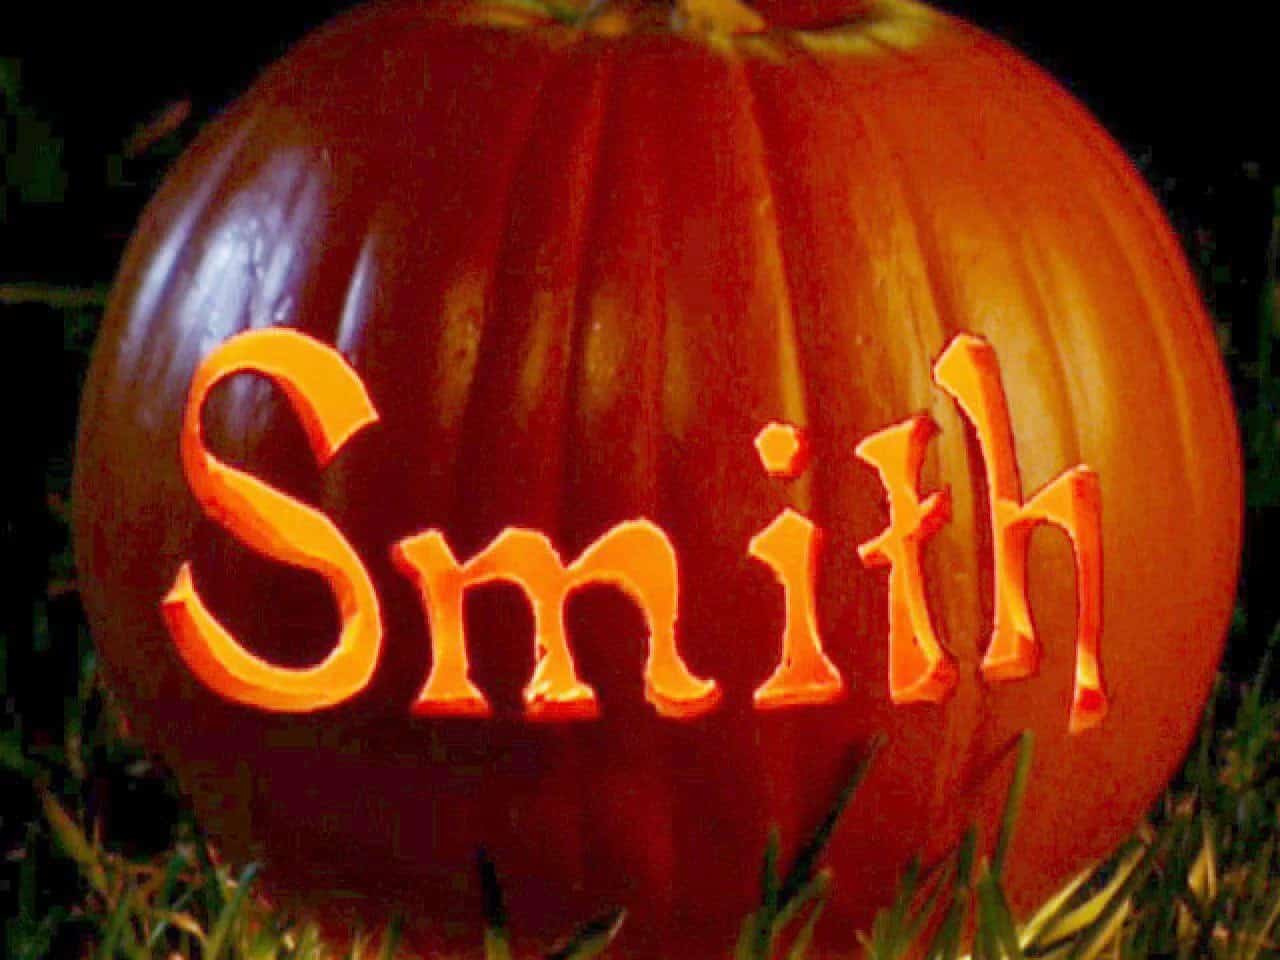
To elevate the humble Halloween decoration, try adding a personal touch by incorporating your name into the design. A simple yet effective approach is to carve or paint your initials onto a pumpkin. You can use pre-made lettered stencils or get creative and draw your own unique design. This thoughtful touch makes for a striking display on your front porch or near the entrance of your home, with the flickering candlelight drawing attention to your personalized message.
Hungry Monster

While the flair.be design might require a bit more effort than some others, the end result will be well worth it. For the smaller pumpkin, simply carve wide eyes and a mouth to create a frightened expression. As for the larger pumpkin, focus on carving a wider mouth at one end, ensuring that your small pumpkin can fit snugly inside.
Easy Spelling
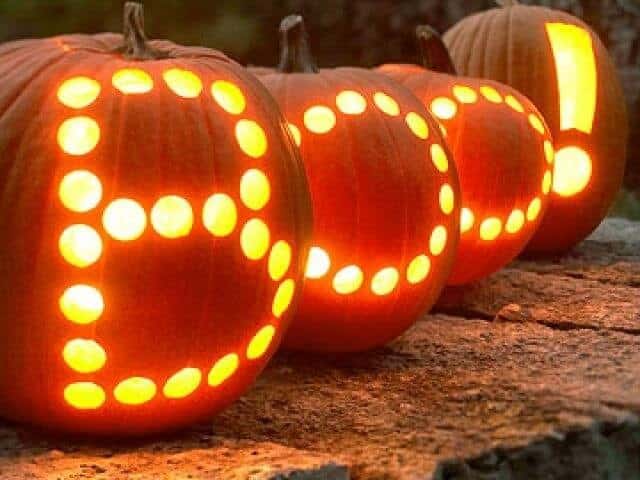
For a delightfully easy and creative pumpkin carving idea, look no further than this clever arrangement. While you will need multiple pumpkins to achieve the desired effect, the actual carving process is surprisingly straightforward! The key to this design lies in writing a Halloween-themed word using individual pumpkins, each adorned with small circular letters. You can either freehand these circles or utilize a stencil for added precision.
Alternatively, feel free to get creative and develop your own unique lettering style.
Carve Your Pumpkins With A Drill
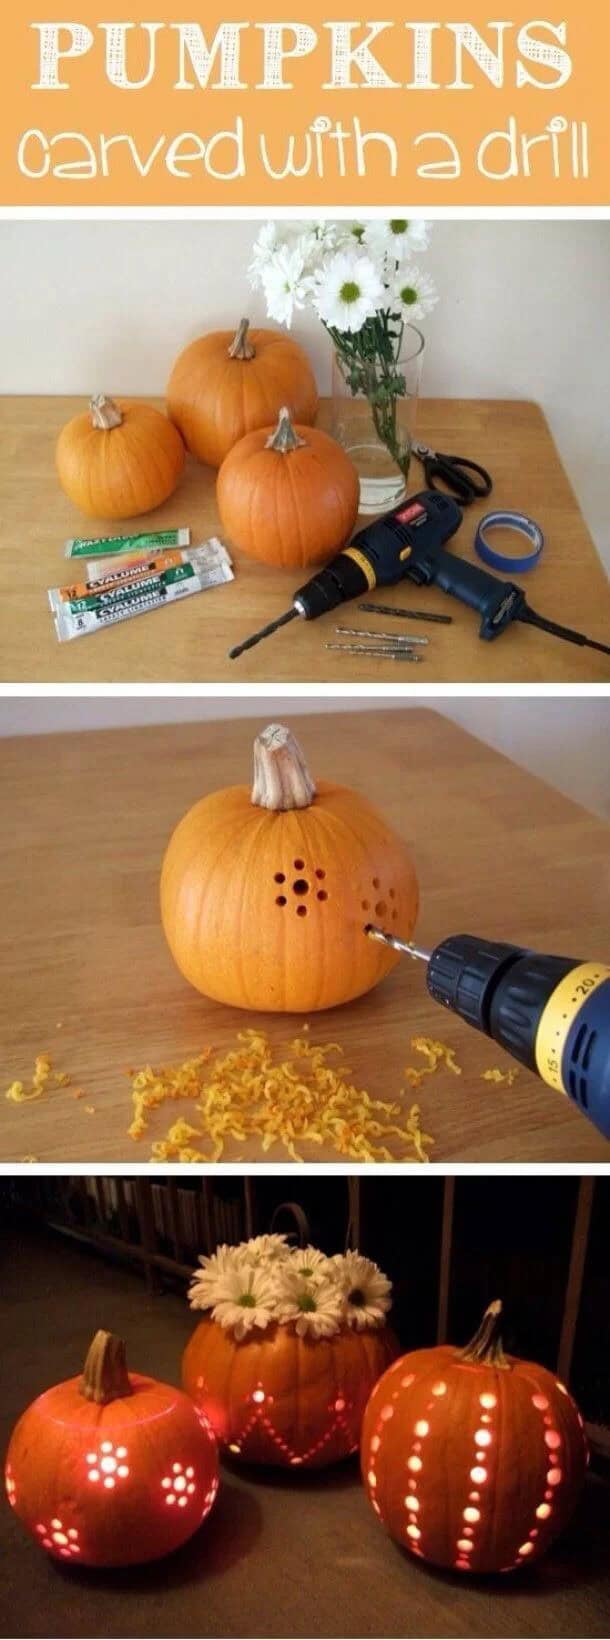
Looking for a creative twist on traditional Halloween decorations? Ditch the carving saw and opt for a drill instead! You can use a drill on most pumpkin sizes, but be prepared to switch out your drill bit depending on the size of the gourd. For added precision, masking tape makes an excellent guide when creating repeated patterns. This innovative approach allows you to keep your pumpkins on display throughout the entire fall season, not just limited to Halloween.
With a little creativity and some drilling know-how, you can create unique and captivating decorations that will impress friends and family alike.
Jack Skellington Inspired
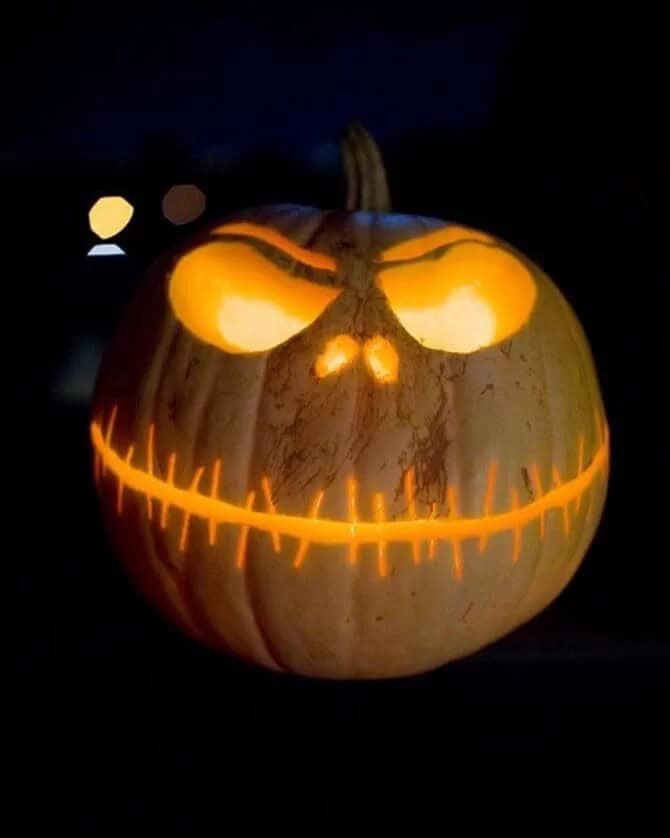
Transform your pumpkin into a terrifying visage with this spooky design! To create a face that will send shivers down the spines of unsuspecting trick-or-treaters, start by carving a deep, straight line across the front of the pumpkin to form the mouth. Add a touch of realism with haphazard, tiny vertical lines through the mouth, mimicking stitches. Don’t forget to add eyebrows that match the eyes for a truly malevolent expression.
With this simple yet effective design, you won’t need a template to unleash your inner jack-o’-lantern.
Open Top Pumpkin
When crafting this distinctive design, you’ll forgo putting the top back on your pumpkin after cutting it with a serrated knife. Instead, carve a design into the top of the pumpkin, complementing the face you’ve already created. While requiring a bit more effort, the payoff is well worth it – a stunning visual that’s enhanced by the warm glow of a candle placed inside. Opt for simple yet elegant patterns like florals or geometry to harmonize with this style.
Angler Fish Pumpkin
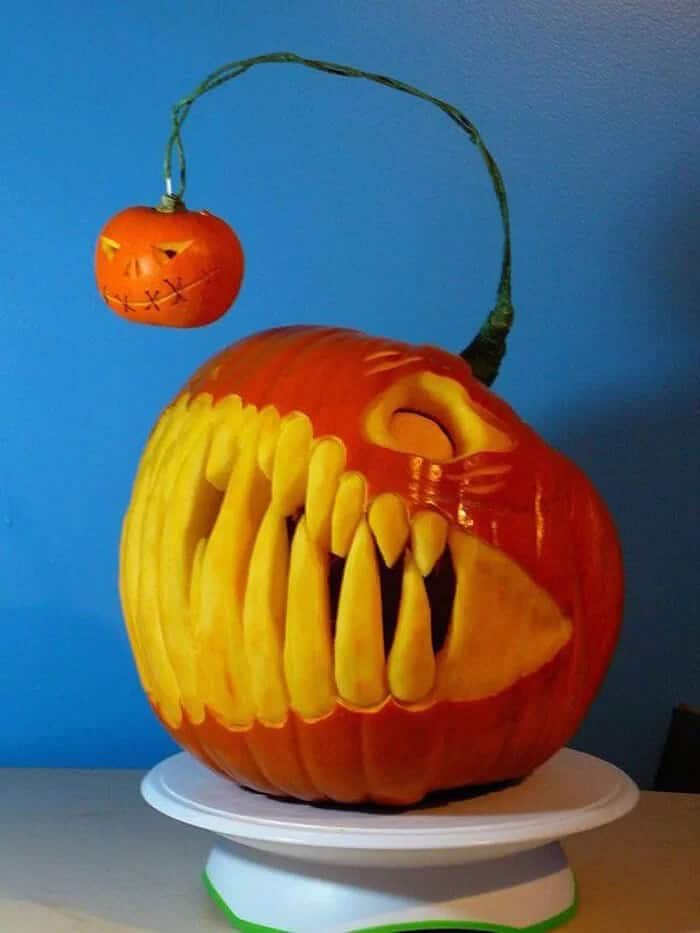
For thrill-seeking pumpkin carvers, this design is an excellent opportunity to flex your creative muscles! To bring this template to life, you’ll require a large pumpkin and one of its smallest counterparts. The smaller pumpkin will serve as the ‘head’ or facial feature, attached to the larger one from the top. You can achieve this attachment in various ways – feel free to experiment and find the method that works best for you.
With the face design out of the way, focus on crafting those eerie teeth! As you delve deeper into the carving process, your artistic abilities will truly shine through.
Fairy Dust
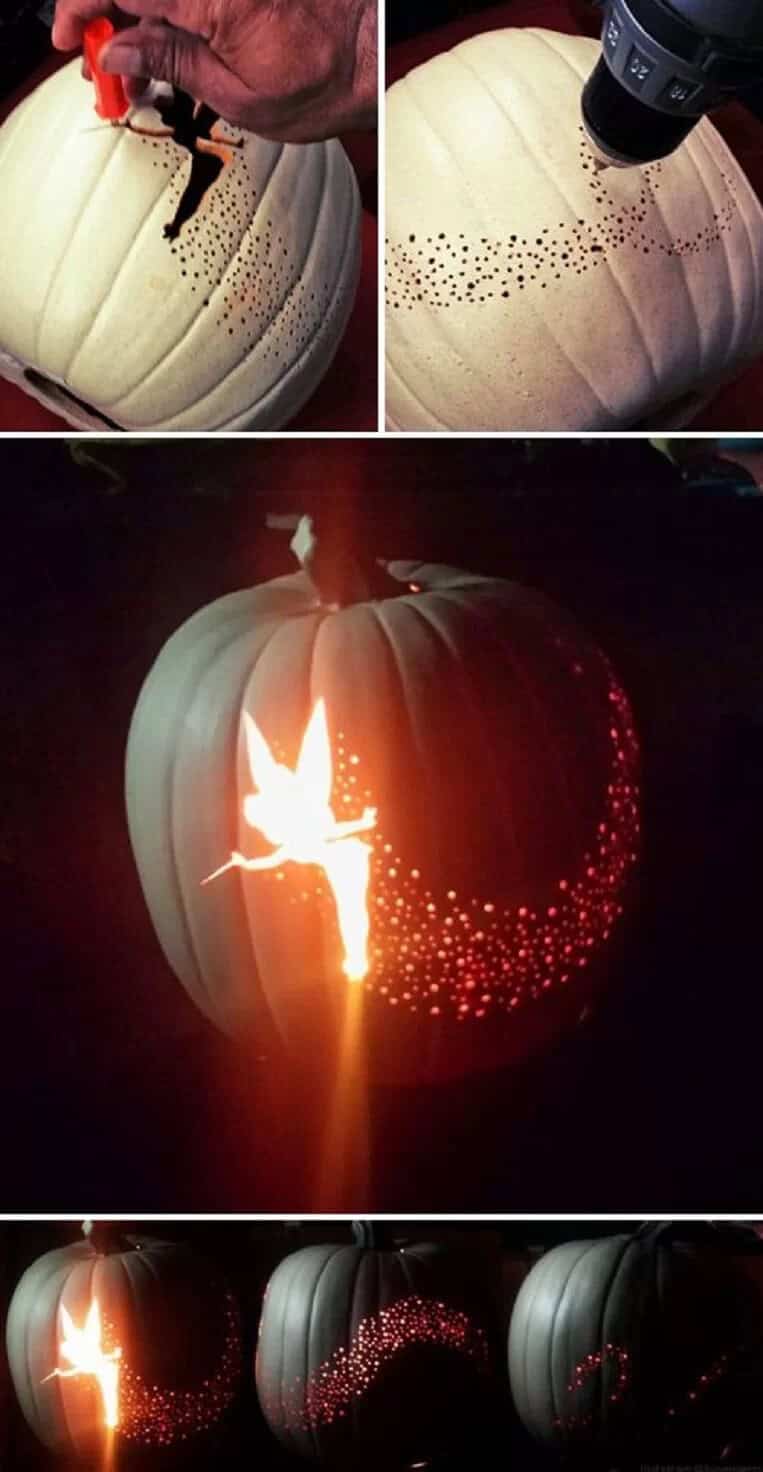
For Disney enthusiasts, a Tinkerbell-inspired pumpkin is a must-have for Halloween. To achieve this whimsical design, a template is highly recommended to ensure precision in carving the fairy’s features. A very precise carving tool will be necessary to bring this magical character to life. Once the fairy is carved, attention can turn to creating the pixie dust effect – a sprinkle of stars and sparkles underneath the fairy that can be customized with personal touches.
This unique pumpkin design is sure to delight friends and family alike.
Golden Geometric Patterns
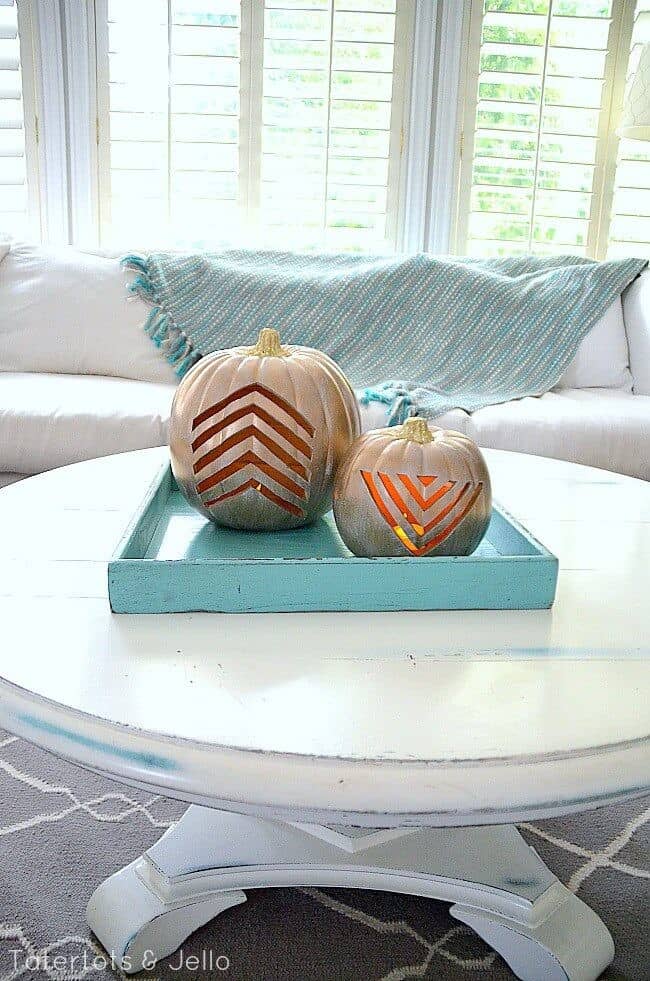
For those seeking an elegant and sophisticated fall-themed pumpkin design, this particular carving idea is sure to impress. To achieve this refined look, you’ll need to deviate from traditional carving supplies by incorporating gold accents. Begin by using a geometric stencil to carve your desired pattern onto the pumpkin. Once satisfied with the design, take it to the next level by applying a metallic sheen using gold spray paint or adding an extra layer of glamour with gold glitter.
This added touch will undoubtedly give your pumpkin an air of sophistication and set it apart from more traditional Halloween-inspired designs.
Minions
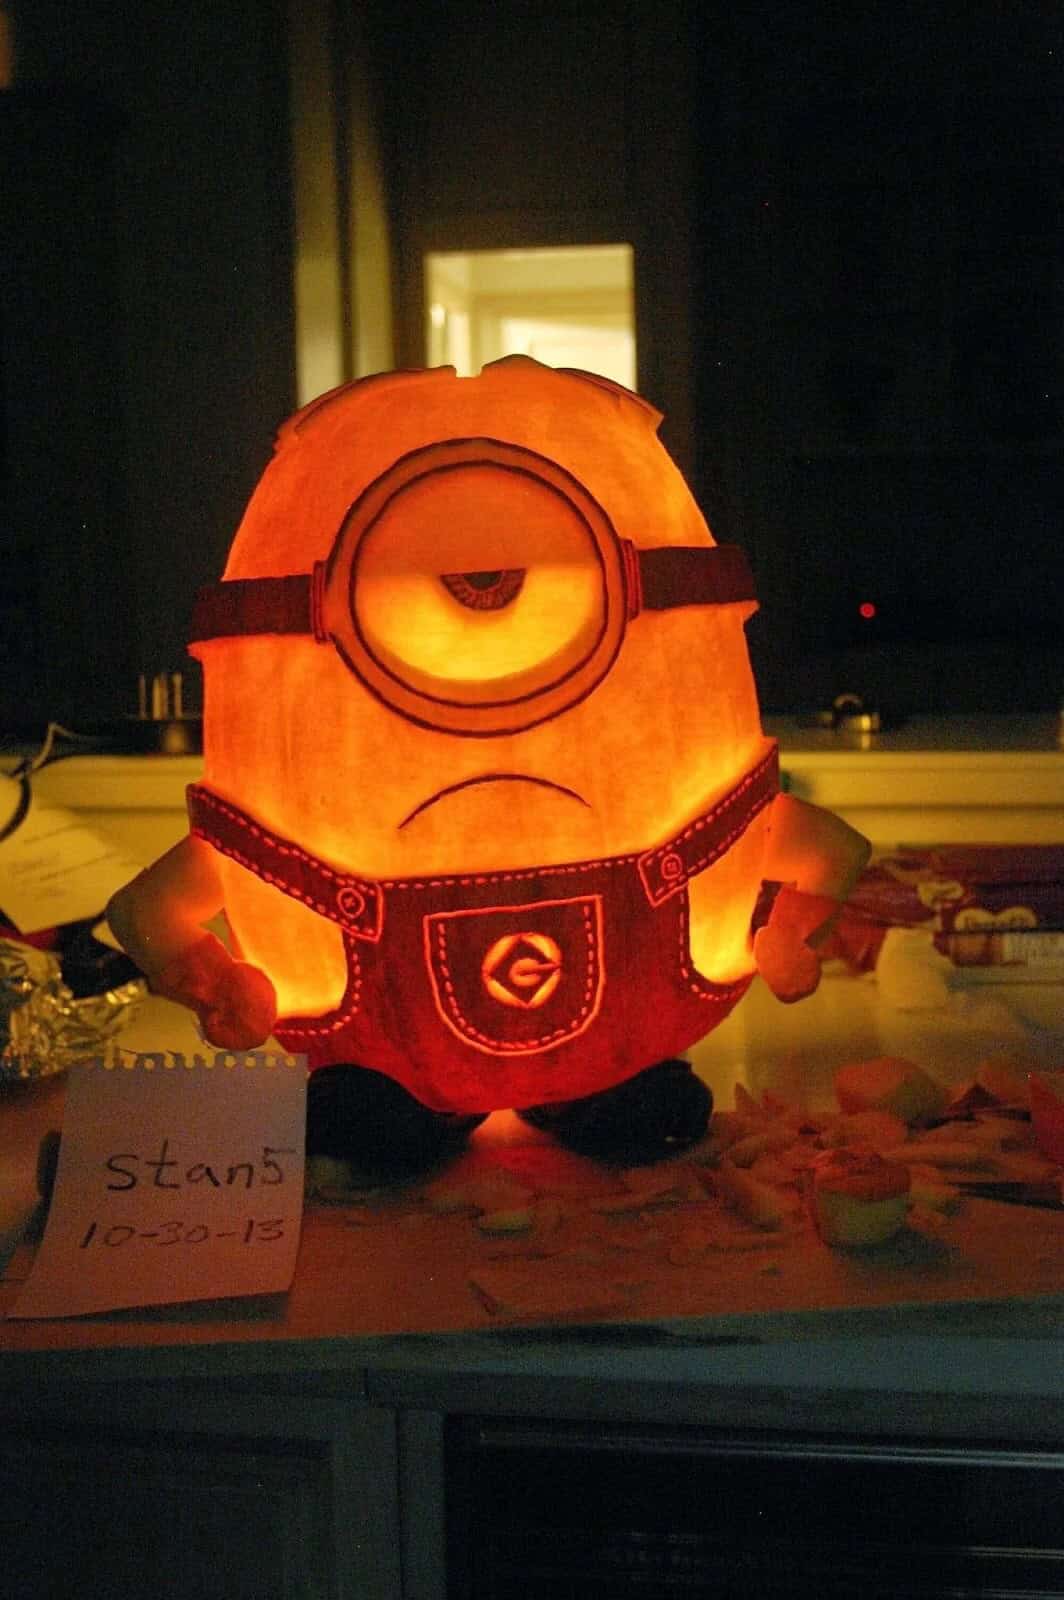
Minions are undoubtedly one of the most lovable and quirky characters from the world of Despicable Gru. This Halloween season, why not bring some whimsy into your home decor by crafting a Minion-themed pumpkin design? The beauty of this project lies in its versatility – you can easily customize it to depict a happy, sad, or even terrified Minion face! Simply start with a standard pumpkin carving approach and then add the iconic Minion features.
To take it up a notch, carve out the top portion of the pumpkin to give it a more rounded, minion-like shape. This DIY project is sure to delight both kids and adults alike.
The Cookie Cutter Trick
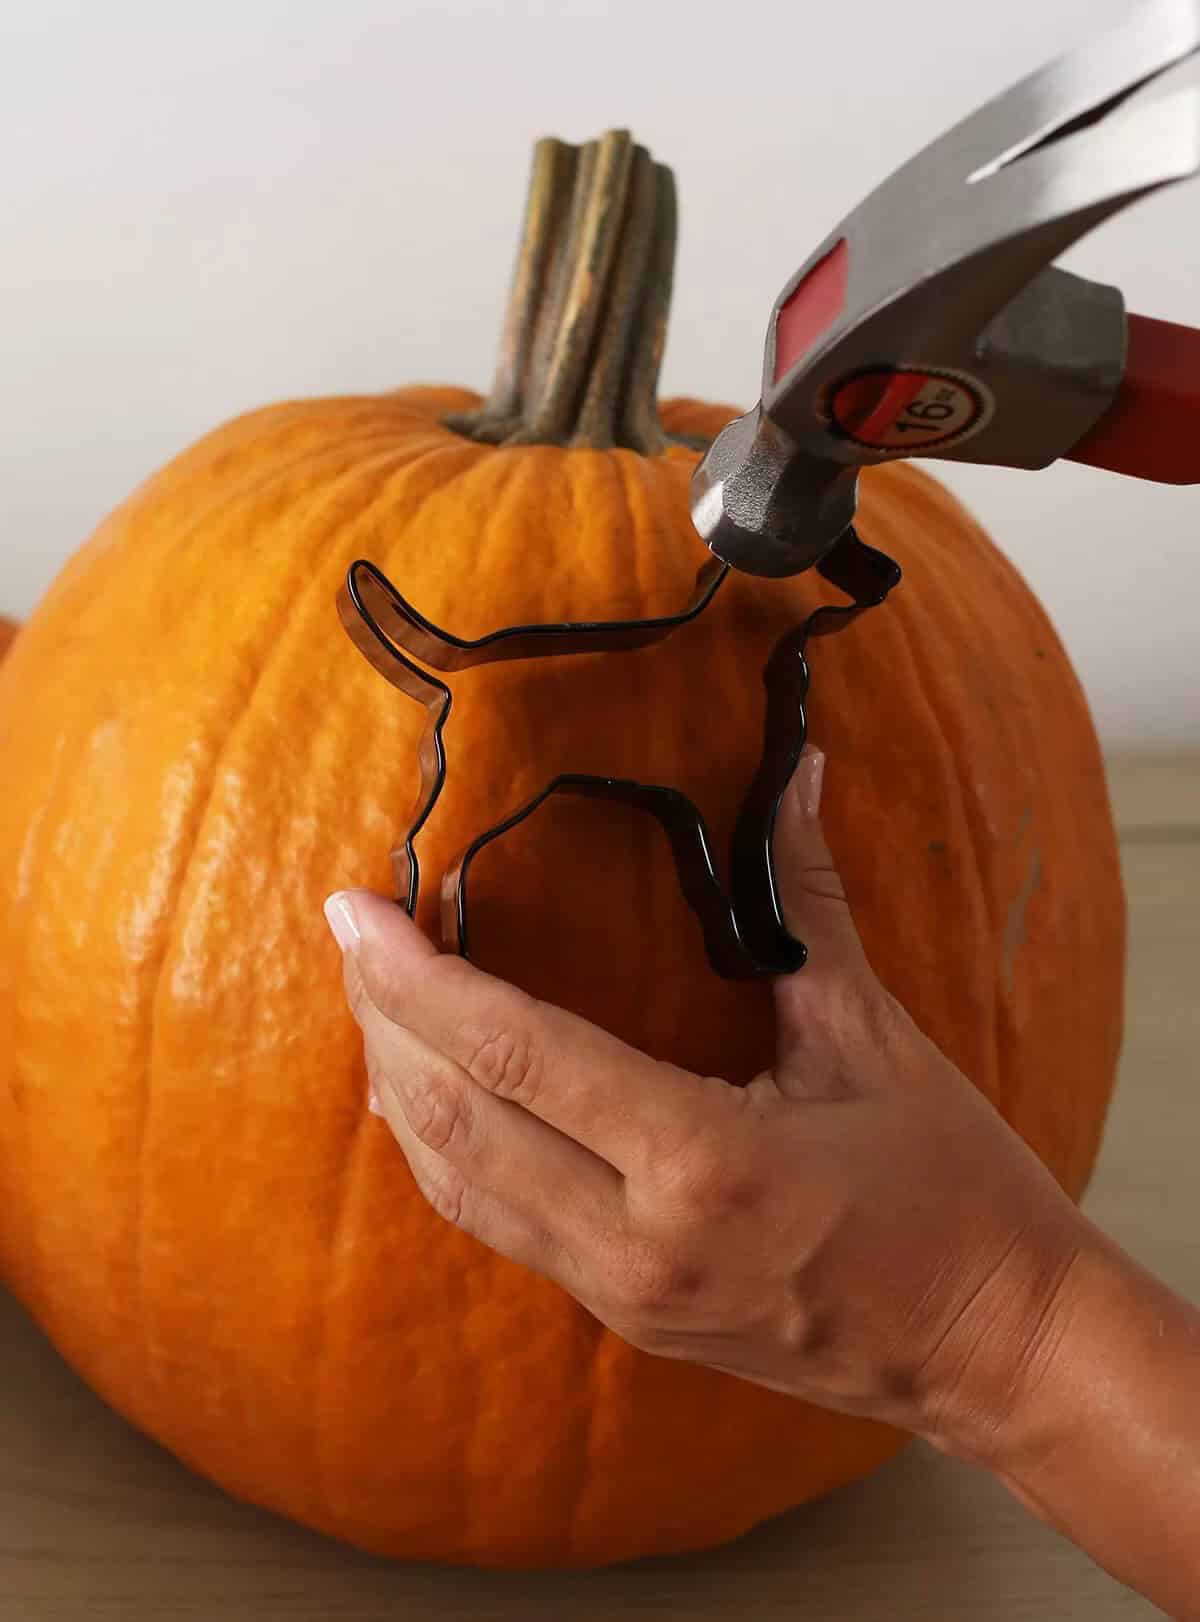
Transforming your pumpkin into a spooky masterpiece has never been easier. With just two simple tools – a cookie cutter and a mallet – you can create intricate designs without any carving expertise. The process is straightforward: place the cookie cutter where you want it on the pumpkin, then use the mallet to gently hammer it in. You can choose to hammer all the way through for a more dramatic effect or opt for a lighter touch to create an indent and carve from there.
This trick opens up endless possibilities for Halloween decorations, with numerous cookie cutters available to help you bring your creative vision to life.
Night Sky
For beginners, this design is an excellent starting point for mastering the art of pumpkin carving. By using stencils featuring celestial bodies like stars and the moon, or even leveraging the cookie-cutter technique, you can create a simple yet striking design. As you gain confidence in your carving skills, you have the option to carve all the way through the pumpkin and add a tea light for that warm, glowing ambiance characteristic of classic Jack-O-Lanterns.
Alternatively, you can opt for a more subtle look by only carving through the top layer of skin, adding a touch of whimsy to your design.
Witchy Woman
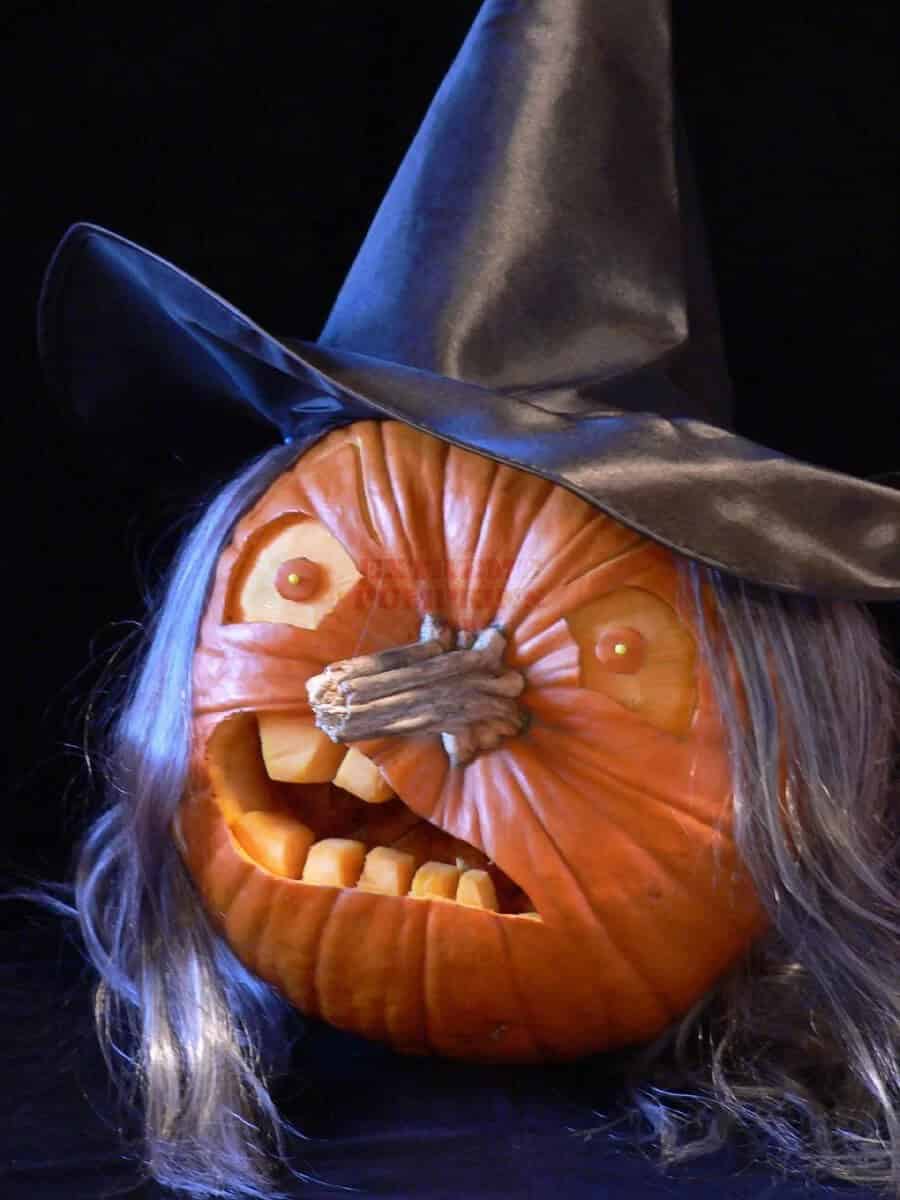
Imagine transforming an ordinary pumpkin into a bewitching masterpiece this Halloween. One of the most captivating and unconventional ideas on our list involves using the top of the pumpkin as the face, where the stem serves as a long, pointed nose reminiscent of a witch’s. Feel free to get creative with the nose and eyes, but for a truly spooky effect, focus on crafting a design that embodies the essence of Halloween.
To take it to the next level, add a flowing wig and a classic black witch’s hat to complete the eerie ensemble.
Sugar Skull
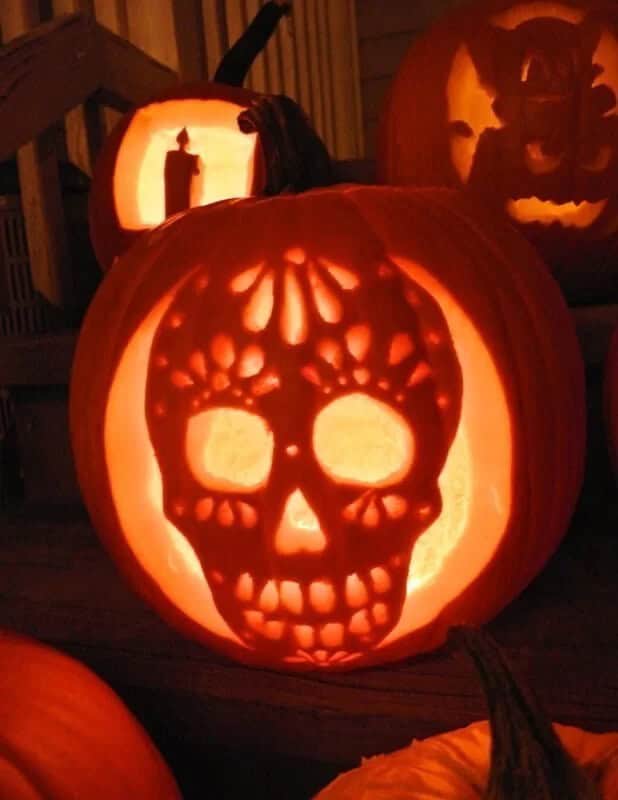
For a classic Halloween vibe, this pumpkin design is a great choice. With various templates available, you can easily create a look that fits your spooky celebrations. Alternatively, unleash your inner artist and carve out a unique skull design. While it may require some creative effort, the process won’t be as daunting as you might think. Simply find a template or draw inspiration from your own imagination to bring this seasonal symbol to life.
Candy Corn Craze
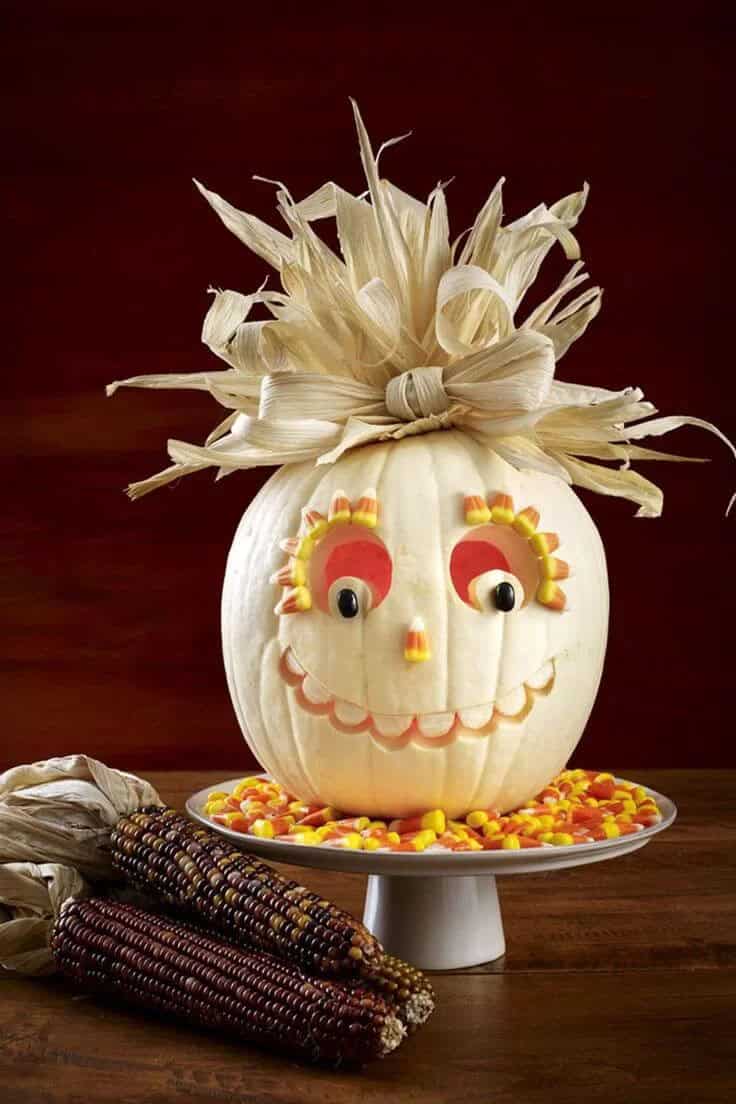
For those who love or loathe candy corn, this creative concept offers a fun and versatile way to decorate a pumpkin. To achieve this unique look, start by carving a simple face onto the pumpkin, then paint it white for a clean canvas. Add some playful flair with ribbon ‘hair’ and top off the design with candy corn ‘eyelashes’ securely glued in place. But the possibilities don’t stop there – feel free to experiment with different uses of candy corn on your pumpkin if another idea strikes!
Zombie
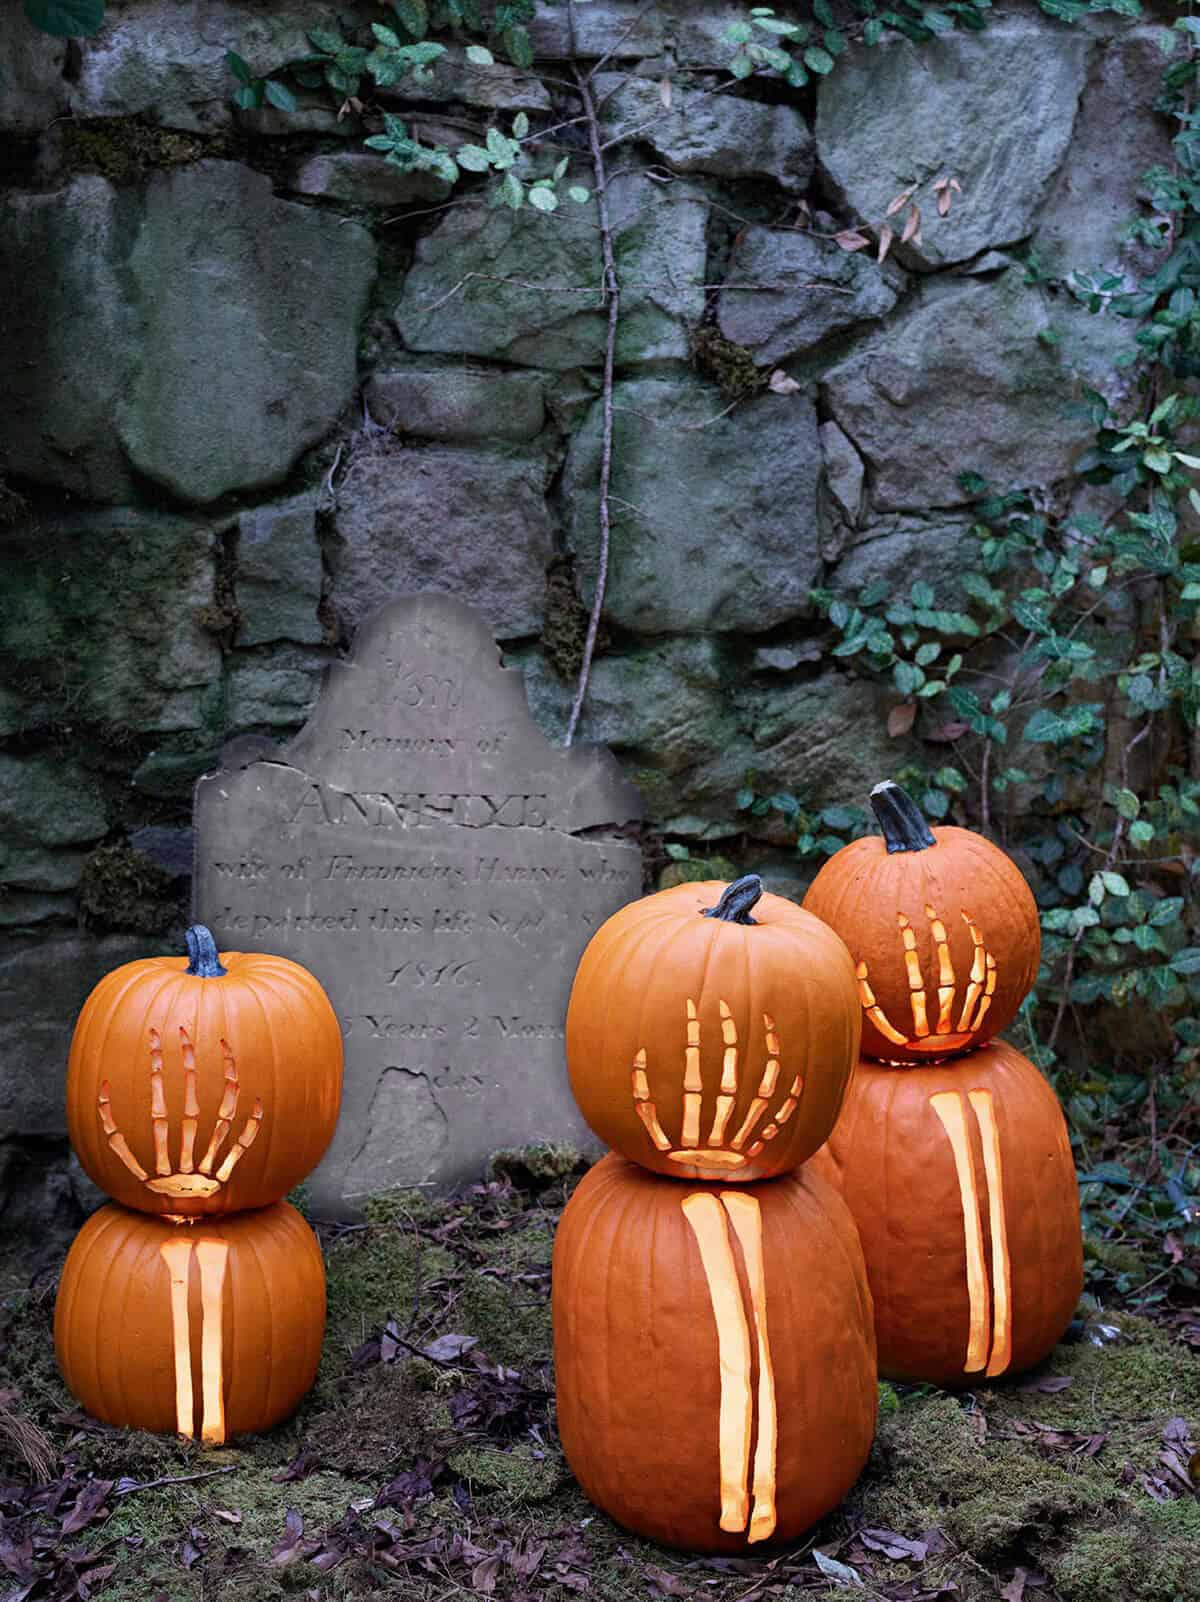
For those seeking to create a spooky atmosphere on their lawn, pumpkins carved with intricate designs can be an excellent option. One unique and impressive idea is to create double-decker pumpkins that resemble a graveyard scene. To achieve this look, you’ll need two pumpkins of varying sizes, with the larger one serving as the base for the skeleton arm. This will consist of multiple vertical lines, requiring some precision and patience.
The smaller top pumpkin will feature the skeleton hand, which will be slightly more complex to carve due to its shape and size. With these double-decker pumpkins, you’ll be able to create a hauntingly beautiful display that’s sure to impress your neighbors and trick-or-treaters.
Googly-Eyed Monsters
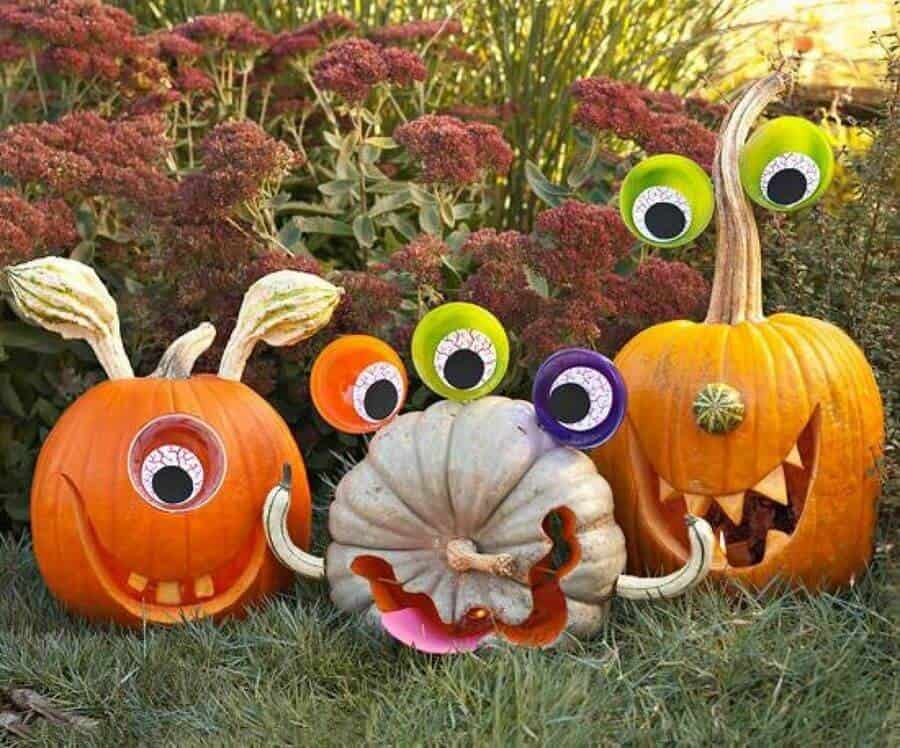
When it comes to crafting monster-inspired homemade Halloween decorations, you’re not limited to just one style – you can go for cute, scary, or even a mix of both! To get started, you may want to gather some additional materials like googly eyes, cotton balls, and paint. While these decorations are relatively straightforward to create, the key is to have fun with it. For the most part, carving the mouth is all you need to do – but feel free to get creative with that design!
Alternatively, you can carve a circle for the eyes or add them directly on top of your creation. The possibilities really are endless!
Ding! Dong! The Witch is Dead
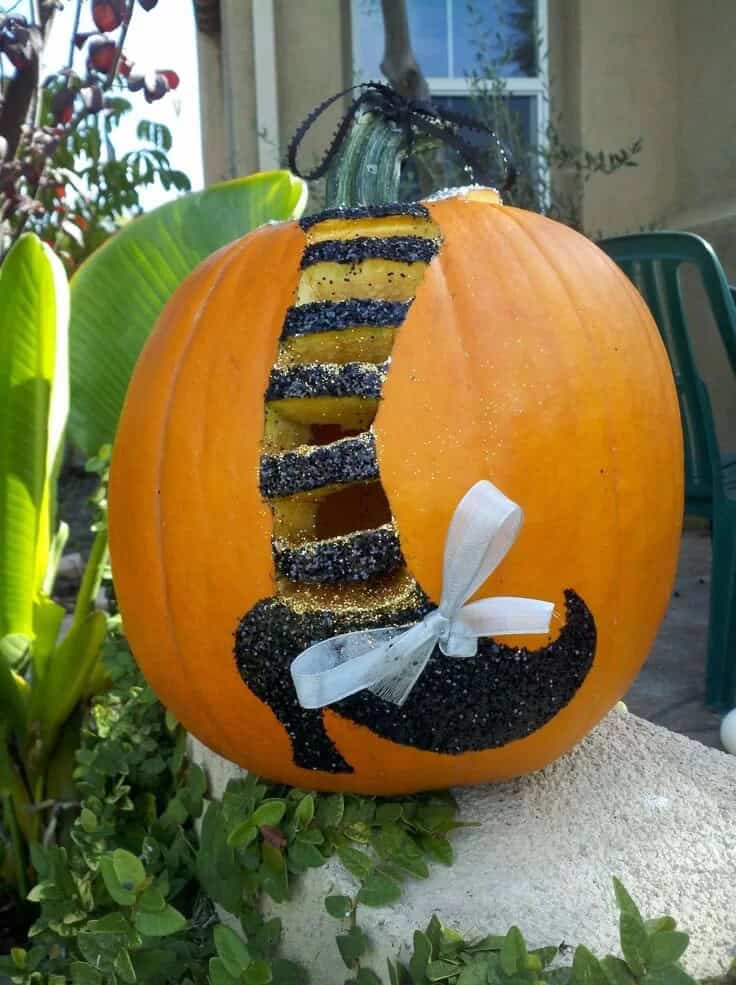
One of the most delightful and effortless Halloween decoration ideas is to transform old stockings into charming jack-o’-lanterns. The beauty of this project lies in its simplicity – you can alternate between carving and painting, or opt for two distinct paint colors to save time. By adding a pop of color with paint on an old black shoe and finishing it off with a dashing ribbon, you’ll create a unique and adorable decoration that’s sure to delight.
Hoo Wants Another Owl Pattern
While owl templates might be most commonly associated with elaborate designs, they can also be incredibly versatile when it comes to carving pumpkins of various sizes. A smaller pumpkin, for instance, can be simplified to just carve the face, resulting in a delightfully cute and whimsical design that doesn’t require the same level of detail as a larger pumpkin.
And if you’re set on incorporating the feathers and wings, there are numerous creative approaches you can take, offering endless possibilities for self-expression.
Spiral Top

The simplicity of this design is striking from a bird’s-eye view. One of its best features is that it allows you to leave the pumpkin’s original front intact if desired. Alternatively, you can add geometric patterns to the front for an extra touch of flair. In this case, you won’t need to carve off the entire top; instead, you’ll create a spiral design by carving into the surface.
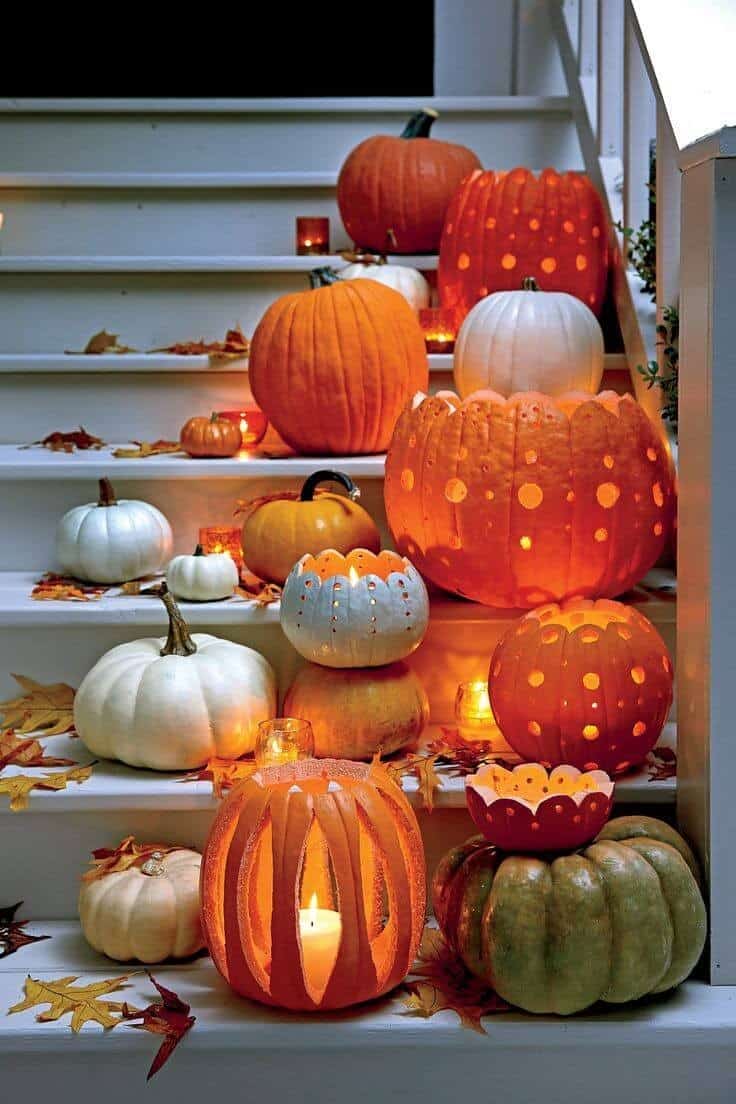
Small Porch Style
Transforming a small outdoor space into a charming oasis may seem like a daunting task, but incorporating pumpkins in a unique and playful way can make all the difference. To create a visually appealing display, gather a variety of pumpkins in various shapes and sizes to add depth and visual interest. Feel free to get creative by adding faces or patterns to give your porch a one-of-a-kind personality.
This is an excellent opportunity to showcase your personal style and revamp the overall ambiance of your outdoor space.
Plant It On Me
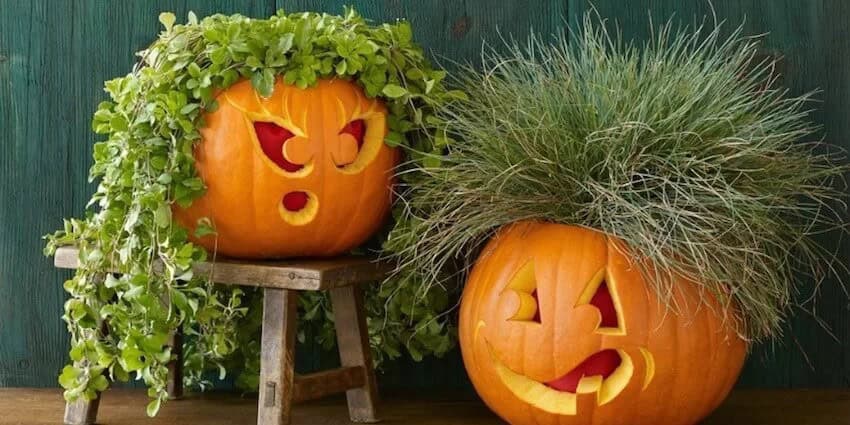
Double up on the functionality of your pumpkins this season by using them as planters! Carve out the insides and add some potted fall plants, which will not only provide a unique display on your front porch, but also serve as a creative addition to your Jack-O-Lanterns. To complete the look, carve a face into the pumpkin’s front, allowing you to get playful with silly or scary designs.
More Drilling Ideas
Take a break from carving and try some creative pumpkin drilling ideas instead. Drilled pumpkins can be used as unique DIY Halloween decorations. To ensure your design turns out as planned, consider pre-marking your pumpkin beforehand. Just remember that this process can get messy, so it might be best to do it outside to contain the mess.
Haunted House
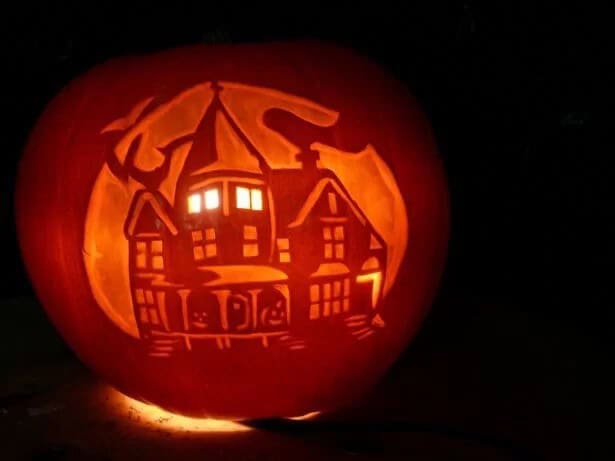
If you’re looking for a show-stopping fall decoration that will leave your neighbors in awe, consider crafting an intricate design on your front porch using pumpkins. The key to achieving this spooky yet elegant look is to carefully balance the level of carving required to create a glowing window effect. To achieve this, carve most of the pumpkin’s surface, but intentionally stop short of cutting all the way through when creating the windows you want to illuminate.
This will allow the candlelight to shine brighter and create an otherworldly ambiance.
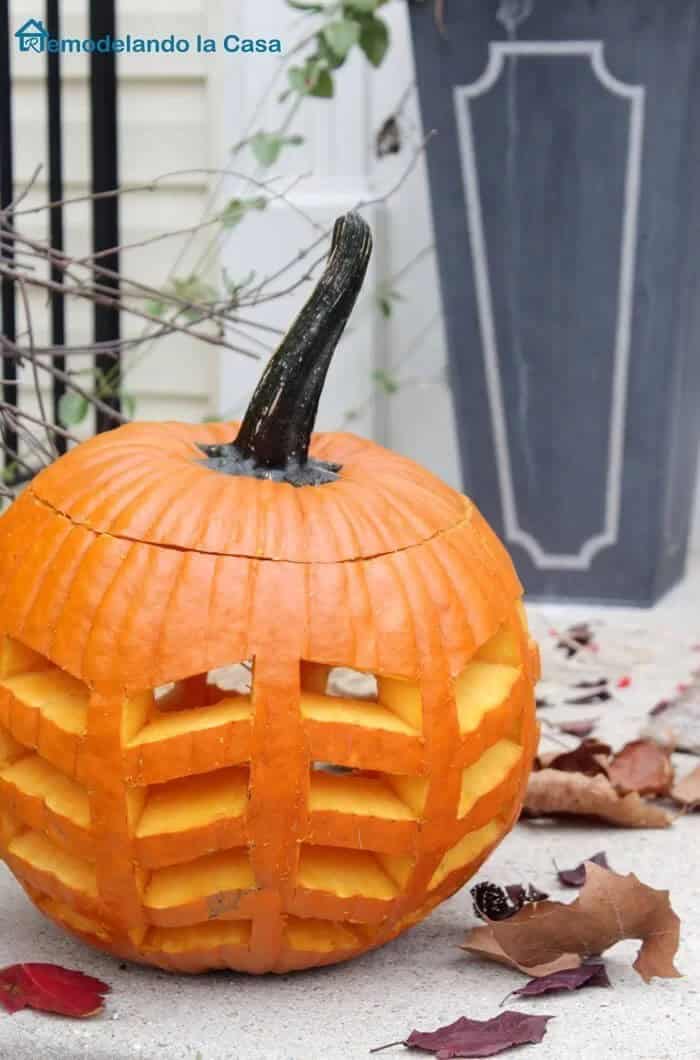
Lace Patterned Pumpkins
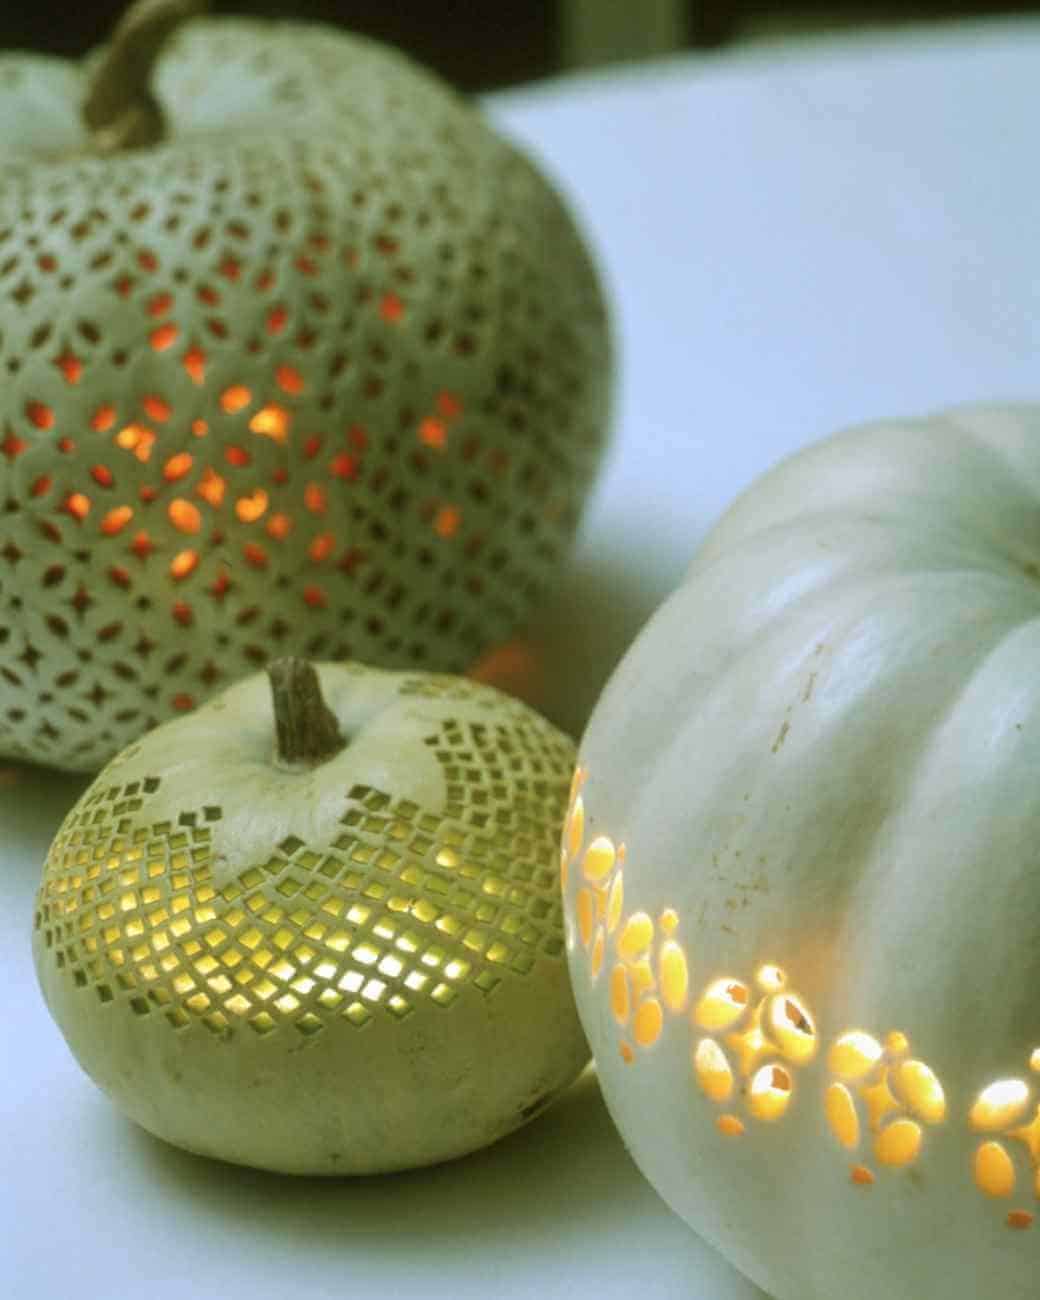
Looking to shake things up this Halloween season or simply don’t have an affinity for orange? Look no further than these stunning lace-patterned pumpkins. And if you’re not feeling the traditional gourd, why not try using a squash instead? The result is a unique and captivating decoration that’s sure to be the talk of the trick-or-treater’s town. To achieve this look, simply use masking tape as a guide and carve a repeating pattern around the pumpkin above the tape.
With this clever hack, you can create a show-stopping centerpiece for your Halloween party or a one-of-a-kind addition to your autumnal decor.
Stargazing
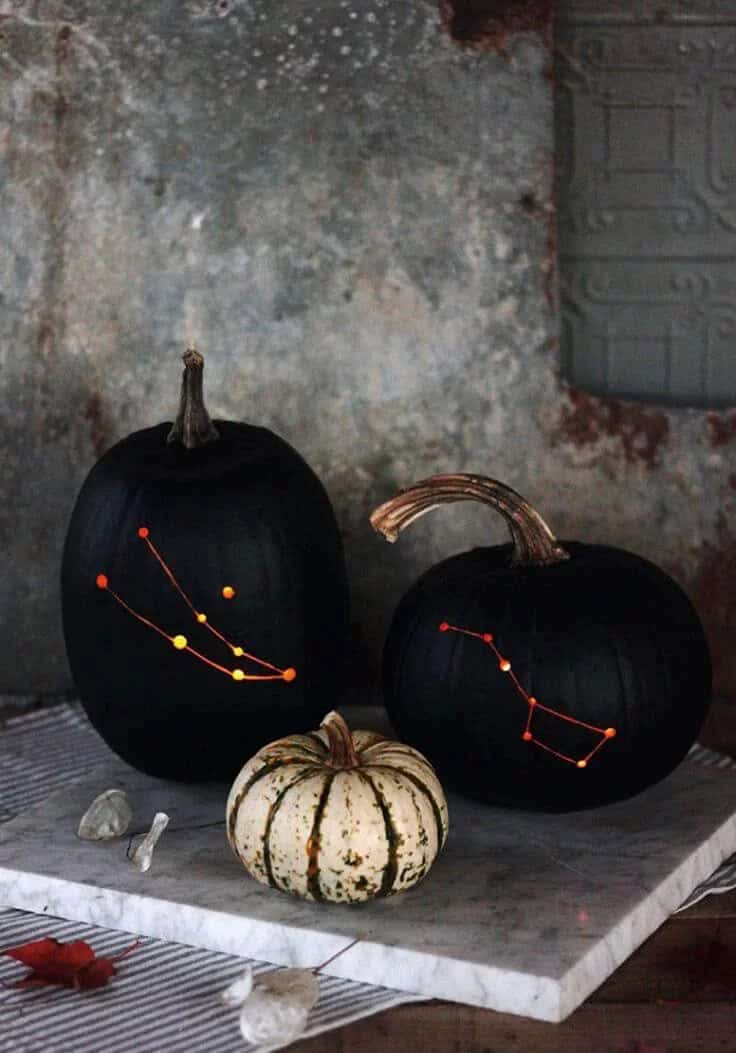
To elevate your fall decor, try creating these stunning constellation pumpkins that will transport you under a starry night sky. Start by choosing your favorite constellations and giving them a bold statement with black spray paint on the pumpkin – or opt for a celestial blue or navy hue to evoke the brightness of the stars. To create the intricate designs, use a drill to carve out the shapes and then connect the dots using a v-chisel.
With these celestial pumpkins, you’ll be shining bright this autumn season.
Engraved Pumpkin
To add some extra flair to your Halloween decorations, try this one-of-a-kind DIY project that requires a few specialized tools. You’ll need an engraving attachment and a grinding stone, which can be found alongside other handy accessories. To give your pumpkin some sparkle, you’ll also require a generous amount of glitter. Start by painting the pumpkin with your chosen color – a crisp white provides a nice contrast to the rest of the decorations.
Once the paint is dry, use the engraving attachment to carve out a decorative border around the pumpkin. Next, use the grinding stone to add some intricate details, such as your initials or a spooky design. Finally, sprinkle the glitter within the border to give your pumpkin a truly unique and eye-catching look.
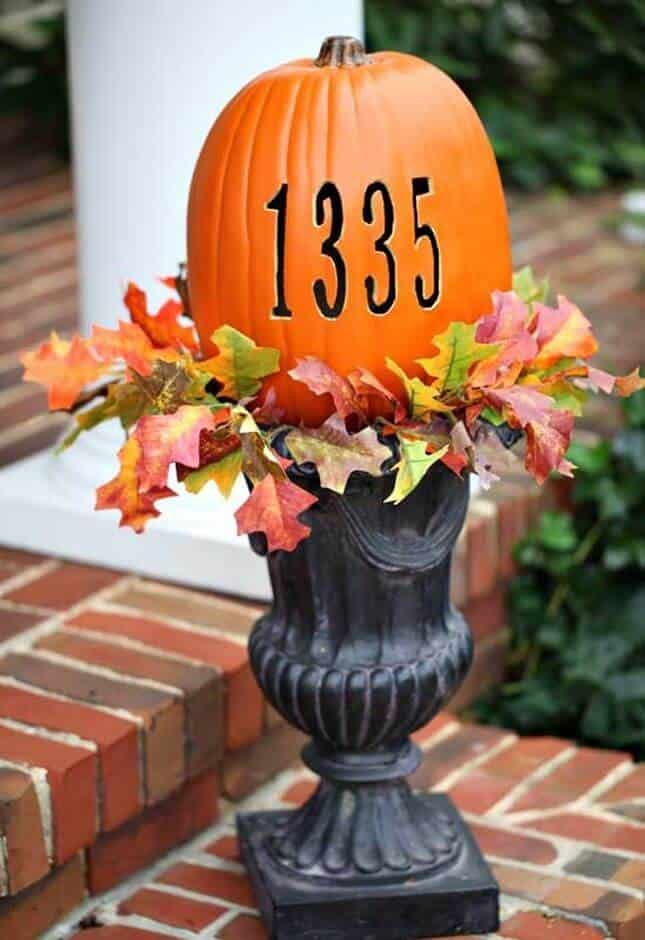
Writing On The Pumpkin
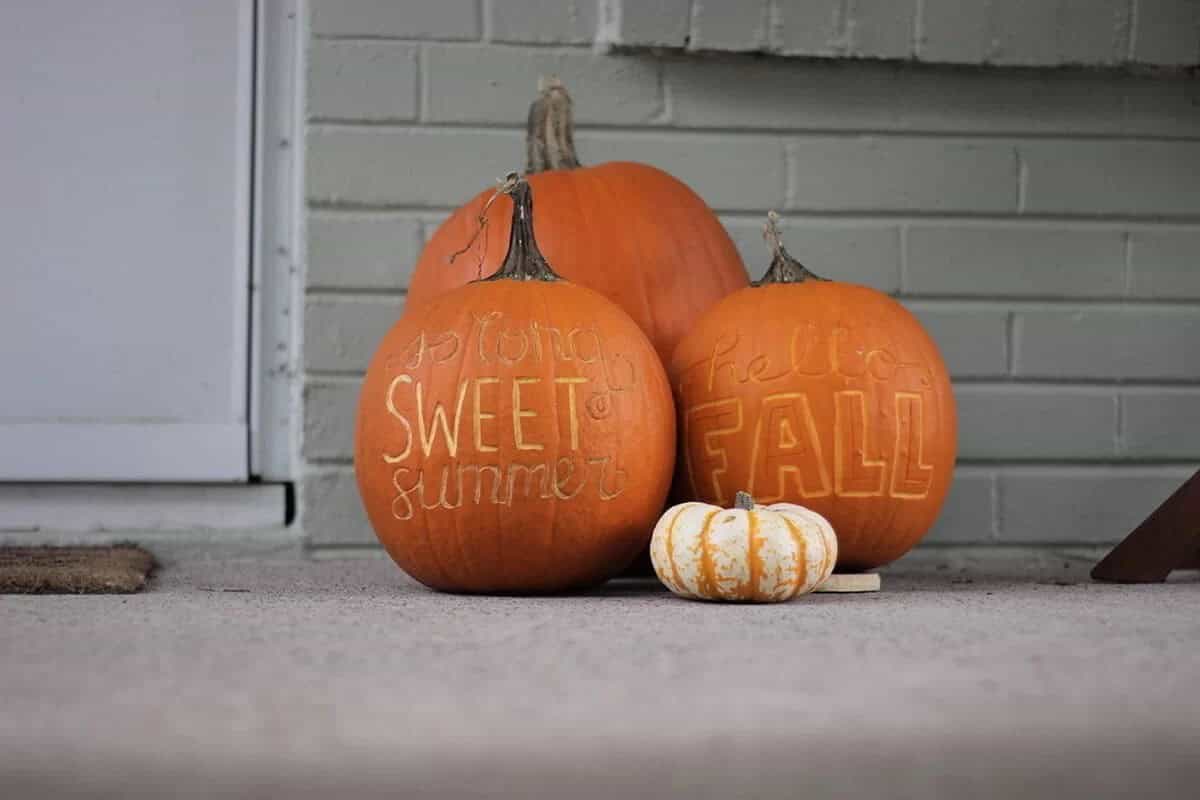
One of the simplest yet most effective ways to create a beautiful pumpkin design is by carving a fun Fall phrase. This technique requires minimal effort and can be achieved with or without the aid of stencils. Simply write your chosen phrase onto the pumpkin’s surface, either freehand or using a stencil as a guide. What’s more, you don’t need to carve all the way through the pumpkin to achieve a stunning effect.
Instead, opt for a lighter carving approach that creates a delightful contrast between the carved and uncarved areas.
Rose Petals
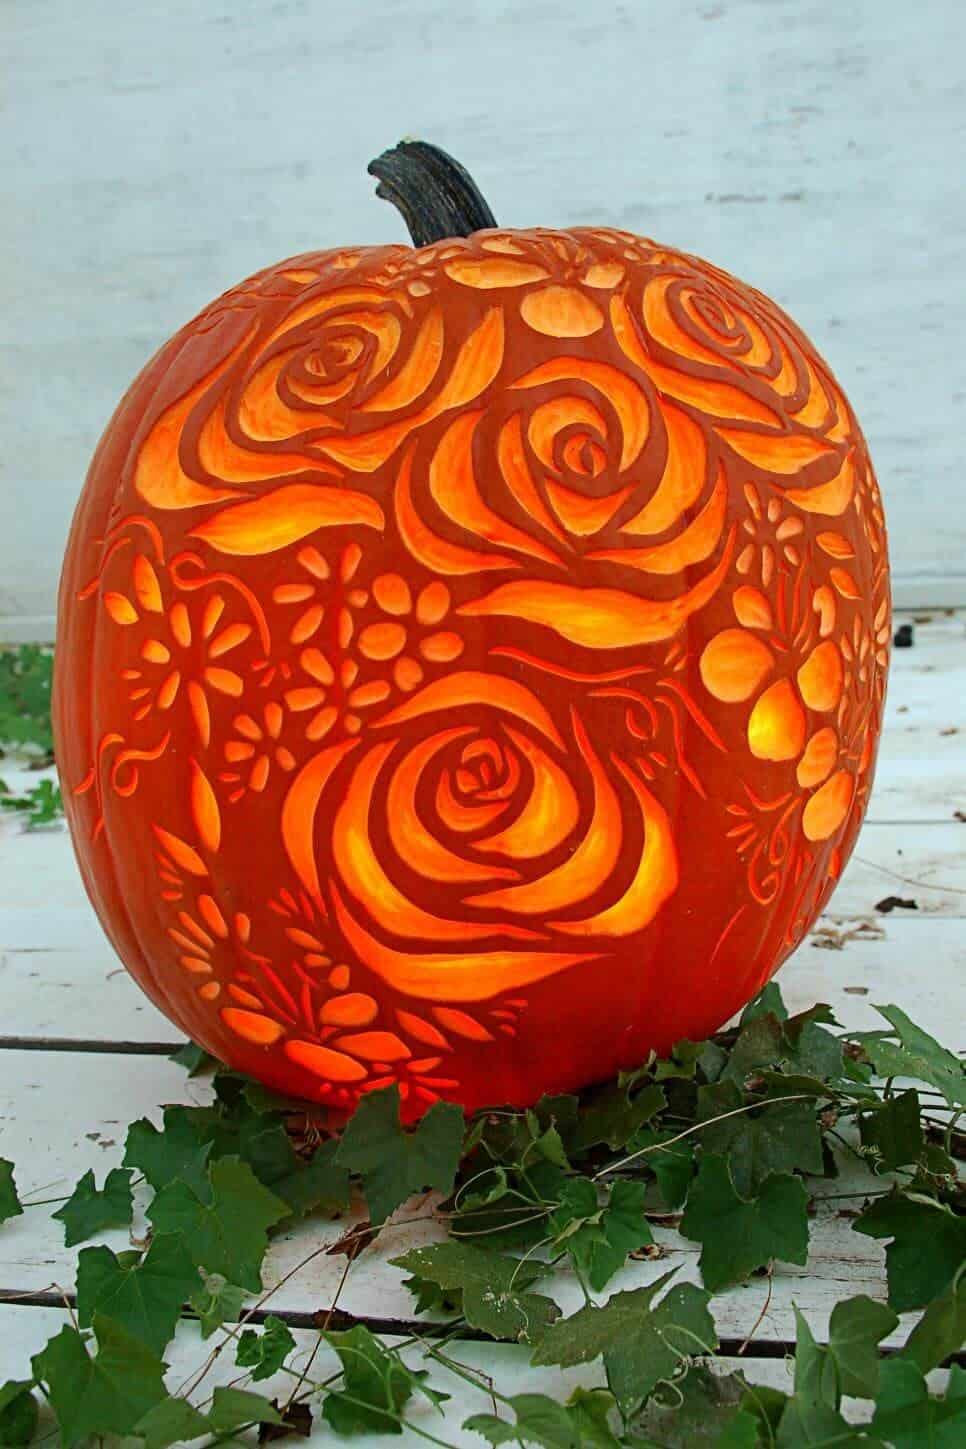
When it comes to creating intricate designs on pumpkins, one technique that stands out is the use of varying depths to achieve a textured look. This particular pattern boasts a beautiful, dimensional quality due to the deliberate carving of deeper grooves in certain areas of the petals. In contrast, the vines and outer flowers require more shallow cuts. The key is to create depth by carving through some sections of the pumpkin, allowing the candle flame to shine through with greater intensity.
As for the design itself, feel free to let your creativity run wild – the layout and exact pattern are entirely up to personal preference.
Hot Knife Carving
Transform your Halloween decor with a unique twist! Instead of carving a traditional Jack-o-Lantern, try using a foam pumpkin and a hot knife to create one-of-a-kind designs. While you won’t be able to place a candle inside the foam pumpkin, battery-powered lights offer a safe and spooky alternative. To get started, stencil your desired design onto the pumpkin – whether it’s numbers, letters, or intricate patterns.
Then, use the hot knife to carefully carve out your design, creating striking black outlines against the orange foam. The result is a truly unique and eye-catching Halloween decoration that’s sure to impress.
Classic Jack-O-Lantern
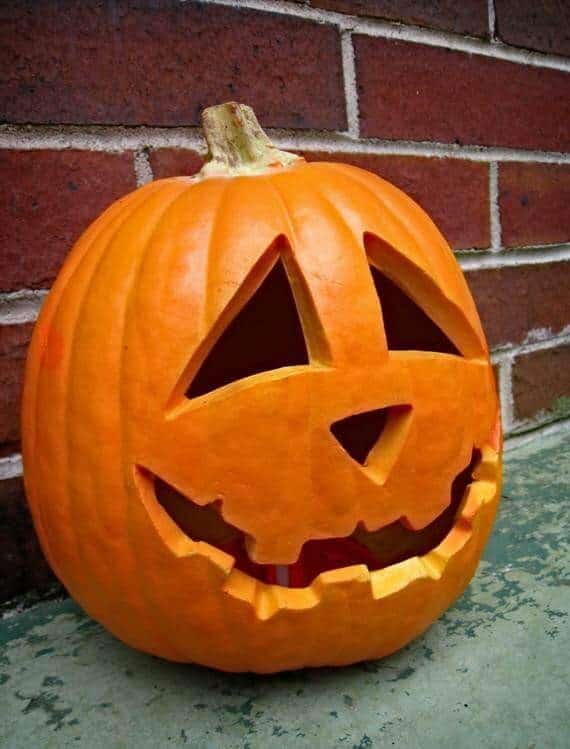
When it comes to carving pumpkin faces, few designs are as iconic or accessible as the classic Jack-O-Lantern. A simple search online will yield a plethora of stencils featuring this timeless face. To bring it to life, start by carving out two triangular eyes and a central nose. While the mouth can be customized with some creative flair, a wide smile with visible teeth remains a popular choice. Once complete, simply place your candle inside and let the spooky ambiance shine through.
Feather Carved Pumpkin
Imagine transforming your home’s interior design into a stunning work of art. To create this mesmerizing pattern, start by drawing the design on the wood before carving it in. You can download a template or take inspiration from geometric shapes like rhombuses to create your unique pattern. Once you’ve got your design down, use an electric carving tool to make the process smoother and more efficient. Alternatively, channel your inner craftsman and carve it manually with patience and dedication.
As you work on bringing your design to life, watch as the flames of candles or a fireplace dance through the intricate carvings, casting a warm glow throughout the space.
Fall Floral Prints
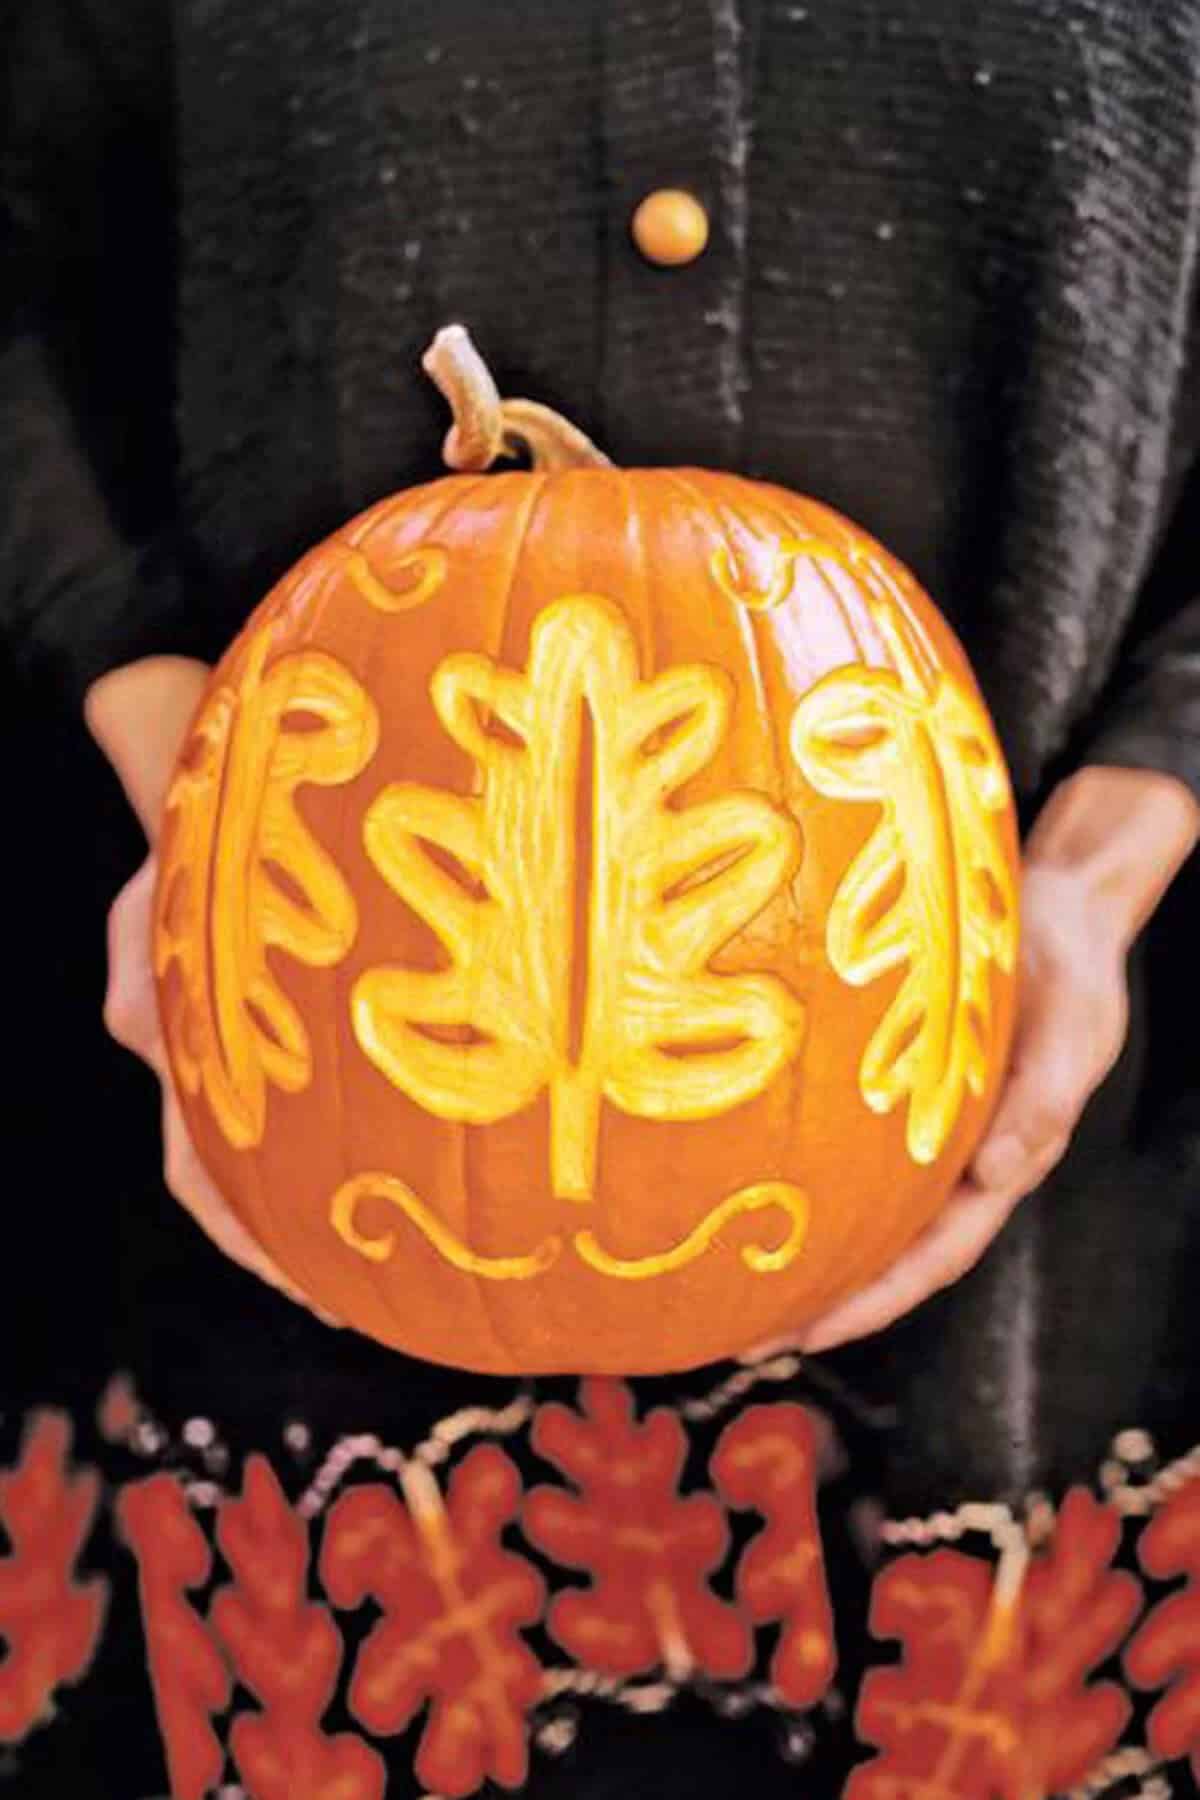
Fall season’s warmth and coziness are perfectly encapsulated in a simple yet striking pumpkin carving pattern that celebrates the beauty of autumn leaves. The alternating leaf design allows for versatility, as you can easily incorporate different types of leaves or even face them in opposite directions to add visual interest. A tasteful border around the leaves adds a thoughtful touch, elevating this design from simple to stunning.
Get Your Drill On
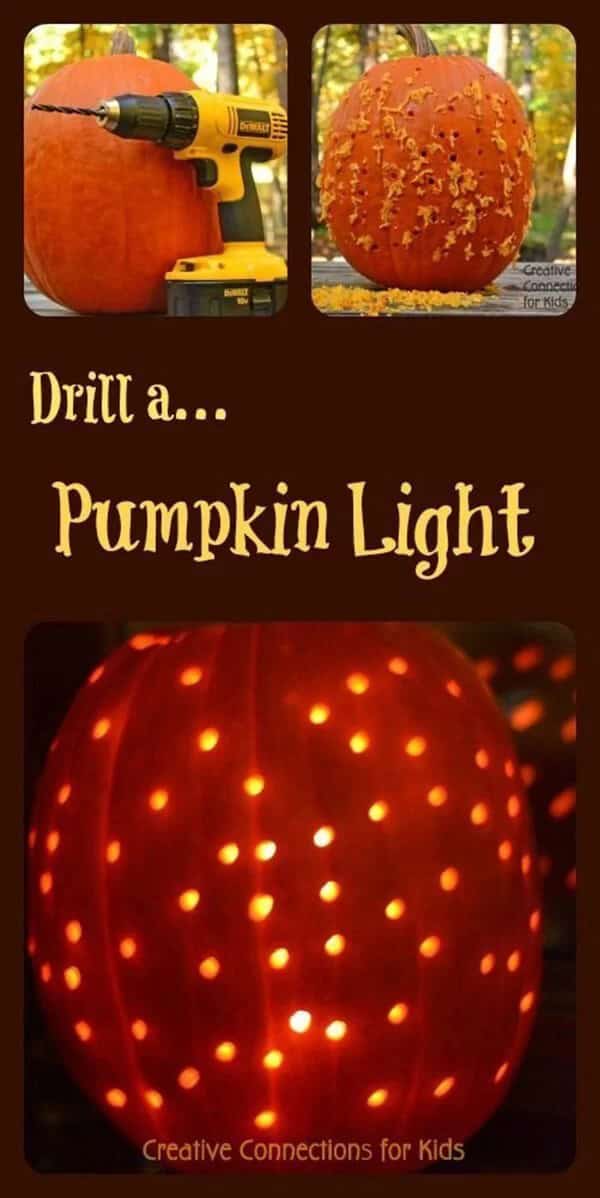
Drilling pumpkins has become a beloved fall activity for many of us at creativeconnectionsforkids. com. And it’s easy to see why – with just a few simple drills, you can transform your pumpkin into a dazzling masterpiece that shines like a disco ball. The best part? You get to be the artist, deciding exactly where those holes go. Do you opt for a precise pattern or go wild and scatter them randomly across the surface? The choice is yours!
And when you add a candle inside, the warm glow of the flame will illuminate the night, making your pumpkin a beacon of fun.
Kitty Cat
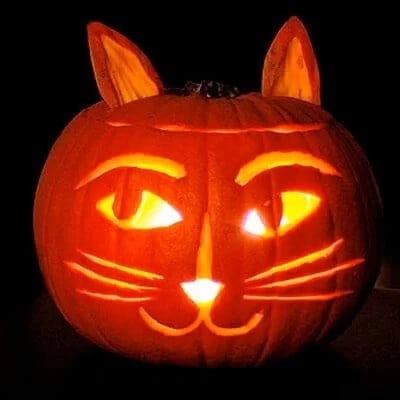
At woodlandspark. com, we’re thrilled to showcase another adorable animal pumpkin carving design – this time, a charming feline face that’s sure to delight your porch visitors. With some practice, you’ll easily master the carving process and add the finishing touch with whiskers. The ears might require a bit more finesse, but don’t worry, there are creative ways to achieve the desired effect. One approach is to carve separate ear pieces from another pumpkin and secure them using toothpicks.
Alternatively, if you opt for a smaller cat face design, you can carve the ears directly into the pumpkin, creating a seamless and polished look.
Starry Night
When engaging your kids in pumpkin carving, simplicity and cuteness are key. A good starting point is to use star-shaped templates that offer an easy-to-follow design. This allows for creative freedom, enabling you to craft a single large star or create a repetitive pattern with stars of varying sizes. What’s more, this template works beautifully on pumpkins of all shapes and sizes, making it an ideal choice for families with smaller gourds or a variety of pumpkin sizes.
Spooky Spiders
For a spooky yet easy pumpkin carving idea, why not try creating a spider carving? To make this design come to life, start by selecting a large pumpkin that will accommodate the entire spider. Next, use your serrated knife to carefully cut off the top of the pumpkin, leaving enough room for carving. You won’t need to carve too deeply, making it accessible even for those new to pumpkin carving. A basic carving tool set should suffice for this design.
Monster Mash
As the Halloween season approaches, why not start by unleashing your creativity with a terrifying pumpkin carving design? This monstrous face requires some skill and patience, but the end result is well worth the effort. Begin by carving out the basic shape of the eyes and mouth, then take it to the next level by crafting the pupils and iris into the eye area. For added depth and an eerie effect, carve subtle wrinkles under each eye, giving your pumpkin a truly malevolent gaze.
Painted Owl
Carving a cute pumpkin is a straightforward process. Begin by creating two large ovals for the eyes, being mindful not to carve all the way through the pumpkin except for two small circles in the middle that will serve as the pupils. Next, carve a small inverted triangle beneath the eyes to form the beak. To add some visual interest, paint a floral pattern around the eyes in a design that resonates with you. Finally, complete your masterpiece by inserting flowers into the top of the pumpkin.
Cute And Cuddly Faces
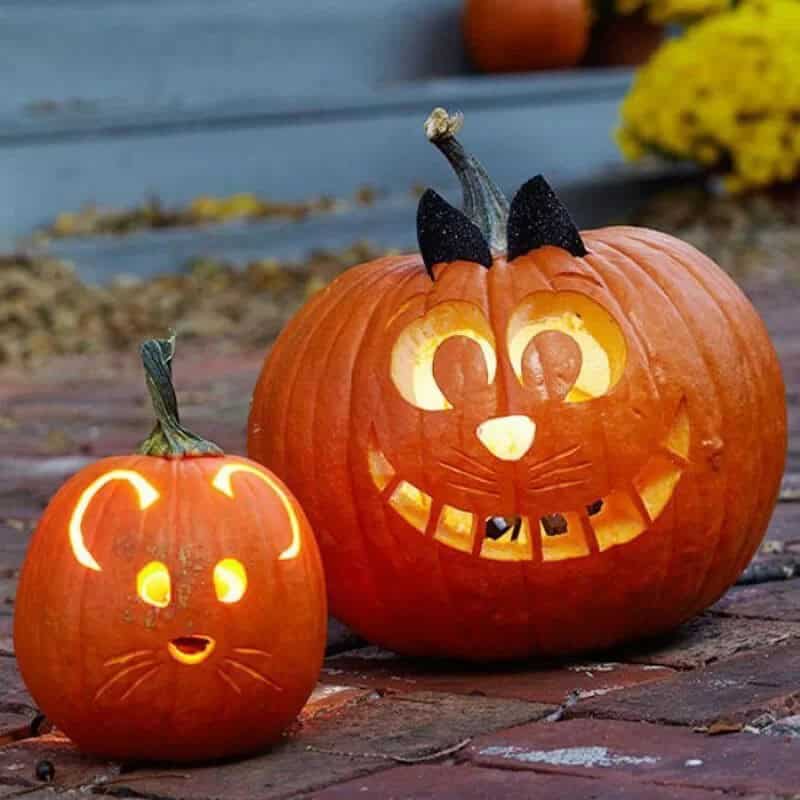
If Halloween-themed designs aren’t your thing, there are plenty of other ways to carve a pumpkin that can be just as enjoyable and even kid-friendly. Simple cartoon or animal faces are a great option for those who want to avoid the spooky vibe altogether. For instance, a mouse design is quick and easy to create, requiring no template at all – just don’t forget to add the whiskers!
Alternatively, you could opt for a cartoon character carving, such as a Cheshire cat-inspired design, which can be a fun and creative way to showcase your pumpkin-carving skills.
Skyline
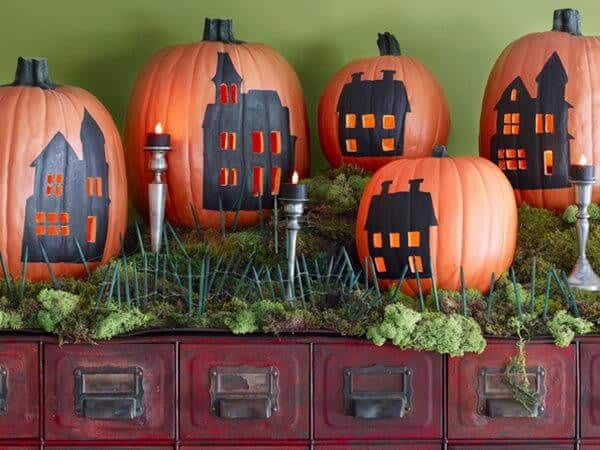
Transform your porch into a whimsical wonderland by arranging pumpkins of varying sizes to create a skyline, neighborhood of haunted houses, or even a landscape. For an added touch of eeriness, only carve out windows on your structures and place a candle inside. As the flame flickers, the illuminated windows will cast an enchanting glow against the dark pumpkin skin, creating an unforgettable visual display.
Emojis
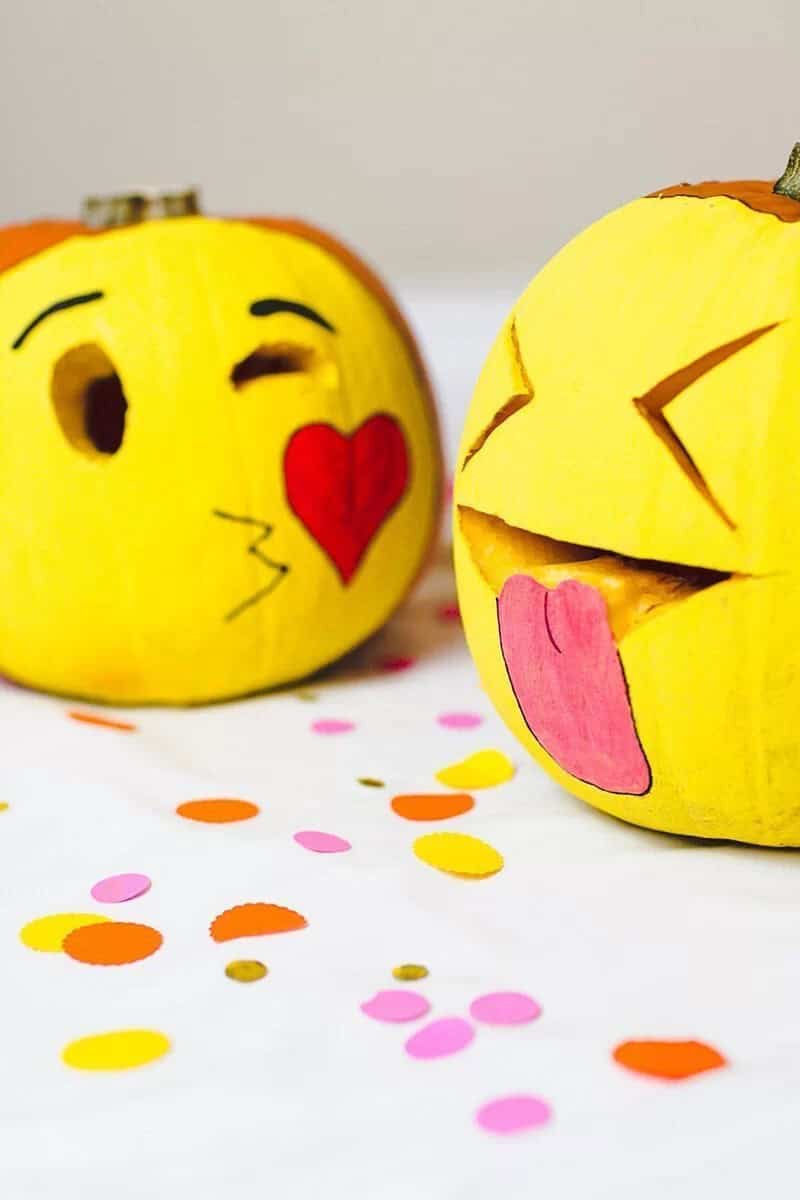
Transforming your pumpkin-carving experience with a twist! The concept of creating emoji pumpkins is surprisingly simple and versatile. Begin by giving your pumpkin a vibrant yellow base coat, then move on to carving out the eyes. Finally, add some creative flair by drawing on the mouth and any other distinctive features that make your favorite emoji come alive.
Vine Branch
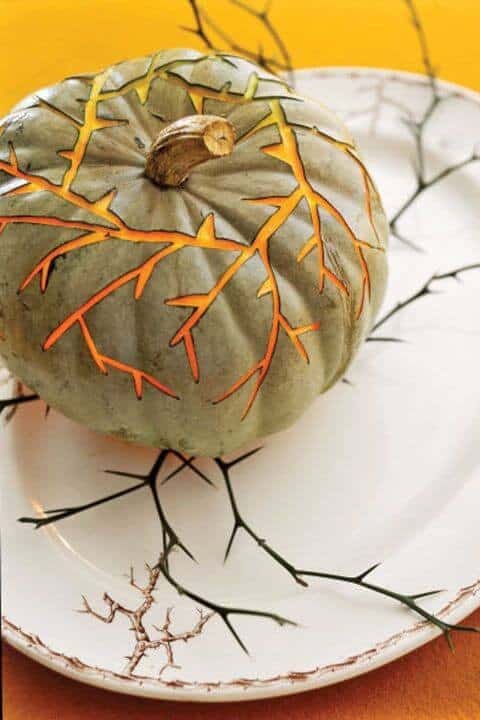
For a Halloween-themed decoration that transcends October 31st, consider this sophisticated design. Begin by applying a neutral, autumnal hue to your pumpkin. You can keep the top intact if you prefer, as the carved ring around the stem and thorny vines will be enough to create a striking effect. To take it to the next level, surround the pumpkin with real or artificial vines that appear to burst forth from its surface, adding an organic touch to the overall arrangement.
Ghosts And Ghouls
Create a hauntingly beautiful pumpkin display with a Casper-inspired design that shines from within. To achieve this spooky-chic look, carve around the ghost shape to allow light from a candle inside the pumpkin to illuminate it. You can either use a stencil to draw and paint the ghost’s outline or take on the challenge of freehand painting. For added details, carefully carve tiny circles for the eyes and mouth.
This design works with pumpkins of any size, making it a versatile and easy-to-execute idea.
Bouquet Brain
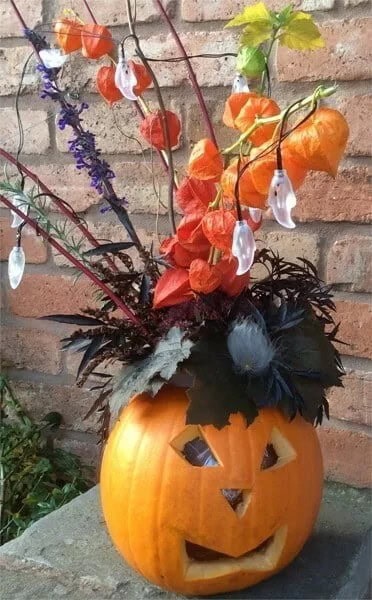
Elevate your floral arrangements by turning them into a one-of-a-kind centerpiece – literally! Carve a unique design or face onto a pumpkin, then use it as a vase throughout the Fall season. To prolong the life of your gourd-based vessel, consider preserving the pumpkin itself. One innovative approach is to coat it in peppermint soap, which can slow down the decomposition process. Alternatively, soak and refrigerate the pumpkin overnight for an extended lifespan.
Happy Halloween
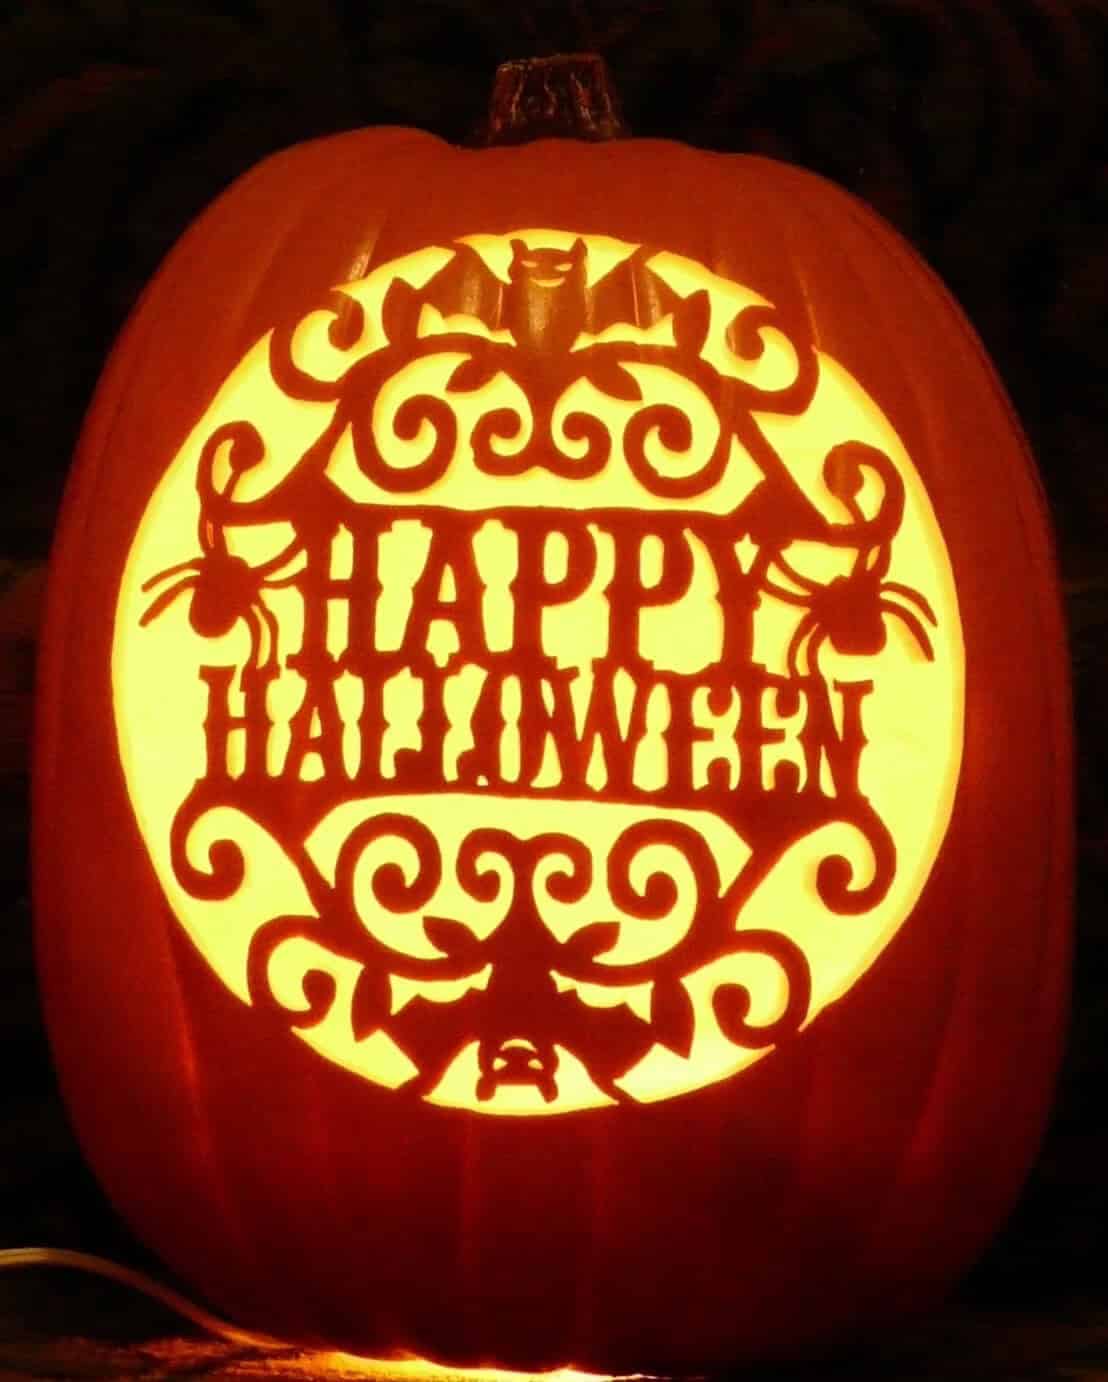
While not necessarily the simplest of DIY projects, this intricate design still offers a great deal of flexibility. The key aspect that sets it apart from some of the other Halloween decoration ideas is the ability to customize the border surrounding your Happy Halloween carving. This allows you to add a personal touch and make the finished product truly unique.
Monsters, Inc
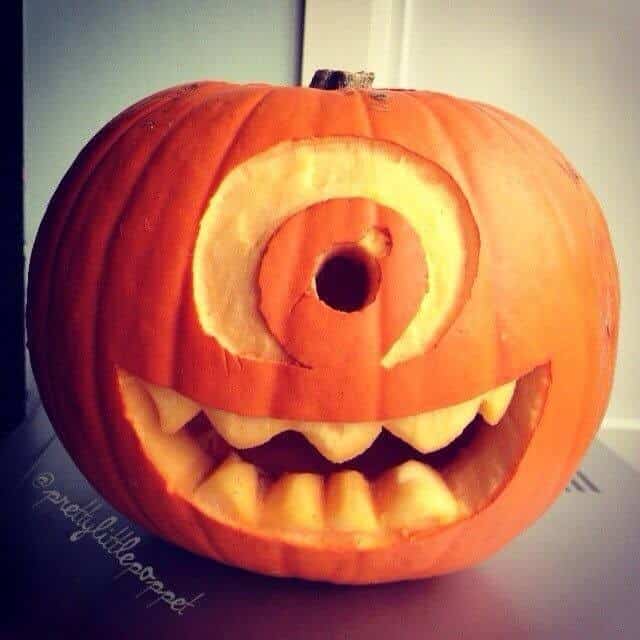
Elevate your monster carving game by creating an iconic Mike Wazowski-inspired pumpkin, straight from the world of Monsters, Inc. This DIY project is surprisingly straightforward – simply focus on crafting the signature single eye in the center and adding pointy teeth to bring the character to life. For an added touch of creativity, consider gathering multiple pumpkins to design a whole cast of beloved characters from the hit franchise.
With this simple yet effective approach, you’ll be well on your way to creating a unique and attention-grabbing Halloween display that’s sure to delight friends and family alike.
The Tree Of Life
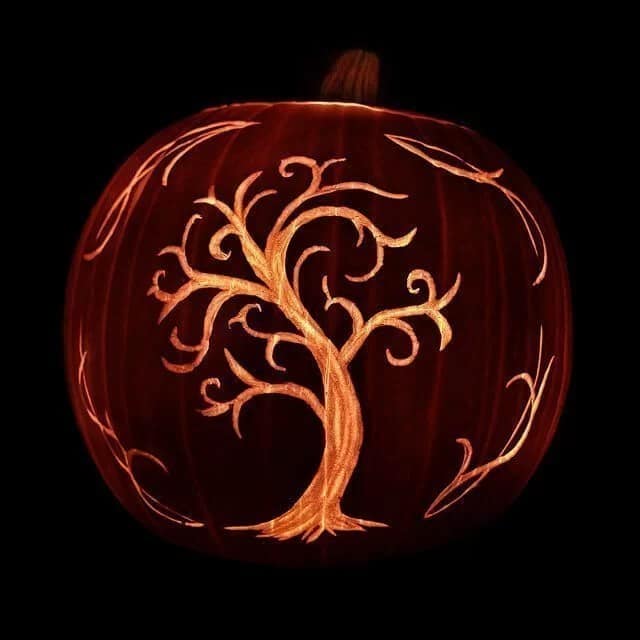
As autumn’s crisp breeze sets in, the iconic image of a tree shedding its vibrant hues resonates deeply. This design is perfect for carving onto any pumpkin, as it seamlessly captures the essence of the season. By adding a border around the tree, you can elevate the overall aesthetic and imbue the design with an extra touch of sophistication.
For A Plain Yellow Pumpkin To Become A Golden Carriage
This whimsical Cinderella-inspired pumpkin is sure to delight! Carving it out is an effortless process. Simply create a rectangular door and pair of window squares on either side, then add some diminutive wheels to transform the design into a charming carriage. The final touch? A coat of vibrant paint to bring the entire creation to life.
LED Flashlight And Spikes
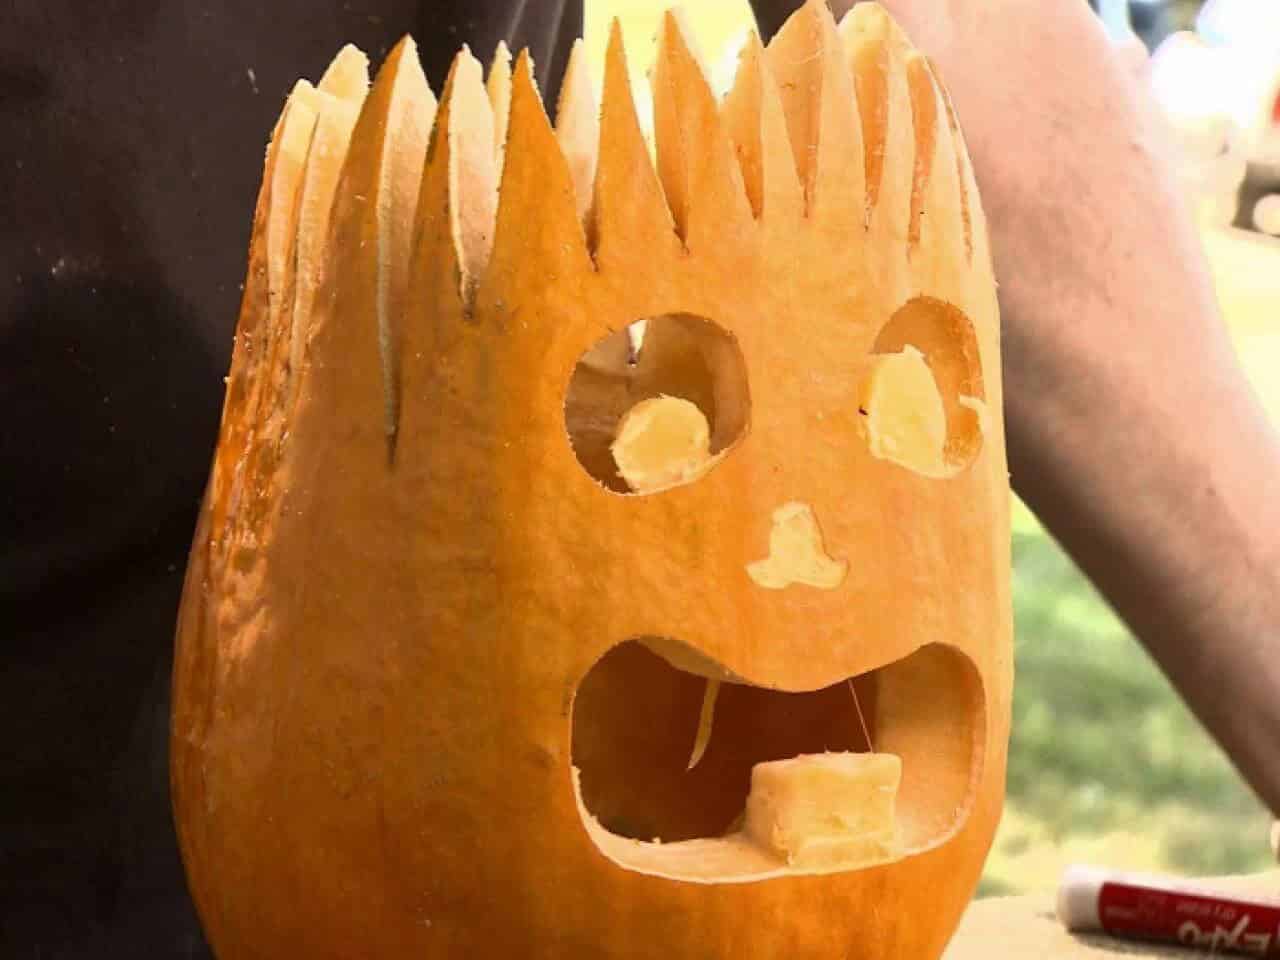
For an eerie yet impressive jack-o’-lantern, select a tall and slender pumpkin over its round, plump counterpart. Before cutting off the top with a serrated knife, sketch out the spikes and facial features onto the pumpkin’s surface. Once you’ve removed the pulp and seeds, use your carving tool to carefully craft the defined shapes. Finally, place an LED flashlight inside to illuminate the design, casting an otherworldly glow on the night.
Silly Face
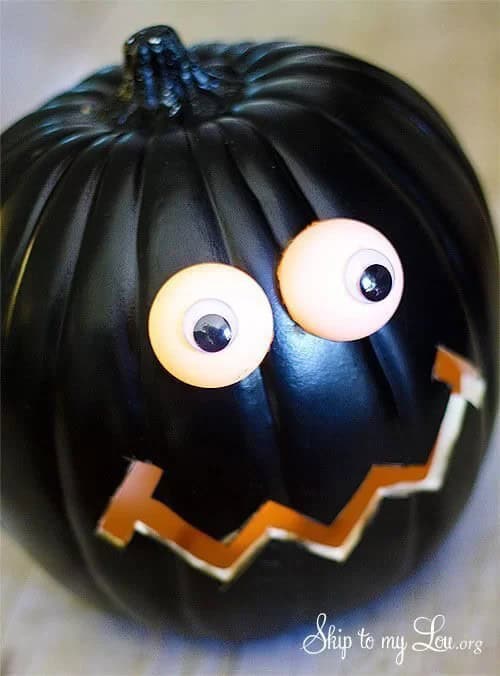
As we conclude our list, let’s add a touch of whimsy with a playful pumpkin design. You can use a foam pumpkin or select a real one of any size, then get creative with paint. While this example features a sleek black finish, feel free to opt for a vibrant hue instead! Add some googly eyes and carve out a mischievous grin, and you’ll be ready to make a splash.
It’s time to get started!
With the skills to carve a pumpkin fresh in mind, it’s time to unleash your creativity and bring some spooky charm to your home. The possibilities are endless when it comes to DIY Halloween decorations, and we’ve got an array of pumpkin carving faces to suit every taste – from adorable animal designs to eerie monsters that’ll send shivers down your spine. And if cutting isn’t your thing, fear not!
You can also transform your gourd with a drill or some paint, making it easy for everyone to get in on the Halloween fun.